Story Timelines
Work Out Dates, Ages, and "Story Math"
Keeping dates consistent in a story can get complicated. Characters need to age correctly. Travel takes time. Events can’t overlap in impossible ways. And once you start revising, small shifts can throw everything off.
Instead of recalculating dates by hand, Aeon Timeline helps take care of the timeline logic for you. You can track ages, measure time between events, and calculate durations automatically.
To help keep your timeline in order, you can also choose to have dependent events stay in sequence even when dates change, so your story remains consistent and believable.
Track Character Ages
If your story spans years or decades, you may want to check how old your characters are at different points in the timeline.
Aeon Timeline can automatically calculate a character’s age at each event, so you can make sure events line up correctly and realistically.
To track character ages:
Many starting templates already allow characters to have dates. To check if your file has this:
- Open [] Settings.
- Select the Item Types tab.
- Select the Character item type.
- Tick Allows dates.
- Under Fields, add the Dates field so it appears in the inspector when selecting a character.
- Optional: Under the Date Label options at the bottom of the panel, rename the start and end date labels to Birth and Death.
Then to set each character’s birth (and optional death) dates:
- Click the character icon in the sidebar to open the Characters panel.
- Select a character.
- In the inspector, set their Date or Birth date and, if relevant, their End or Death date.
If a character is still alive, in the inspector you can open the Date section’s More menu and select Ongoing to mark them as living. Their age will then be calculated up to the date your timeline currently treats as "today".
You can customize what date is considered "today" in your timeline. By default it follows your computer's clock, which works well for real-world projects. For a story set in the future, the past, or another world entirely, you can set it to another date by:
- Open [] Settings.
- Select the Dates tab.
Under Date used as today, choose the date you want Aeon Timeline to treat as the present.
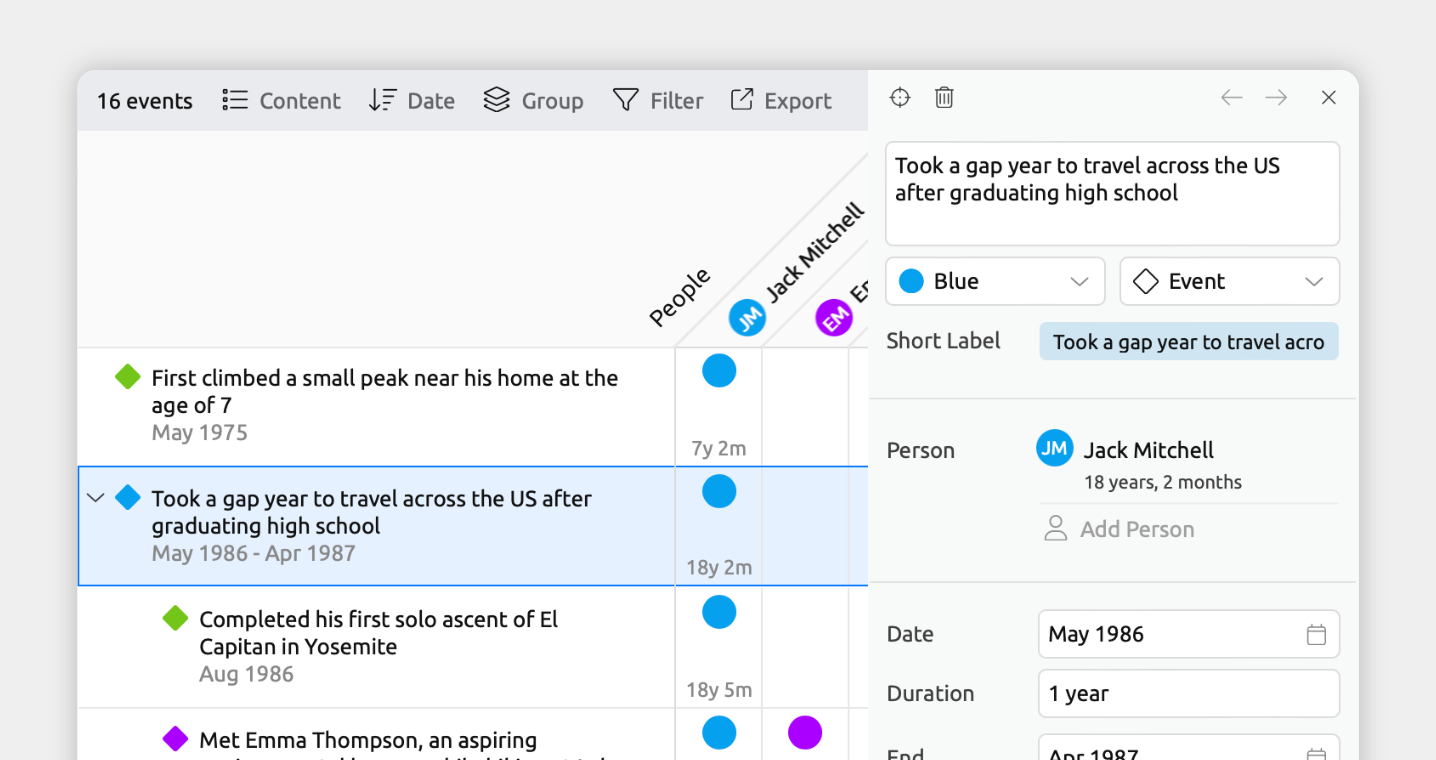
For Aeon Timeline to calculate a character’s age at an event, the event needs to be related to that character. Once related, the character's age at that event is shown automatically in the inspector.
- Select an event.
- In the inspector, find the Characters field.
If it isn’t shown, scroll to the bottom of the inspector and click Add and Edit Fields to add it. - Click Add, then select the character.
Each related character now appears in the Characters field with their age at that event.
Learn more about relationships in the Connect Events, People, and More guide.
The Relationship view can lay out every event against every character in a grid, making it easy to see all your characters' ages at every event at a glance.
- Select or create a tab set to the Relationship view.
- Open the [] Content panel in the view header.
- Under Rows, select Events.
- Under Columns, select Characters.
Each intersection between an event and a character shows the relationship between them. When both have dates, the intersection also shows the character's age at that event — giving you a full grid of ages across your story.
Tip: To see an example of tracking ages in the Relationship view, explore the Biography template in the app.
You can pin a single character’s lifespan to the top of the Timeline view, which will show their age at the current timeline position.
- Select or create a tab set to the Timeline view.
- Open the [] Filter panel in the view header.
- Filter the view by a single character.
If the character has a date set, a bar appears across the top of the view, showing the character’s age at the current timeline position. As you scroll, the age updates to reflect that point in their life.
Manage Dependencies and Event Order
As you plan, it’s natural for events to shift around. If some need to happen in a certain order, dependencies and constraints help ensure those requirements are respected, while still allowing you to work freely with your timeline.
To manage dependencies and event order:
Before you can use dependencies or constraints, the item type must allow dates and show the Dependencies field.
- Open [] Settings.
- Select the Item Types tab.
- In the left-hand list, select the Event item type, or any other item type you want to enable dependencies for.
- Make sure Allows dates is ticked.
- Under Fields, add the Dependencies field.
There are several kinds of rules you can add, depending on what you need. Two commonly used for story timelines are:
Keep two events in a particular order
Use this when the sequence matters more than the exact dates — for example, a body has to be discovered before the investigation begins, or a clue has to be planted before a character can find it. Even as you shift dates around during revisions, the two events will stay in the right order.
- Select one of the events you want to make dependent.
- In the inspector, find the Dependencies field.
If it isn't shown, scroll to the bottom of the inspector and click Add and Edit Fields to add it. - To make the selected event come before the other, click Blocks → + Add. To make it come after, click Blocked by → + Add.
- Select the other event from the list.
Tie two events together, with an optional time gap between them
Use this when events need to happen at the same time, or when a specific amount of time has to pass between them — for example, a wedding happening exactly a year after the proposal, or a sequel needing to take place at least ten years after the original story ends.
- Select one of the events.
- In the inspector, find the Dependencies field.
If it isn't shown, scroll to the bottom of the inspector and click Add and Edit Fields to add it. - Click Constraints → + Add.
- In the first dropdown, choose the event's Start or End date.
- In the second dropdown, choose Equals start of or Equals end of.
- In the third dropdown, select the other event.
- Optional: Enter an offset to enforce a time gap between the events — for example, 1 year for a wedding a year after the proposal.
When you move an event that other events depend on, Aeon Timeline can either shift those dependent events automatically so the rules stay valid, or leave them in place and flag the conflicts for you to review later. You can choose the behaviour that suits how you work.
- Automatically resolve is useful when you want your timeline to stay consistent without manual cleanup — events that depend on the one you moved will shift along with it.
- Highlight violations without resolving is useful when you'd rather see what would break before deciding how to fix it. Conflicts appear with a red warning icon, which you can resolve one at a time, or all at once from the Dependencies sidebar panel.
To set this:
- Open [] Settings.
- Select the Dates tab.
- Scroll to the Date Editing section.
- Under When moving items with dependencies and constraints, choose:
- Automatically resolve dependencies and constraints, or
- Highlight violations without resolving.
Learn more in the Manage Dependencies and Event Order guide.
Measure Time Between Events
Sometimes you just need to quickly check how much time passes between two events in your story. Aeon Timeline makes this easy to do, without needing to manually calculate anything.
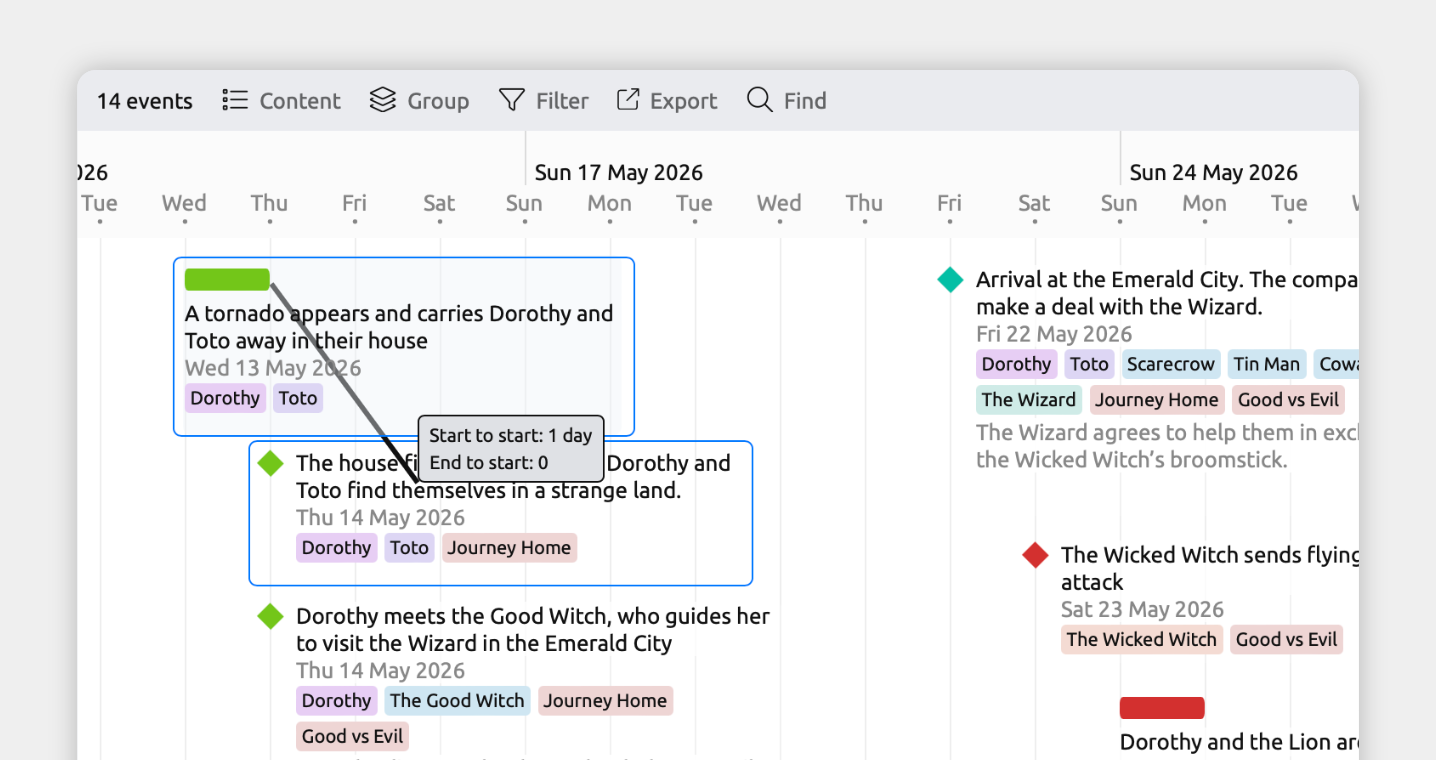
- Measure time between events on the timeline
If both events appear in the Timeline view, you can measure the time between them in place.
If both events appear in the Timeline view, you can measure the time between them in place.
- Select or create a tab set to the Timeline view.
- Hold:
- Option + Shift (Mac), or
- Alt + Shift (Windows)
- Click and drag from one event to another on the timeline.
- A message appears showing the time difference between the two events.
- See the time between related events in the inspector
From the inspector, you can see the time difference between related events wherever you are in the app.
From the inspector, you can see the time difference between related events wherever you are in the app.
Before you start, make sure both events have dates.
- Select one of the events.
- In the inspector, find the Event field, or any other item type you want to relate.
If the field isn't shown, scroll to the bottom of the inspector and click Add and Edit Fields to add it. - Click Add, then select the second event to relate.
If both events have dates, Aeon Timeline automatically shows the time difference between their start dates inside the relationship field.
Mark Important Dates and Anniversaries

Markers let you visually highlight important dates or periods directly on your timeline, so they’re always visible while you work.
- Mark important dates with calendar markers
Calendar markers let you mark specific dates or date ranges on the timeline. You can assign icons and colors, and optionally set markers to repeat at regular intervals.
You might use them to bookmark key dates, highlight pivotal moments, or mark recurring holidays.
- Click the [] Calendar Markers icon in the sidebar to open the calendar marker panel.
- To add a new marker, type a label in the New Calendar Marker row and press Enter.
- Select the new marker to open the inspector and choose:
- The marker’s icon and color
- Whether to draw a coloured section on the timeline background
- The marker’s date, and whether it repeats
- Mark anniversaries
If you already have events for significant dates — such as a battle, the founding of a city, or a character’s birthday — you can display their anniversaries in the timeline header.
- Select the event you’d like to mark the anniversary of.
- In the inspector, find the Dates section.
If it isn’t shown, scroll to the bottom of the inspector and click Add and Edit Fields to add it. - Open the Date section’s More menu and enable Mark anniversary on timeline header.
Track Day or Week Numbers Instead of Calendar Dates

If your story is based on the number of days or weeks since a starting point, you can switch your timeline to use day or week numbers instead of standard calendar dates.
When enabled, your timeline will display dates as Day 1, Day 2 or Week 1, Week 2 and so on, instead of traditional calendar dates like Jan 5, 2020.
Tip: To see an example of this setup, explore the Day 1, Day 2 template in the app.
- Open [] Settings.
- Select the Dates tab.
- Under Calendar Style, choose:
- Day count to display dates as Day 1, Day 2, etc., or
- Week count to display dates as Week 1, Week 2, etc.
- If you’re switching from calendar dates, you’ll be asked to choose which calendar date should be treated as Day 0 or Week 0. Pick the date you want to anchor your relative timeline to.
Times can also be included alongside day or week numbers — for example, 5:00pm Day 1 or 5:00pm Monday Week 1.
Track Timestamps or Runtime Instead of Calendar Dates
If your story is structured around elapsed time, such as minutes or hours since a starting point, you can switch your timeline to use timestamps instead of calendar dates.
When enabled, events will display as timestamps (for example, 00:10:00) rather than traditional dates and times like Jan 5, 2020, 10:00 AM.
Tip: To see an example of this setup, explore the Screenplay Runtime template.
- Open [] Settings.
- Select the Dates tab.
- Under Calendar Style, choose Timestamps.
- If you’re switching from calendar dates, you’ll be asked to choose which calendar date should be treated as Hour 0. Pick the moment you want your runtime to start counting from.
Once switched, events will display as clock-style times like 00:10:15, and the timeline will lay them out across the chosen runtime.
More Guides
Try Aeon Timeline free for 14 days
Get Aeon Timeline and easily visualize and organize your project.