Connect Events, People, and More
Relationships show how the pieces of your project fit together. They let you link events, people, places, and other items so your timeline reflects how things actually connect, not just when they happen.
Why Use Relationships
Most projects aren’t just a series of events. The same people show up again and again, tasks belong to larger pieces of work, and notes or resources support multiple items. Relationships let you capture those connections.
Instead of repeating information, you create it once and link to it wherever it’s relevant.
As your timeline grows, this makes it easier to stay organized, see how everything fits together, and understand how different parts of your project relate to each other.
Common Scenarios
Relationships can be simple links that connect two events or items, or they can use labels to describe how those items relate to each other. For example, a person might be linked to a task or event with a label such as lead, assignee, or witness.
You might use relationships to show:
- Who is involved
For example, a character who appears in an event. - How people relate to each other
For example, two characters who are allies, rivals, or family members. - Who is responsible for what
For example, a person assigned to a task. - Where things happen
For example, a location linked to an event. - What supports your work
For example, a source or document linked to an event. - How work is organized
For example, a task linked to the project it belongs to.
You’re not limited to these. You can customize relationships to match the way you think about and organize your work.
Add and View Relationships
When you create relationships, you’ll see them throughout the app in several ways.
In the Inspector
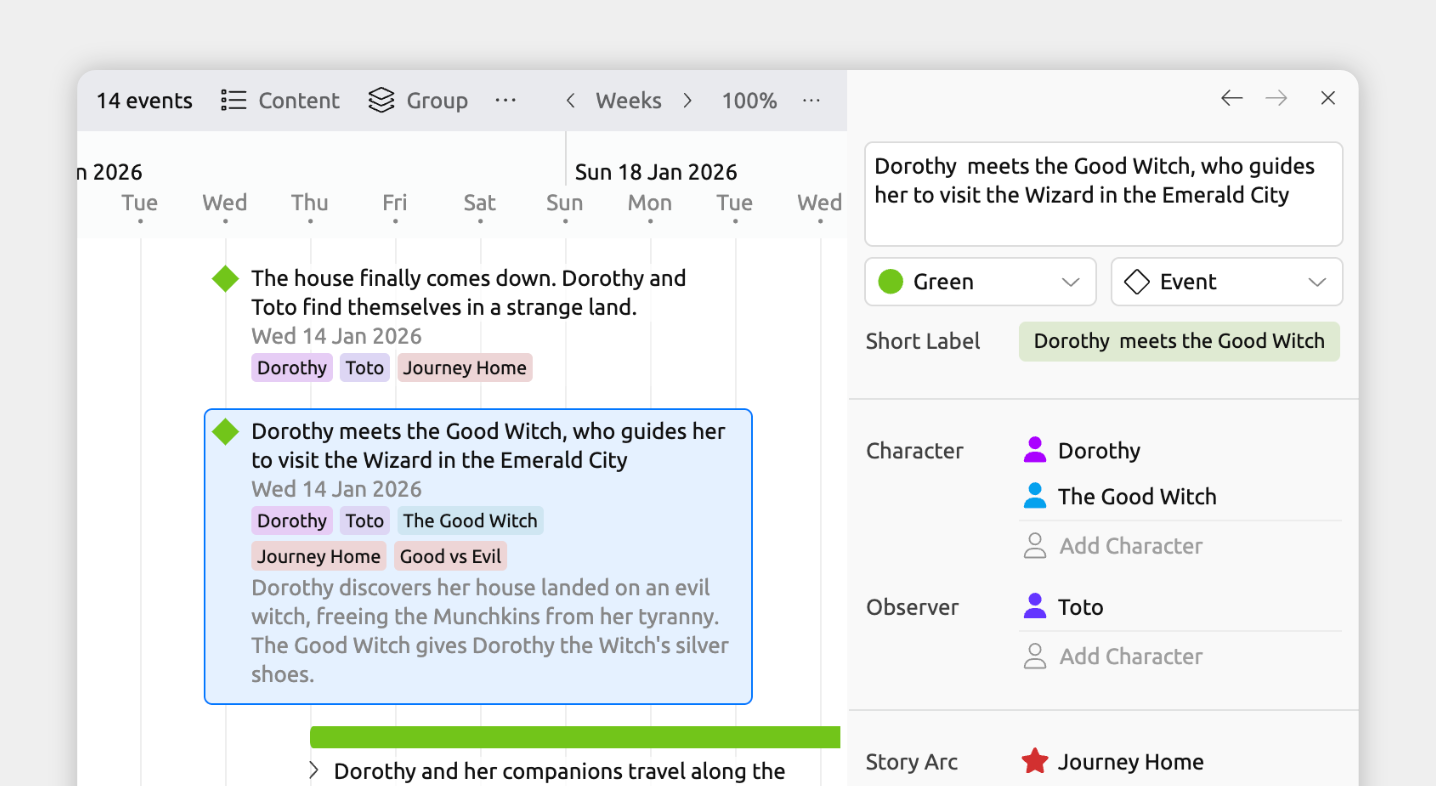
When you select an event or item in any view, the inspector shows all of its relationships in one place.
Add a relationship from the inspector
- Select an event or item.
- In the inspector, find the relationship field you want to add to.
If the field isn’t shown, scroll to the bottom of the inspector and click Add and Edit Fields to add it. - Click Add, then:
- Select an existing item to relate, or
- Choose Create to create and link a new item.
Tip: If both items have dates, the inspector also shows the time difference between their start dates. This is useful for seeing things like a person’s age at an event, or how long after one event another occurred.
As Groups in the Timeline and More
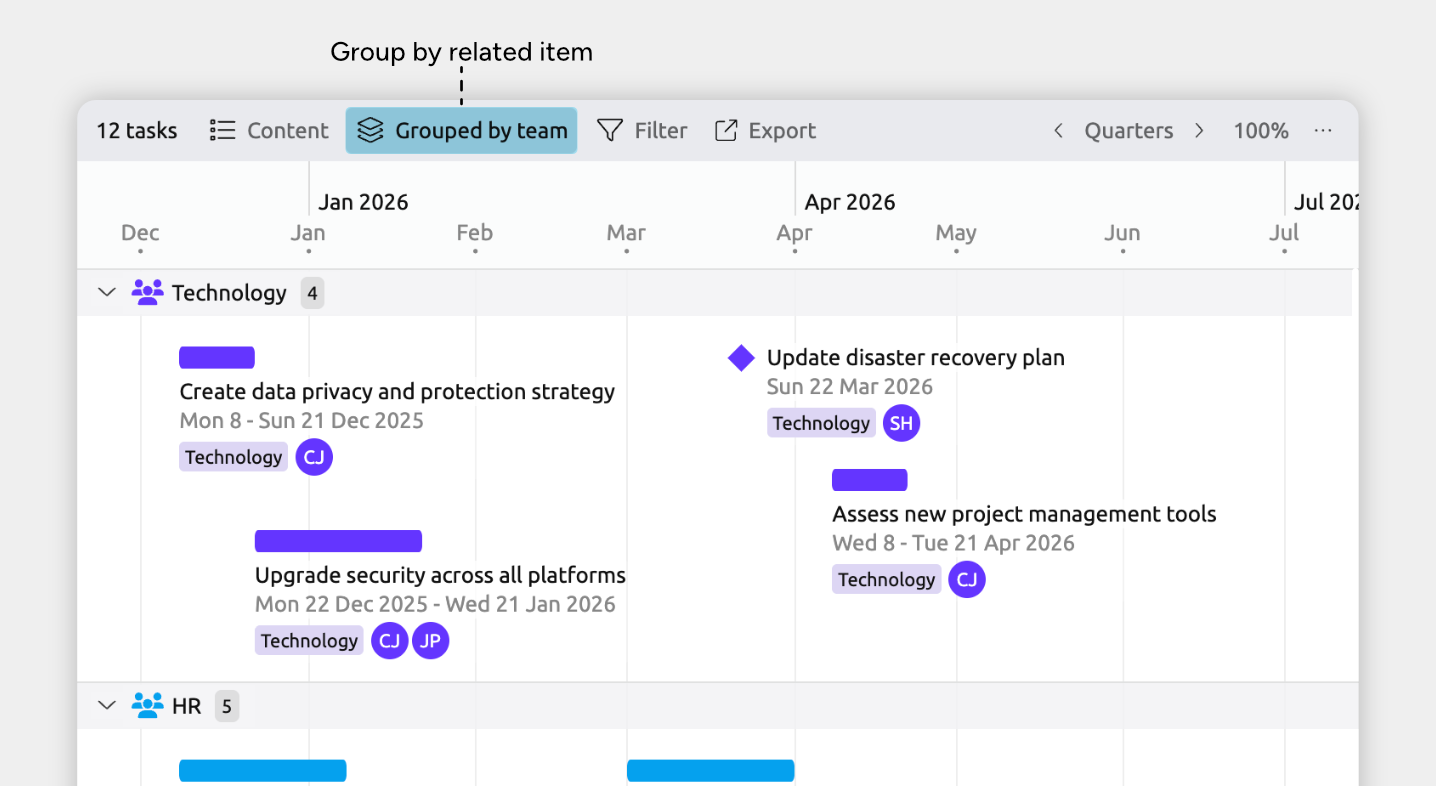
In certain views, related items can be grouped together, so you can clearly see how connected events and items run alongside each other over time.
Groups can be used in:
- Timeline View
- Spreadsheet View
- Relationship View
- List View
- Item type sidebar panels
On Item Cards in the Timeline and More
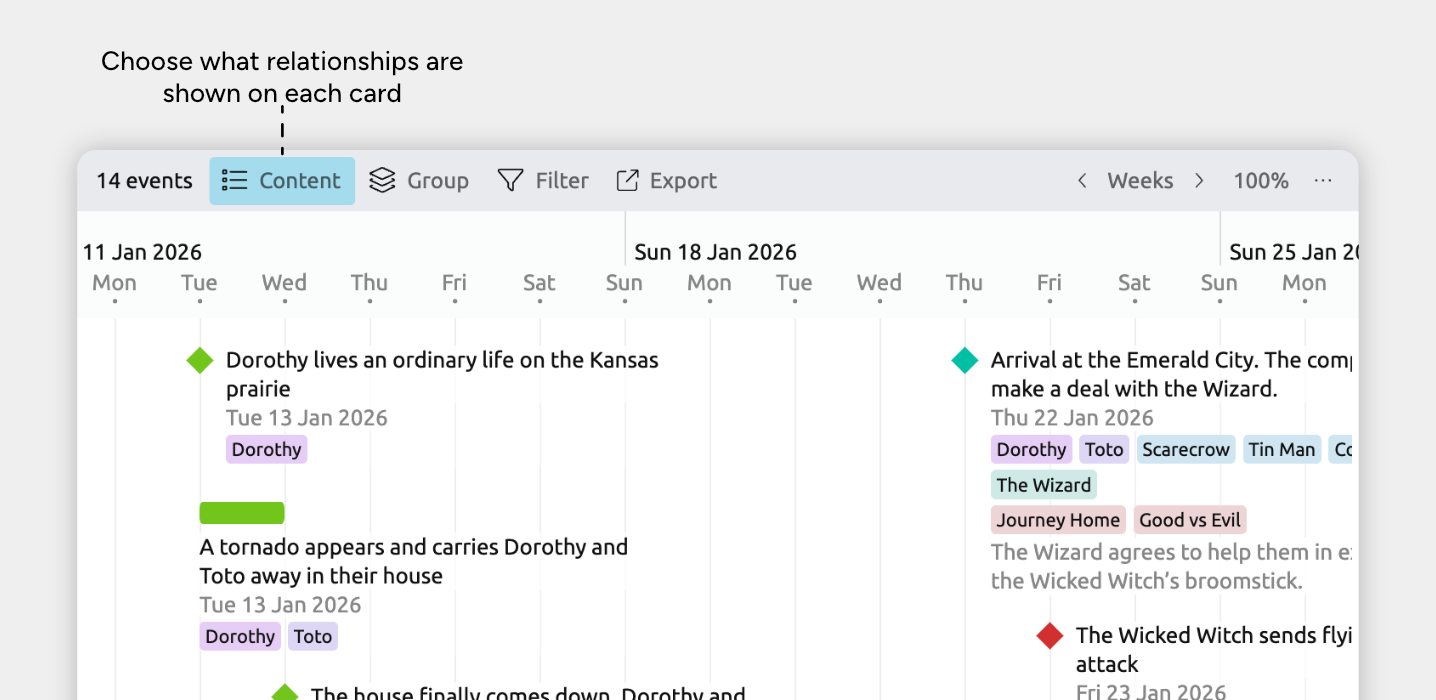
In views that use item cards, you can show related items on each item’s card, so important connections stay visible as you work.
The views that use item cards are:
- Timeline View
- Relationship View rows
- Narrative View
- List View
- Mindmap View
To show relationships on item cards:
- Select or create a tab set to the Timeline, Relationship, List, Mindmap, or Narrative view.
- Open the Content panel in the view header.
- Under Fields, enable the relationship fields you want to see.
These may appear under See More, depending on your settings.
Columns in the Spreadsheet View
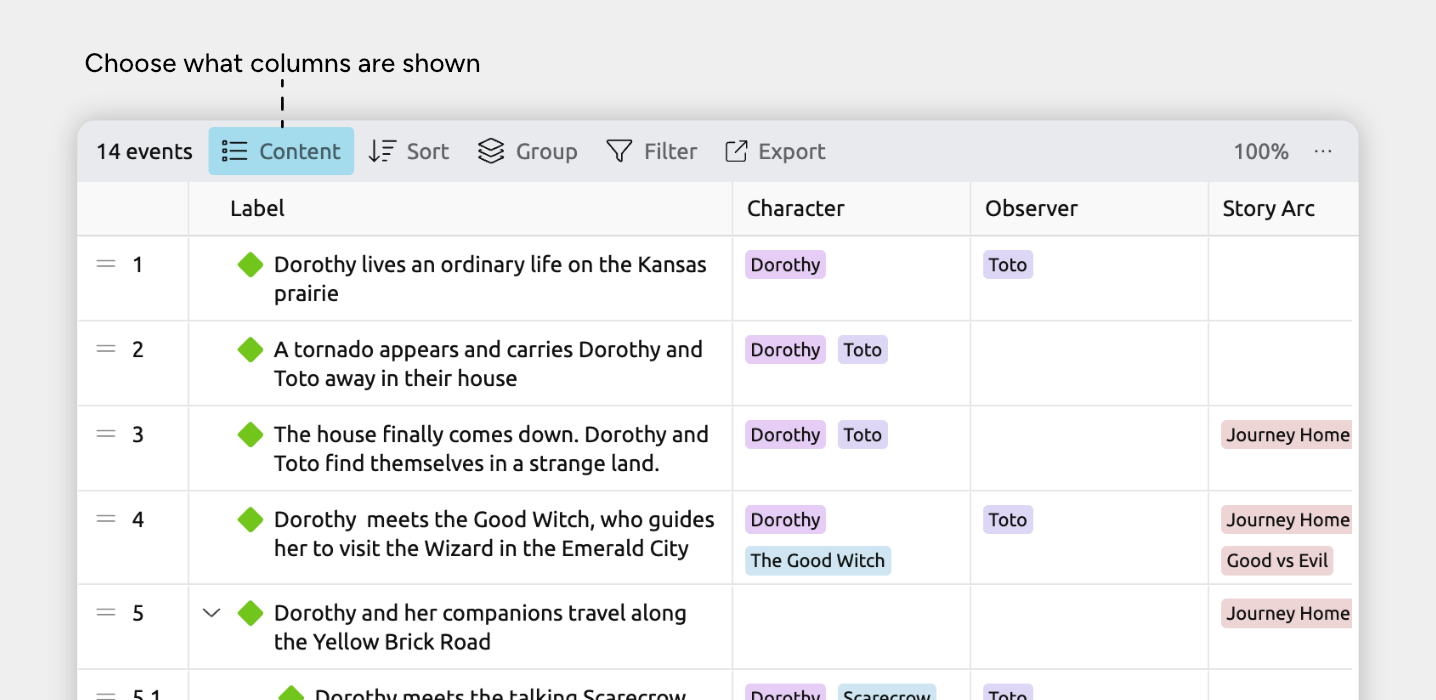
The Spreadsheet view makes it easy to manage relationships in bulk. Relationship types can be shown as columns, so you can quickly link items and update connections across multiple rows.
Add a relationship from the Spreadsheet view
- Select or create a tab set to the Spreadsheet view.
- Open the Content panel in the view header.
- Make sure the relationship you want to use is enabled as a column.
- Close the Content panel.
- In the spreadsheet, click a cell in that relationship column.
- Select an existing item to relate, or choose Create to create and link a new item.
You can control how related events and items appear in these cells — as short labels, avatars, or identifiers — by customizing the compact display settings for their item types. Learn more about item type options →
Intersections in the Relationship View
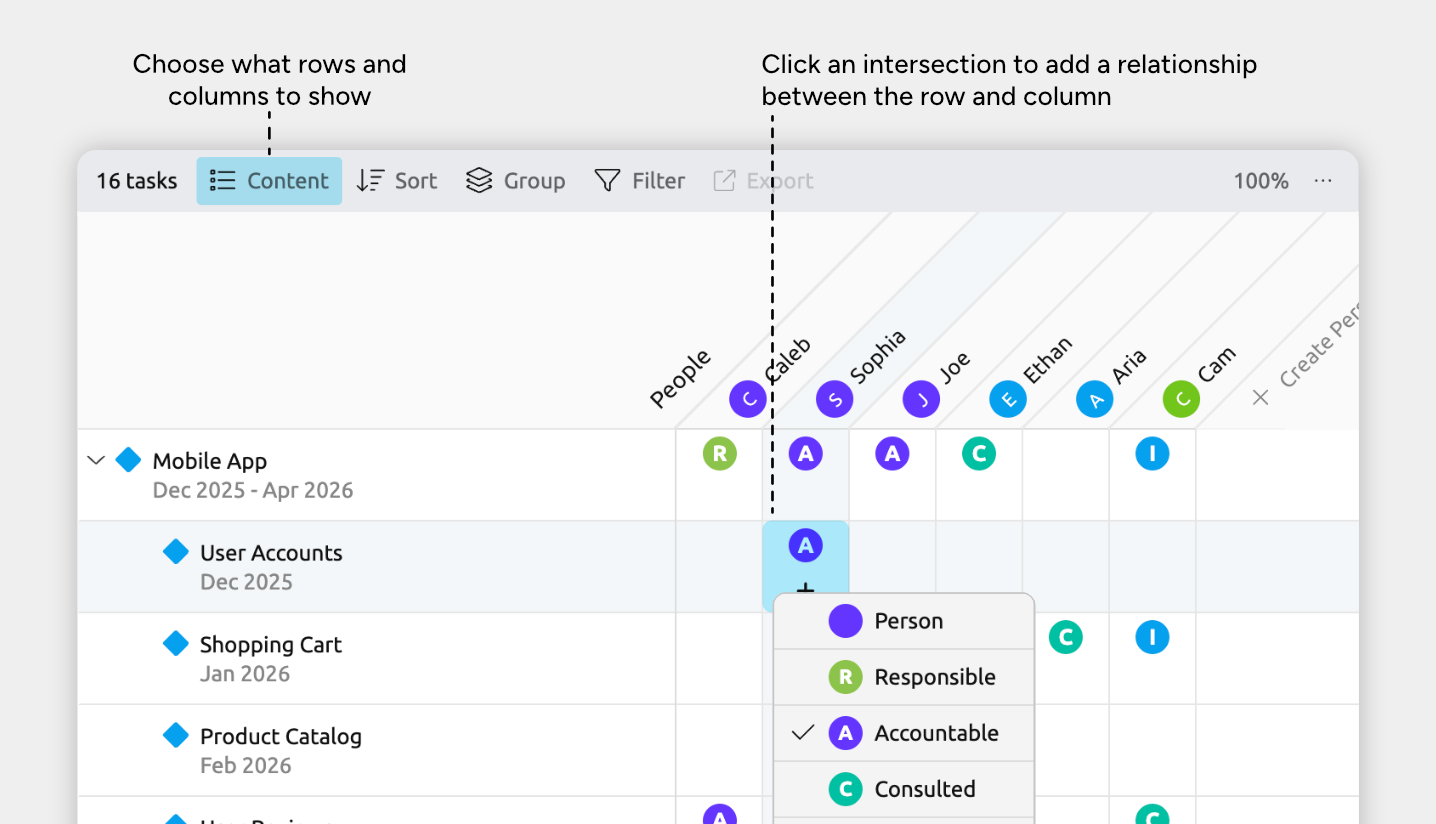
The Relationship view shows connections in a grid, making it easy to explore how events and items link to each other.
Add a relationship from the Relationship view
- Select or create a tab set to the Relationship view.
- Open the Content panel in the view header
- Make sure one of the items you want to relate is shown as a row, and the other is shown as a column.
- Close the Content panel.
- Click the intersection between the row and column for the two items you want to relate.
- Select the relationship type to add.
Tip: If both items have dates, the grid intersection also shows the time difference between them.
Tracks in the Subway View
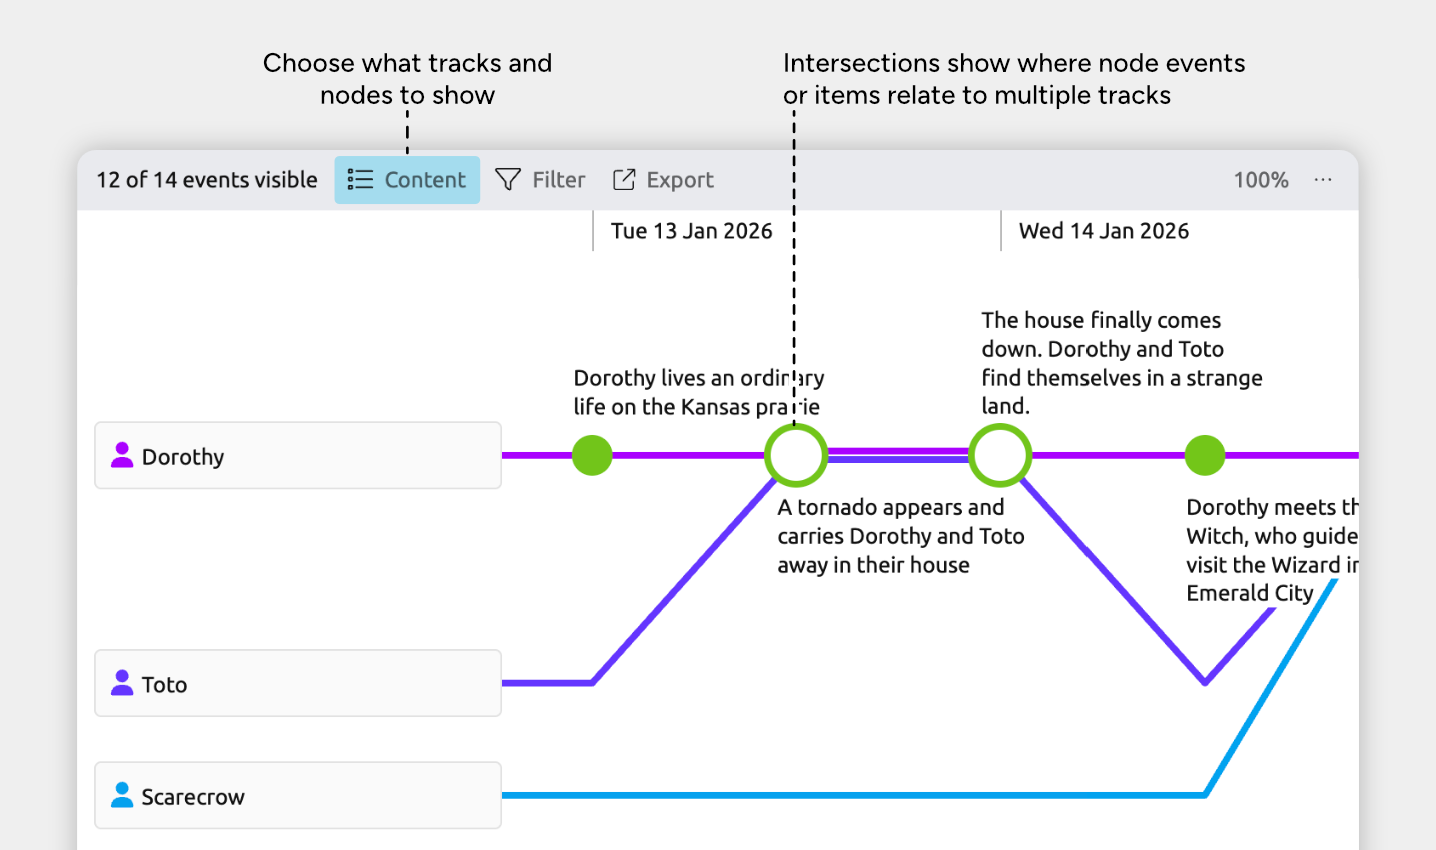
The Subway view shows events and items arranged into parallel tracks based on their relationships. Each track represents a related item, such as a person, project, or story arc, with its associated events shown along the line.
Add a relationship from the Subway view
- Select or create a tab set to the Subway view.
- Open the Content panel in the view header
- Choose the items you want to show as tracks. Each track displays its related events and items.
- To relate an event or item to a track, drag an item from one track and drop it onto another track.
Lines in the Mindmap View

The Mindmap view displays items and their relationships in a freeform layout, giving you space to explore ideas and visualize connections.
Add a relationship from the Mindmap view
- Select or create a tab set to the Mindmap view.
- Hover over an event or item to show the connection icon.
- Drag the connection icon from one item onto another item.
- If only one relationship type is available, it’s created automatically.
Otherwise, choose the relationship type you want from the menu.
Tip: To control whether custom relationship names appear on the connecting lines, open the Content panel in the view header, expand Card Options, and toggle Show custom relationship labels.
Add Relationships for Multiple Items
If you need to add the same relationship to many items, the Spreadsheet view is the fastest way to do it.
- Select or create a tab set to the Spreadsheet view.
- Select multiple events or items:
- Hold ⌘ (Mac) or Ctrl (Windows) and click row gutters to select individual rows.
- Hold Shift and click two row gutters to select all rows between them.
- Add a relationship in any relationship column. It will be applied to all selected items.
You can also select multiple items in any view and add a relationship once in the inspector. The relationship will be added to all selected items.
Customize Relationship Types
Aeon Timeline gives you two ways to set up relationships, depending on what you need.
Item type relationships are just straightforward links between items — for example, connecting a person to an event.
Custom relationships add a bit more detail by explaining how two items are connected, such as a person being a witness to an event, or an assignee to a task.
Add or Edit Relationship Types
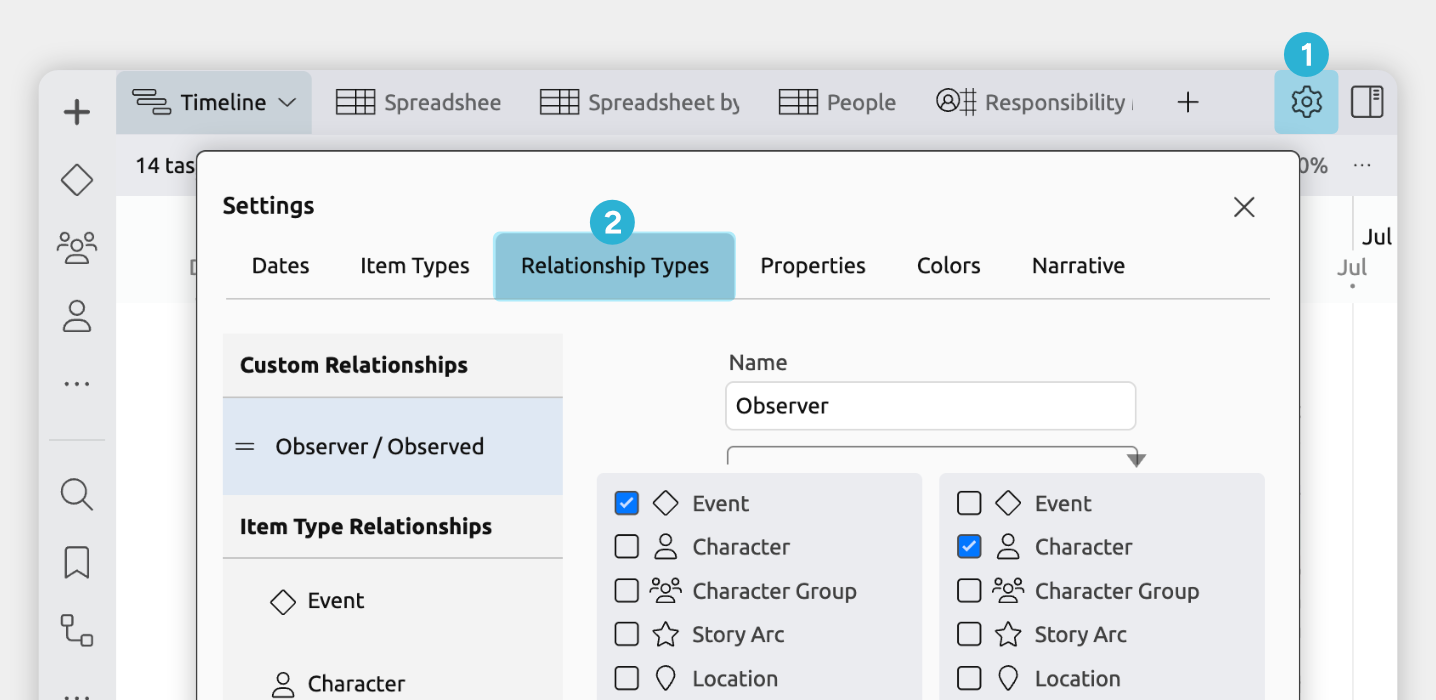
- Open Settings
- Select the Relationship Types tab
From here you can:
- Edit an existing relationship type
Select it from the list on the left. - Create a new relationship type
Click Add at the bottom of the left list.
Settings Reference
When creating or customizing a relationship type, you can adjust the following settings.
Item Type Relationships
Item type relationships are the simplest kind of relationship. The only option is choosing which item types display the relationship as a field.
For example, to show a Person field on Events:
- Open Settings
- Select the Relationship Types Tab.
- Select Person.
- Enable the Event option.
Use an item type relationship when you just want to link two events or items in a straightforward way, without adding labels or extra meaning to the connection.
Custom Relationships
Custom relationships let you define how items relate, not just that they’re connected. Custom relationships have the following options:
Name
The label used for the relationship. This is how the field appears in the inspector and in views, such as a column in the Spreadsheet view.
For example, when relating people to events you might use labels like Witness or Assigned to. When relating people to other people, you might use labels such as Spouse or Mentor.
Item Types
Choose which item types this relationship can connect.
Inverse (Optional)
Sets the label used when viewing the relationship in the opposite direction.
For example, you might label the relationship from a person to an event as Initiates, with an inverse label of Initiated by when viewed from the event back to the person.
When an inverse is set, the relationship appears as two separate fields in the inspector and as two separate columns in the Spreadsheet view — one for each direction.
Show for Item Types
Choose which item types display this relationship as a field in the inspector.
Group Relationship Under Item Type Fields
When enabled, this relationship is shown alongside its related item type fields in the inspector, instead of in its own section.
This is useful when a custom relationship is effectively a subcategory of an existing item type relationship and you want them displayed together.
For example, if a task already links to people, you might also have custom relationships like Lead or Reviewer. Grouping them keeps all people-related connections together and easier to scan.
View Display
Controls how the relationship appears in the Relationship and Mindmap views.
Where to Next?
The Relationship View
Use the Relationship view to quickly add and review relationships.
Categorize and Group Events and Items
Learn how grouping helps you organize events and items into clear sections based on relationships and more.
Try Aeon Timeline free for 14 days
Get Aeon Timeline and easily visualize and organize your project.