Nest Items and Manage Hierarchy
Nesting helps you break complex work into manageable parts by organizing items into hierarchies. It lets you structure how events and items fit together, placing smaller items within larger ones.
Examples of Nesting
You might use nesting to:
- Break down larger events and items
For example, splitting a task into subtasks, or breaking a large event like a war into smaller events like individual battles. - Structure items in a hierarchy
For example, nesting cities within countries to organize locations. - Collect similar items together
For example, placing story characters into character groups.
You’re not limited to these examples. You can nest items in whatever way best matches how you structure your work.
Note for story timelines: Nesting is useful when story events sit inside larger events on the timeline. If you’re arranging select events into chapters, acts, or other story structures, the narrative instead lets you pick events to put into folders. Learn more about the narrative →
How Aeon Timeline Shows Nesting
When events and items are nested in Aeon Timeline, that structure is reflected throughout the app.
Depending on the view, nested items appear indented beneath their containing item, making it easy to collapse and expand hierarchies at a glance.
Nesting is shown in the following views and panels:
- Timeline view
- Spreadsheet view
- Relationship view rows
- List view
- Item type sidebar panels
Tip: Right click a containing item’s arrow and select Expand or Collapse all items to quickly expand or collapse all nested items in the view.
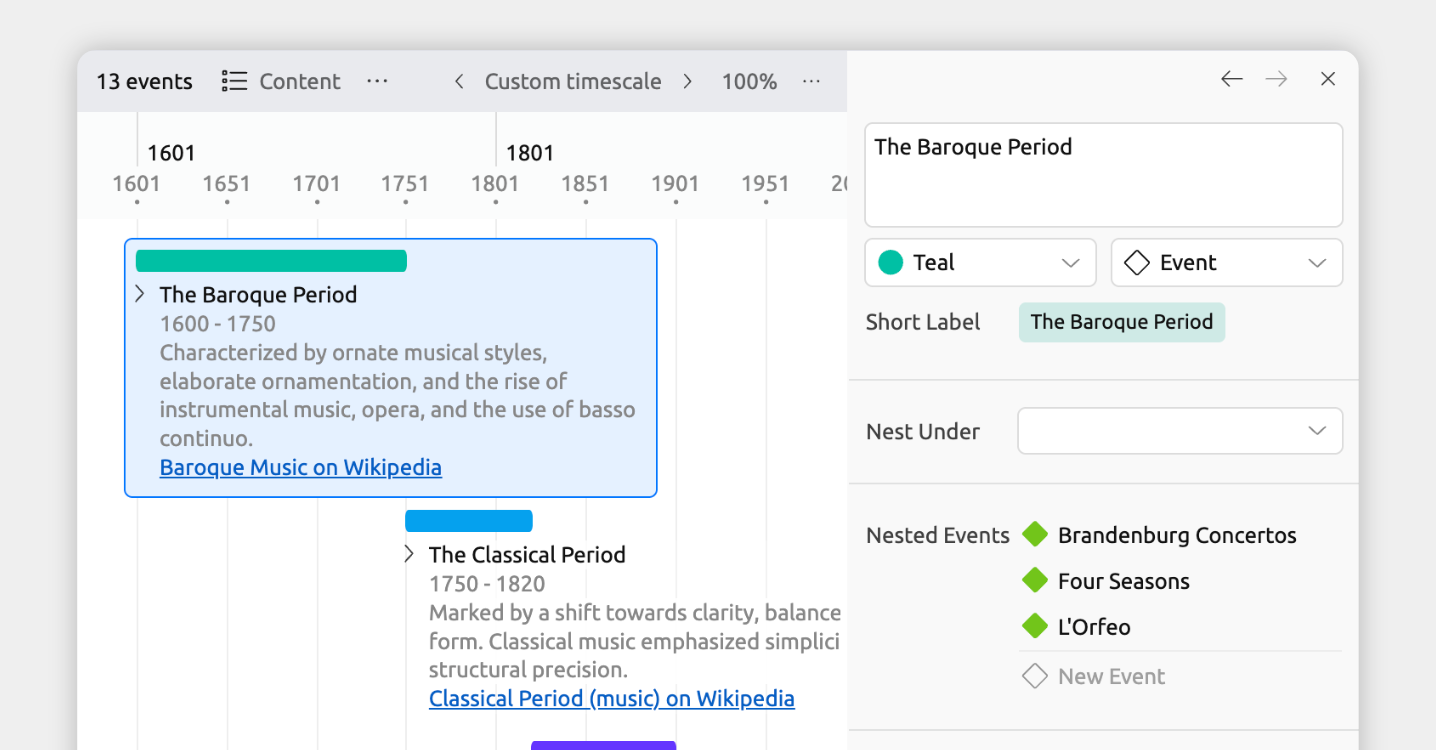
Nesting is also shown as fields in the inspector:
- When you select a nested item, the inspector shows its containing item in the Nested Under field.
- When you select a containing item, the inspector lists all of its nested items in the Nested Items field.
How Nested Dates Work
When you nest items, the dates of nested events or items affect their containing item.
- Nested items must fit within the containing item’s date range
If a nested item is added or moved outside the current range, the containing item will expand to include it. - Containing items can span a wider date range than their nested items
They can include extra time beyond their nested items’ dates. - Moving a containing item may also move its nested items
Depending on your date editing settings, shifting a containing item’s dates may shift its nested items by the same amount, keeping their timing aligned. Learn more about date editing behaviors →
Tip: You can lock a containing item’s dates to keep its date range fixed. When it’s locked, nested items can still be moved, but only within that date range. Learn more about locking dates →
Customize What Can Be Nested
Nesting is configured per item type. In many starting templates this is already set up, but you can adjust it as needed for your project.
Set Which Item Types Can Be Nested
To customize nesting:
- Open Settings.
- Select the Item Types tab.
- Select the item type you want to nest.
- Under Nesting, choose which item types it can be nested under.
Show Nesting Fields in the Inspector
To make nesting easy to work with, you’ll usually want to show the relevant fields in the inspector:
- For the containing item type, enable the Nested Items field under Fields.
- For the nested item type, enable the Nested Under field under Fields.
To do this:
- Open Settings.
- Select the Item Types tab.
- Set which item types can be nested inside others.
- Select the item type you want to nest.
- Under Nesting, choose the item types it can be nested under.
- Set which nesting fields are shown in the inspector.
- For the containing item type, under Fields enable the Nested Items field.
- For the nested item type, under Fields enable the Nest Under field.
Example: Nest Tasks Under Projects
To nest Tasks inside Projects, you would configure the item types like this:
- Item type: Task
- Nesting: Project
- Fields: Nested Under
- Item type: Project
- Nesting: none
- Fields: Nested Items
Once set up, Tasks can be placed inside Projects. Projects will show their Tasks in the inspector, and vice versa.
How to Nest Events and Items
Once nesting is configured for your item types, items can be nested in several ways.
Nest Existing Items
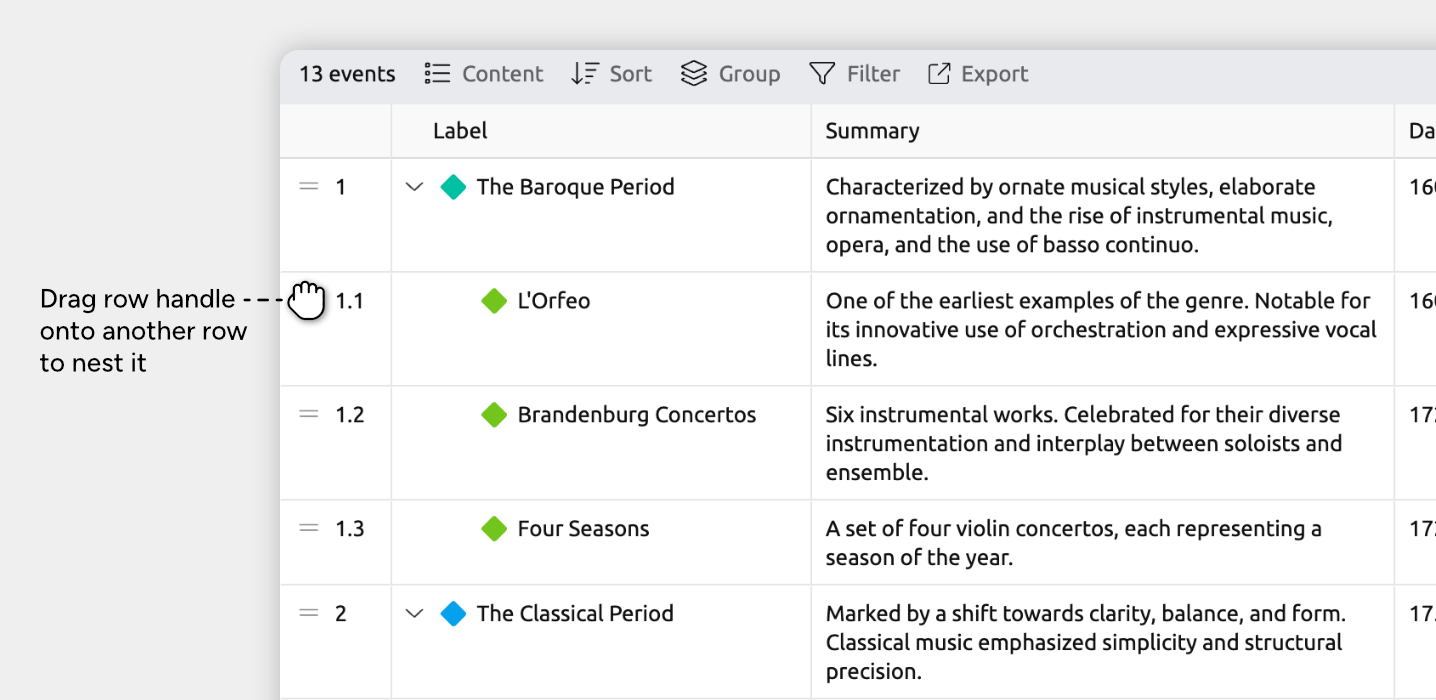
Drag and Drop
You can nest items by dragging them in several views:
- Spreadsheet, Relationship, and List views, and item type side panels
Drag an event or item onto another item to nest it.
In the Spreadsheet view, drag using the leftmost gutter cell. - Timeline view
Drag an item onto another item while holding Cmd (Mac) or Ctrl (Windows).
This nests the item instead of just moving it in time.
Using the Inspector
You can also nest items directly from the inspector:
- Select the event or item you want to nest.
- In the inspector, find the Nest Under field.
- Choose the item you want to place it inside.
Create New Containing or Nested Items
You can also create new items and nest them at the same time.
Right-Click Options
You can create nested items in place from the views that show nesting:
- Timeline view
- Spreadsheet view
- Relationship view rows
- List view
To do so:
- Right-click an event or item.
- Open the Create Item menu.
- Choose one of the following options:
- Create Nested Item
Creates a new item inside the selected item. - Nest Under New Item
Creates a new containing item and places the selected item inside it.
- Create Nested Item
Using the Inspector
You can also create nested items from the inspector:
- Select the event or item you want to add nested items to.
- In the inspector, find the Nested Items field.
- Create a new item directly from that field.
Where to Next?
Categorize and Group Events and Items
Learn how grouping can help you organize events and items into clear, related sections.
Try Aeon Timeline free for 14 days
Get Aeon Timeline and easily visualize and organize your project.