The Spreadsheet View
The Spreadsheet view presents your timeline as a table of rows and columns, making it easy to scan, compare, and edit lots of items or details at once.
You can work within the cells in the view, or click in a row’s leftmost gutter cell to select it and use the inspector.
Customize Content
You can control what appears in the view by choosing which item types are shown as rows, and what fields are shown as columns.
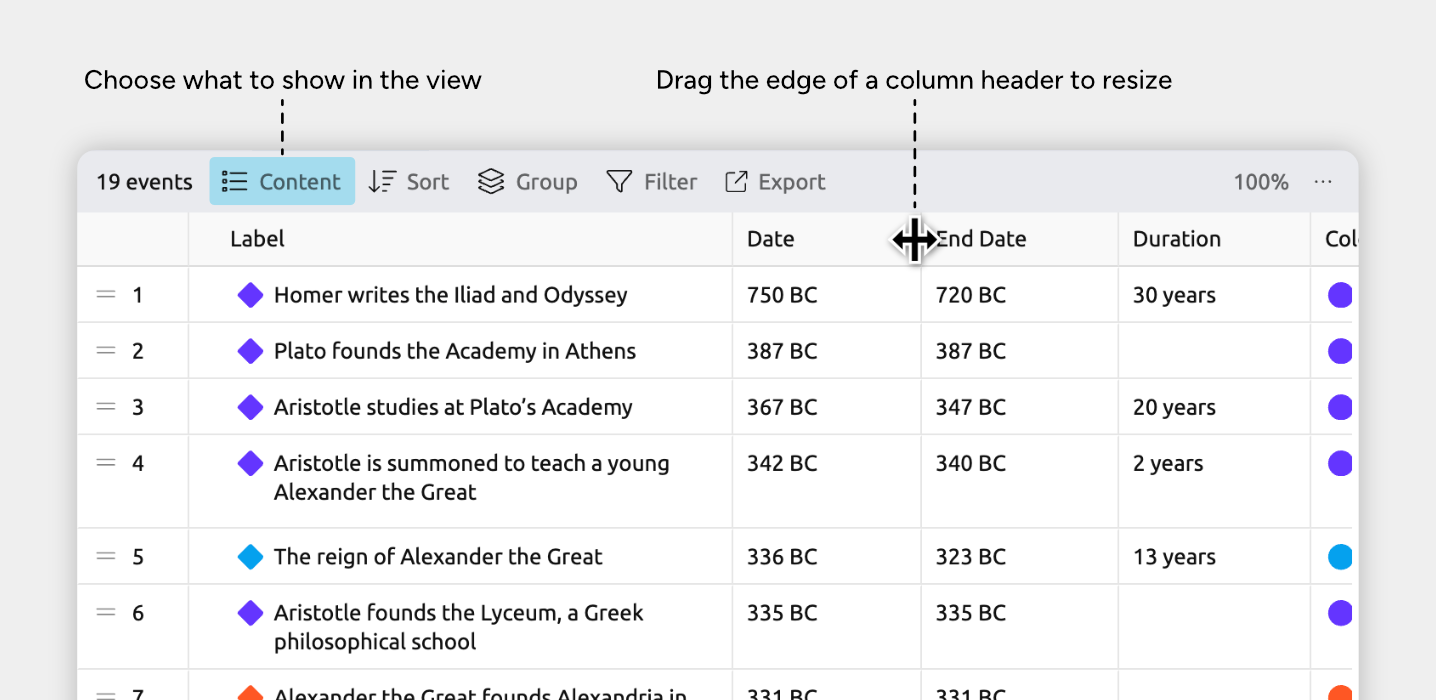
Choose Which Item Types to Show as Rows
- Open the Content panel in the view header.
- Under Rows, check or uncheck the item types you want to show or hide.
- (Optional) Adjust Max Lines Per Row to limit how tall each row can be.
Note for narrative views: If you’re using a spreadsheet view set to show the narrative (shown by the Narrative label in the view header), the rows will always show your narrative items and cannot be customized per view. Learn more about the narrative →
Choose Which Fields to Show as Columns
- Open the Content panel in the view header
- Under Columns, click fields to show or hide them
Add New Columns
If you want to store information that isn’t already available as a column, you can add new fields in two main ways:
- Connect rows with other events, people, or items
Add a relationship field to link items together.
Connect Events, People, and More → - Store text, numbers, option lists, or checkboxes
Add a property field to hold supplementary information.
Add Notes, Tags, and Extra Details →
Reorder and Resize Columns
- Reorder: Drag a column header left or right.
- Resize: Hover over the right edge of a column header until the resize cursor appears, then drag to adjust the width.
Add Events and Items
Add a New Event or Item
- Scroll to the bottom of the spreadsheet and focus the New Event or New Item cell.
- If multiple item types are available, click the down arrow on the right side of the cell to choose the item type.
- Type a label and press Enter.
Duplicate an Existing Item
- Click an event or item’s pencil icon to open its Edit menu.
- On Mac or Windows, hover over the item’s label cell to show the icon.
- On iOS, tap the item’s gutter cell once to show the icon.
- Select Duplicate.
Create an Item Directly Above or Below Another
- Click an event or item’s pencil icon to open its Edit menu.
- On Mac or Windows, hover over the item’s label cell to show the icon.
- On iOS, tap the item’s gutter cell once to show the icon.
- Choose Create item above or Create item below.
Reorder Events and Items

Sort All Rows
Use sorting to quickly reorganize the entire view based on what you want to focus on.
- Open the Sort panel in the view header.
- Choose the field you want to sort by, such as date, label, or another column.
Reorder Individual Rows
In some cases, you can drag and drop individual rows to reorder them. Whether this is available depends on how the view is currently sorted.
- Click and hold the leftmost gutter cell (with the drag handle).
- Drag the row to where you want it to go.
Rows can be manually positioned when you are sorted by:
- No sort order
- Dates → Flexible ordering enabled
- Color, as long as you stay within the same color group
- Item type, as long as you stay within the same item type
- Option list properties, as long as you stay within the same option
Note for iOS: Long-press to enter Edit mode, then drag a gutter cell.
Note for narrative views: If you’re using a spreadsheet view set to show the narrative (shown by the Narrative label in the view header), the rows will always show your narrative items and cannot be customized per view. Learn more about the narrative →
Group Events and Items
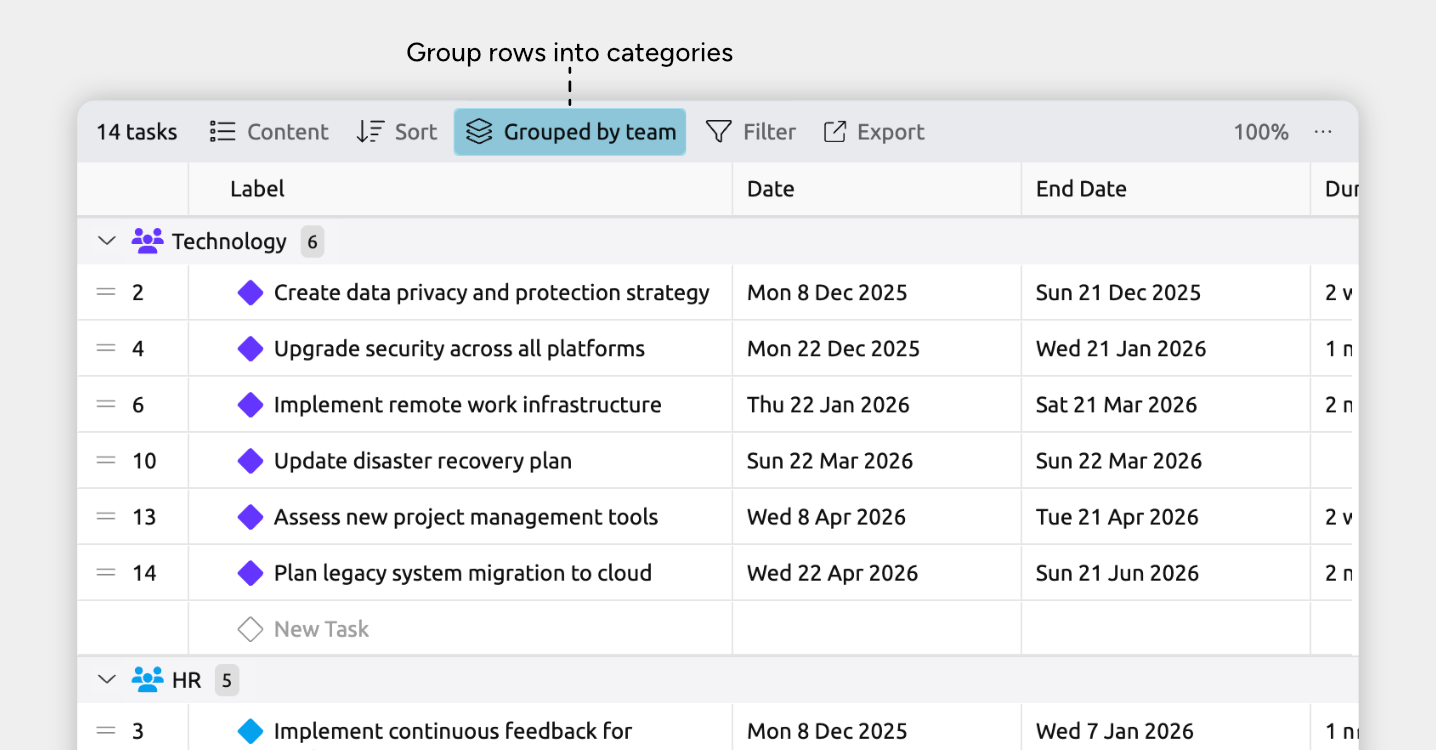
Grouping divides the table into sections of related rows. This makes it easier to focus on one group at a time, and work through large tables in a more manageable way.
Enable grouping from the Group panel in the view header.
Nest Items to Create Hierarchies
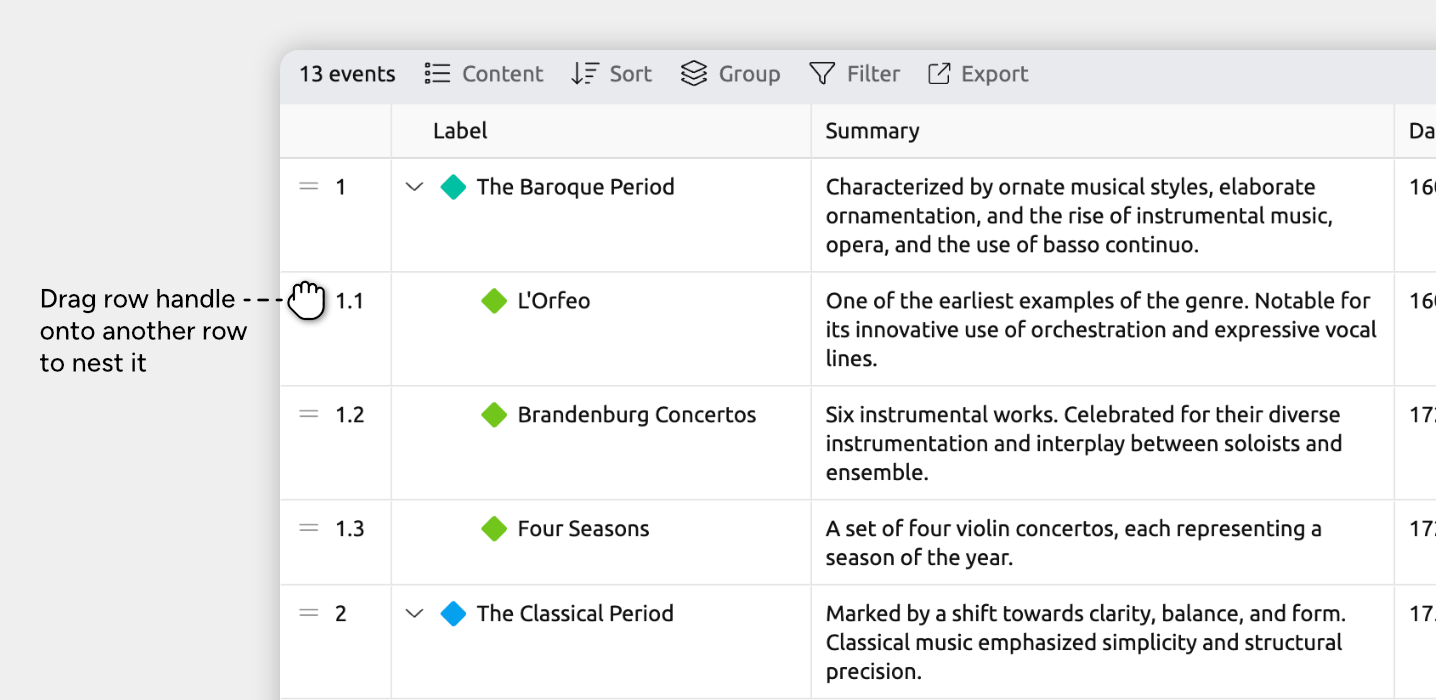
Nest events under a parent to break larger events into smaller, detailed sub-events, like battles in a war or subtasks in a task.
To nest items within the spreadsheet, click and hold a row’s leftmost gutter cell (with the drag handle), then drag the row into another.
Note for iOS: Long-press to enter Edit mode, then drag a gutter cell.
Note for narrative views: If you’re using a spreadsheet view set to show the narrative (shown by the Narrative label in the view header), dragging to nest items changes their narrative structure, not their timeline hierarchy. Learn more about the narrative →
Shortcuts and Quick Actions
Jump to the First or Last Row or Column
Quickly move to the edges of the table.
- Hold Cmd (Mac) or Ctrl (Windows).
- Press the arrow keys to jump to the first or last row or column in that direction.
Select Multiple Events or Items
Select more than one row so you can work with several items at once.
- Hold Cmd (Mac) or Ctrl (Windows) and click the rows’ leftmost gutter cells one by one, or
- Hold Shift and click two row gutter cells to select the range between them.
When multiple events or items are selected, you can change dropdown values in the table for all of them at once, or edit their details together in the inspector.
Note for iOS: Long-press to enter Edit mode, then tap the leftmost gutter cells for the rows you want to select.
Select Multiple Cells
- Click to focus a cell.
- Hold Shift, then:
- Use the arrow keys to grow the selection, or
- Click another cell to select the range between them.
You can then copy from or paste into all selected cells at once.
Where to Next?
Customize Item Types
Use item types to organize your timeline into meaningful categories like Events, People, Places, or Tasks. Learn how to create and customize item types, and choose what details they track.
Connect Events, People, and More
Learn how to use relationships to connect events, tasks, people, and other items.
Try Aeon Timeline free for 14 days
Get Aeon Timeline and easily visualize and organize your project.