Compare Timelines
Some of the most useful insights come from seeing timelines next to each other, not just on their own.
Aeon Timeline makes it easy to compare what’s happening across different people, story arcs, teams, or projects.
Depending on what you want to compare, you can use grouping, split views, or the Subway view to see timelines side by side and understand how they line up over time.
Compare with Grouping
Why Use Grouping
Grouping splits your timeline into separate rows, making it easier to see related items in their own sections.
It organizes those sections based on a category of information you choose—such as color or related items—so similar events and items are shown together. This makes it easier to follow what’s happening across different parts of your timeline at the same time.

Grouping works well when you want to:
- See how different parts of your timeline run alongside each other
For example, grouping by story arc or project to see how different aspects of your timeline progress over the same time period. - Understand responsibility at a glance
For example, grouping by character or team to quickly see who is involved in what at any point in time. - Compare activity and spot patterns or gaps
For example, grouping events by legal issues or historical themes to see where information clusters and where details may be missing.
How to Group the Timeline
See Categorize and Group Events and Items to see the different ways you can group, and how to apply it.
Compare with Split Views
Why Use Split Views
Split views let you see two views of the same project at the same time, either side by side or stacked vertically. Each view can be set up and scrolled independently.
Split views work well when you want to:
- Fully customize what each view shows
For example, filtering one pane to focus on specific events, people, or themes while keeping a broader, unfiltered view visible for context. - Compare different timescales or points in time
For example, zooming one pane out to see long-term trends while using the other to examine a short, detailed window of time. - Compare different parts of a long timeline
Because each view scrolls independently, you can view different sections of the same timeline at once.
Each side of a split view is independent, so you can use different views, grouping, filters, and zoom levels in each pane.
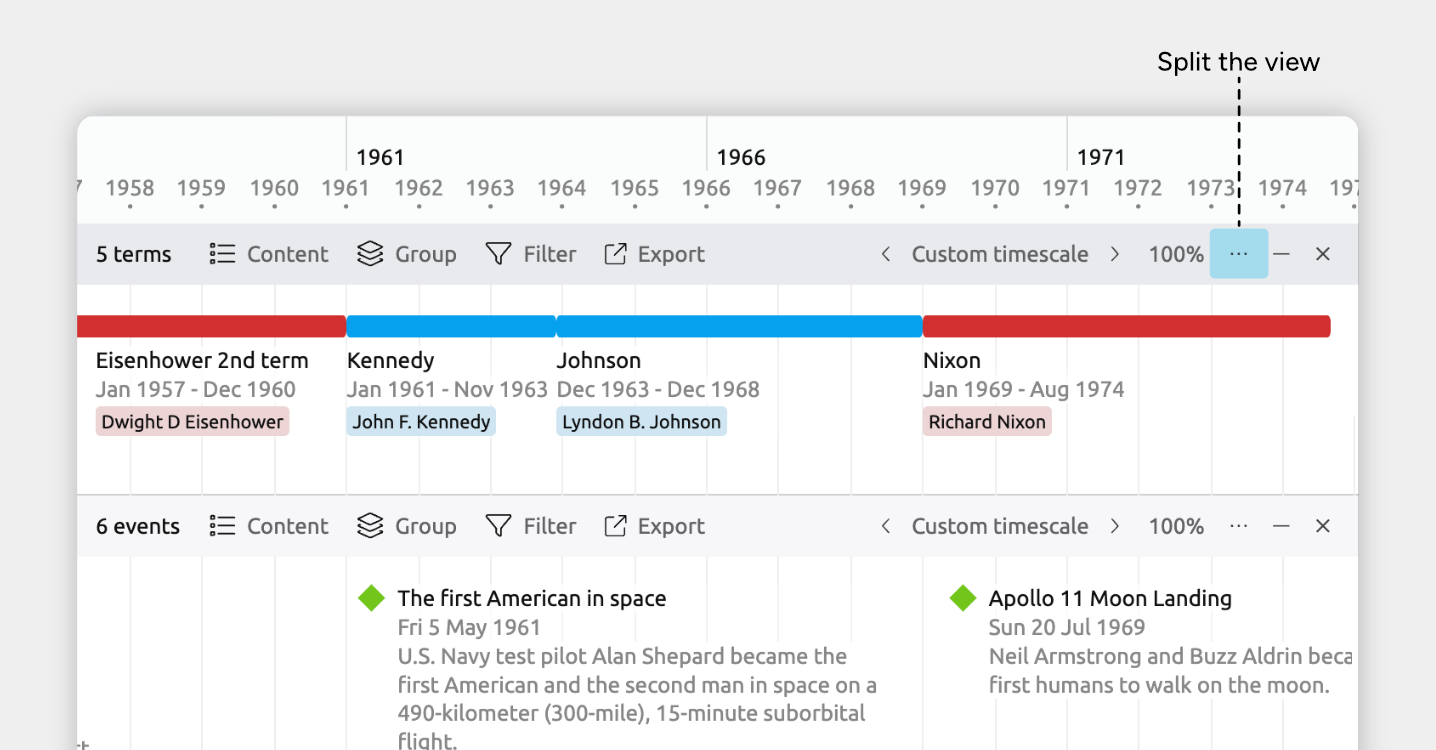
How to Split the Timeline
- Select or create a tab set to the Timeline view.
- Click the … button at the right of the view header.
- Choose Split view and select a Horizontal Timeline view.
You’ll now see two timelines stacked on top of each other, each with their own header and controls.
You can set each view’s Content or Filter options to choose the events or items you want to compare.
Learn more about split views →
Scroll Split Views Separately or Together
You can set your split timelines to either scroll horizontally together, or separately. If separated, you can also independently change the timescale of each view.
- Select or create a tab set to a split Timeline view.
- Click the … button at the right of the view header.
- Open the Stacked views panel.
- Choose to either Scroll separately or Scroll together.
Compare with the Subway View
Why Use the Subway View
The Subway view is designed for comparing timelines that run in parallel and connect through shared people, characters, or items. It’s especially useful when events involve multiple related participants and you want to see how those connections play out over time.
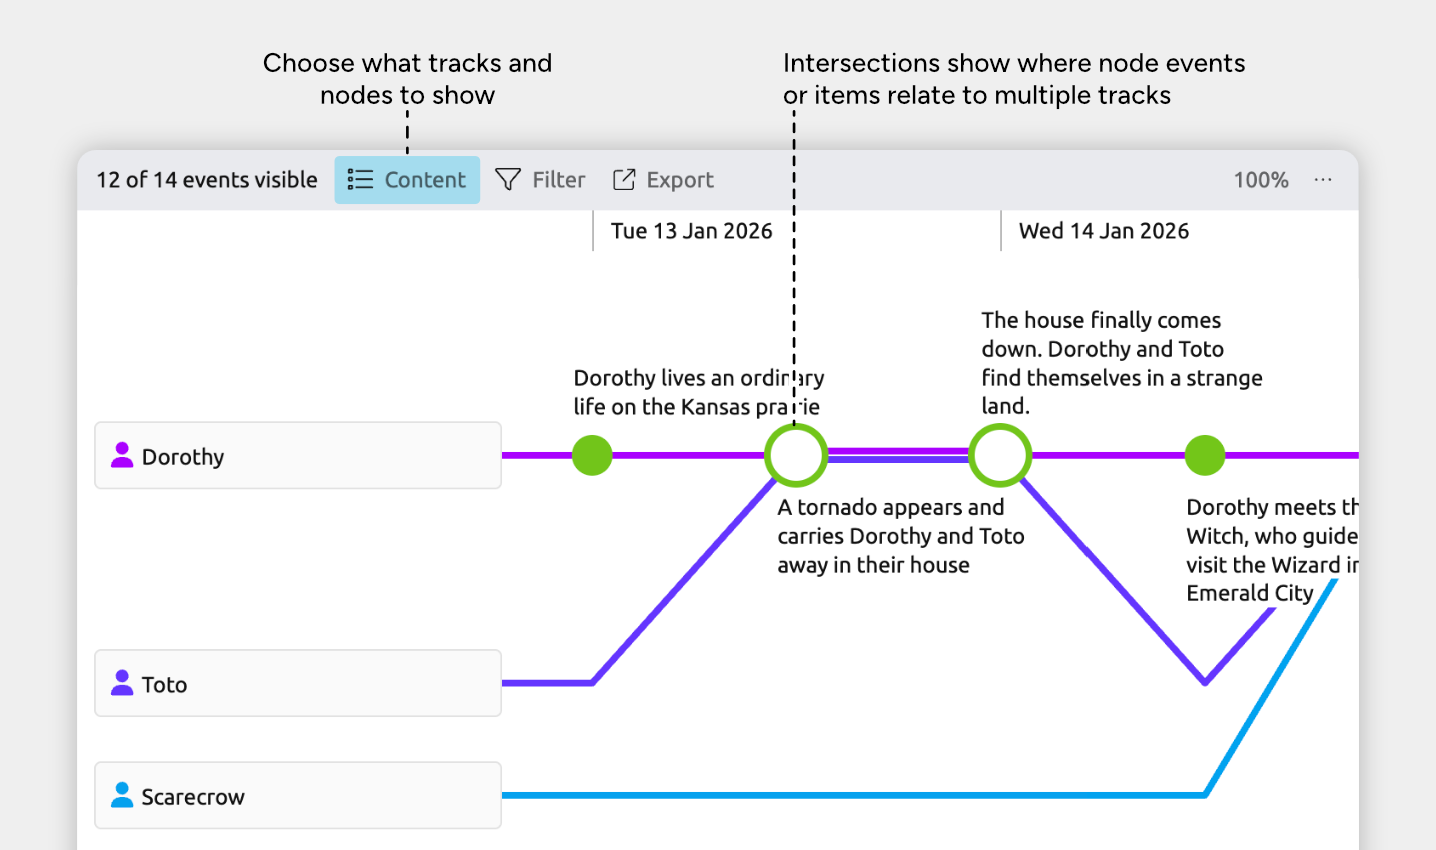
The Subway view works well when you want to:
- See where timelines connect through shared events
For example, see how multiple characters appear in the same event, then continue on their own paths afterward. - Track parallel activity across related items
Each line represents its own timeline—such as a character, person, or story arc—making it easy to see what each one is doing at the same time. - Work with a flattened view of events
The Subway view shows events and items in strict chronological order, without nesting or hierarchy. This can make it easier to focus on the strict sequence of events.
Each line represents one character, person, story arc, or item of your choice and the events they’re involved in. You can set the view to show events that involve multiple lines as connections between them.
Create a Subway View
- Create a new tab and choose Subway View as the view type.
- Open the Content panel in the view header
- In the Content panel, choose:
- Which items form the tracks
For example, Story Arcs or People - Which items appear as nodes along each track
For example, Events or Tasks
- Which items form the tracks
Once configured, the view automatically lays out events, items, and their connections based on dates and relationships.
Show Shared Relationships as Connections
- Select or create a tab set to the Subway view.
- Open the Content panel in the view header.
- Open the Layout section.
- Choose one of the following options:
- Subway: Shows shared relationships as connections between tracks.
- Separate: Shows each track as its own straight line, and does not visualize connections to other tracks.
Learn more about the Subway view →
Where to Next?
Customize Item Types
Use item types to organize your timeline into meaningful categories like Events, People, Places, or Tasks. Learn how to create and customize item types, and choose what details they track.
Connect Events, People, and More
Learn how to use relationships to connect events, tasks, people, and other items.
Try Aeon Timeline free for 14 days
Get Aeon Timeline and easily visualize and organize your project.