Sync with Scrivener
Syncing lets you keep your writing in Scrivener, while using Aeon Timeline to organize and track what happens in your story.
Scrivener syncing is available on Mac and Windows, and not available on iOS.
How Syncing Works
When you sync with Scrivener, Aeon Timeline links a folder in your Scrivener project to your timeline.

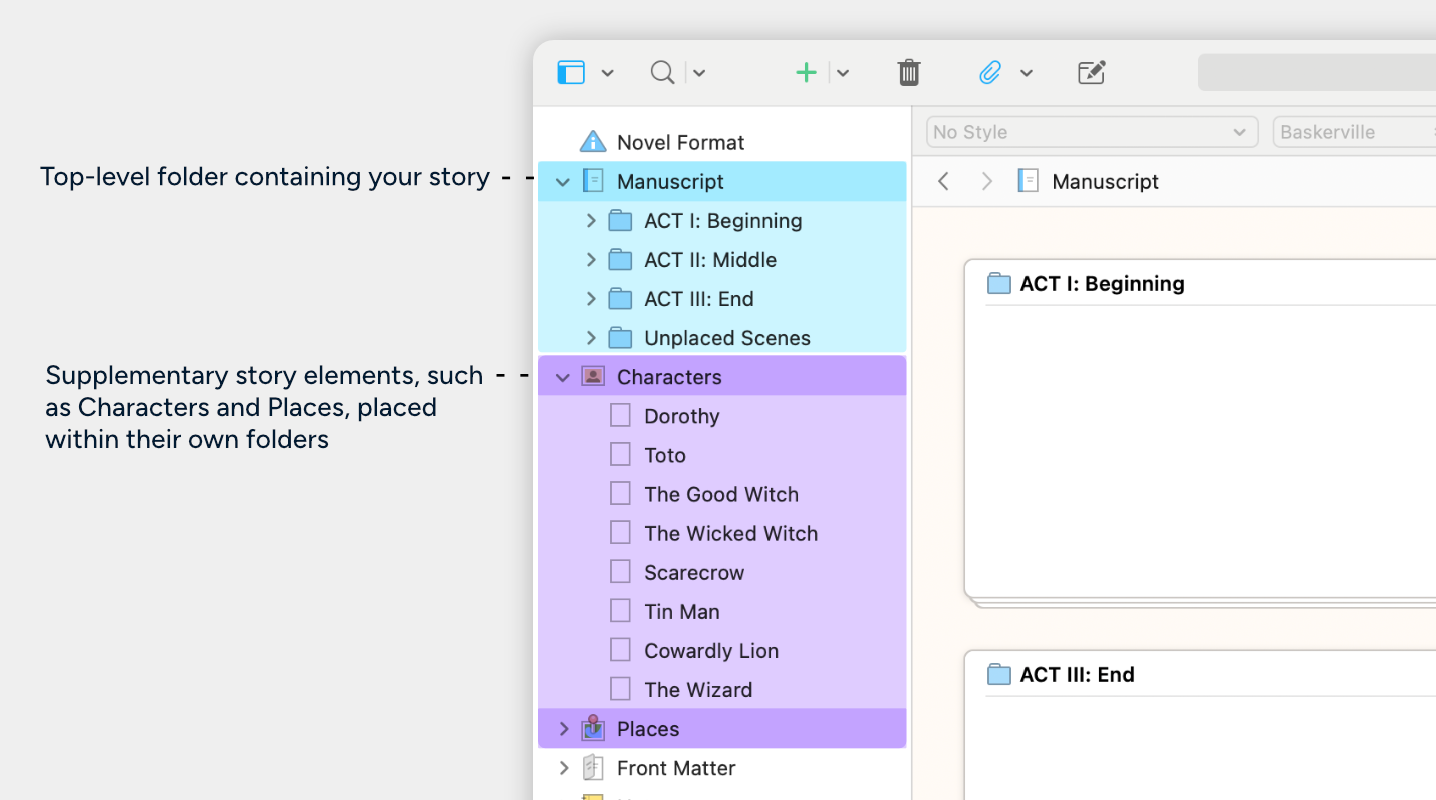
- In Scrivener, your story's documents live in one main folder
In order to sync successfully, you need to choose one folder in your Scrivener project where the documents that make up your story live. This is usually a top-level folder like Manuscript or Draft. - Each Scrivener document becomes an event in Aeon Timeline
When you sync, Aeon Timeline creates a matching event for each Scrivener document in that folder.
You can also use subfolders to organize your story, such as into acts or chapters. These subfolders are also synced to Aeon Timeline. - Aeon Timeline mirrors your document structure in the narrative
Aeon Timeline also mirrors the structure and order of that folder in the narrative. This gives you a space to manage your story order within Aeon Timeline.
Learn more about the narrative → - Use Aeon Timeline to organize and explore your story
You can then build a timeline, or connect characters and story arcs to your events. Any information you add can be synced back to Scrivener.
What gets synced
- Each document maps to an event
Each document in your top-level Scrivener folder becomes an event in Aeon Timeline. - You choose what fields to sync
You can choose exactly what information is synced for your documents. Typically, at least the document title is synced. You can also include the synopsis, status, color, or any custom metadata fields you’ve set up. - The main text stays in Scrivener
Syncing doesn’t touch the body of your writing. Only the fields you choose are synced. - You can optionally sync characters, locations, and more
In addition to your main story, you can track the characters, locations, or other elements involved in your story's events, or keep reference documents on them, and keep these in sync.
Set Up Syncing
You can set up syncing at any point, whether you’ve already started writing in Scrivener and are new to Aeon Timeline, or you’ve built out a timeline and haven’t yet begun writing.
Prepare Your Scrivener Project
If you already have a Scrivener project, follow the steps below to organize it for syncing.
Otherwise if you’re starting fresh, you’ll first need to create a new Scrivener project.
Organize an Existing Scrivener Project
When syncing an existing Scrivener project, take a moment to organize the folders in the binder to put your story content in the right place, and relocate any documents you don’t want to sync with your timeline.
- Put your story documents inside the top-level folder
This is usually named Manuscript, Draft, or Script. Aeon Timeline syncs only the content inside this folder. You can have subfolders within this folder that organize your story, such as into acts or chapters. - Move other content to separate folders
Notes, research, characters, and locations should be stored outside your story folder. You can optionally also sync this additional content. - Structure your story’s documents as separate scenes
Aeon Timeline creates an event for each document in Scrivener. Structuring your project so that each document represents a single scene will help you build a more useful and detailed timeline. - Give each document a clear, unique title
Use clear and specific names for your documents. A title like “Scene 5” can be hard to recognize when setting up syncing, but “Coffee Date in Paris” is much easier to recognize.
Or, Create a New Scrivener Project
If you don’t already have a Scrivener project, you’ll need to create one:
- In Scrivener, go to File > New Project.
- Choose any template.
- Name and save your project.
You’ll need to locate this file during setup, so give it a clear name and save it somewhere easy to find. - Optional: Scrivener may include example documents and folders when you start. You can delete these if you don’t want them synced to Aeon timeline.
New Scrivener projects include a top-level folder—usually called Manuscript, Draft, or Script—where your main story content goes. This is the folder Aeon Timeline connects to when syncing.
Connect Your Scrivener Project
Now that your Scrivener project is ready, you can connect it to your timeline.
Open the Sync Sidebar Panel
The sync sidebar panel is where you’ll manage your sync setup and all synced documents.

If you don’t see the sync icon in the sidebar, click the … button to enable it.
Choose Your Scrivener Project
In the sync sidebar panel:
- Click Set Up Syncing.
The sync settings window will open to the Select Sync Application page.
You can also click the options icon at the top of the panel to return to the settings at any time. - Choose Scrivener as your sync application.
- Browse to find your Scrivener project file, then click Open.
You’ll then be taken to the Select Sync Folders screen to continue setup.
Choose Your Story Folder
Now you’ll choose which folder in your Scrivener project contains your main story content.
On the Select Sync Folders screen:
- Use the Narrative Folder dropdown to select the folder that contains your story’s documents.
- This is usually a top-level folder like Manuscript, Draft, or Script.
- If your story is in a different folder, you can select that instead.
- Leave the Additional Folders section blank for now. You can optionally configure this in a later step.
- Click Next.
You’ll then be taken to the Sync Fields screen to continue setup.
Choose What Fields to Sync
Now you’ll choose what information is synced for your documents.
You can update these settings at any time, so there’s no need to configure everything up front. If you’re syncing for the first time, it’s usually simplest to start with just the essentials, like the document title, then add more fields later as your workflow evolves.
On the Sync Fields screen:
- By default, Label in Aeon Timeline maps to Title in Scrivener. It is recommended to leave this selected so your document names come through correctly.
- Use the rows to choose any additional fields that you want to sync. Common settings include:
- Summary in Aeon Timeline → Synopsis in Scrivener
- Color in Aeon Timeline → Label (color) in Scrivener
- Dates in Aeon Timeline → Custom metadata in Scrivener
- Selecting Create New will create a new metadata field in Scrivener when you run the sync.
- You can alternatively map dates to an existing metadata field.
Learn about metadata fields for dates →
Note: Tags in Aeon Timeline always maps to Keywords in Scrivener. This happens automatically and doesn’t need to be set.
Looking to sync additional fields? See all fields that can be synced →
- Click Next. You’ll then be taken to the Sync Relationships screen to continue setup.
Sync Characters, Locations, and Other Story Elements
In addition to tracking your story’s events, Aeon Timeline can optionally also help you manage other story elements, such as characters or locations.
You can:
- Connect characters, locations, and other elements them to your story's events, and then sync these to Scrivener.
To do this, see Sync Relationships → - Keep folders of character sheets or other reference documents in Scrivener, and sync these across to Aeon Timeline.
To do this, see Sync Additional Folders →
Sync Relationships
Use this option if you want to track (and sync) which characters, locations, or other story elements are involved in each event. For example, you can track:
- Which characters appear in an event, or
- Which locations an event takes place in.
In Aeon Timeline, these connections are called relationships. To learn more about relationships, see Connect Events, People, and More →
When syncing, relationships can be synced to Scrivener as either Keywords or Custom metadata.
Keywords vs Custom Metadata
Scrivener’s keywords are useful for simple tagging, but they can be harder to organize when you’re tracking multiple types of story elements. All synced items for an event will be added to a single keyword list.
Scrivener’s custom metadata lets you sync each relationship type to a separate field — for example, one field for Characters, another for Locations, and so on. This works well if you want clearer organization.

Set Up Relationship Syncing
On the Sync Relationships screen:
- Under Map relationships to, select either Keywords or Custom Metadata.
If using keywords:
- Under Item Types to Sync to Keywords, use the checkboxes to choose which item types will sync as Scrivener keywords when they’re related to a synced event or document.
Or if using custom metadata:
- Under Relationship Types to Sync to Custom Metadata, use the rows to choose which relationship types will sync to Scrivener as custom metadata when they’re added to a synced event or document.
- In the Scrivener Field dropdowns, choose either:
- Create New to create new metadata fields in Scrivener when you run the sync, or
- Select an existing field that’s already set up in your Scrivener project. Learn more about metadata fields requirements →
Sync Additional Folders
If you keep reference materials such as character sheets in Scrivener, you can sync those folders with Aeon Timeline.
Each additional synced Scrivener folder maps to an item type in Aeon Timeline. For example, if you sync a folder of character documents, each document in that folder can become a Character item in Aeon Timeline.
To customize what item types are available in your file, such as Characters or Locations, see Customize Item Types →
Note: The order of items in an additional synced folder is not kept in sync with the order of documents in Scrivener. The two remain independent of each other — reordering documents in an additional synced folder in Scrivener won't reorder the matching items in Aeon Timeline, and vice versa.
Set Up Folder Syncing
- Without closing the sync settings window, click the Back button at the bottom to go back to the Select Sync Folders screen.
Going back will not reset the settings you have configured.
On the Select Sync Folders screen:
- Under Additional Folders, click the + Add Folder button.
- Choose the Scrivener folder containing the documents you want to sync.
- Under the Timeline Item Type dropdown in the same row, select the Aeon Timeline item type to map the selected folder to.
Note: Only item types that aren’t set to be allowed in the narrative can be selected. This is because documents in Scrivener can only belong to one folder. Learn more about item type settings → - Under the Structure option, select either:
- Flat List: Best if you're syncing a simple folder of documents with no subfolders.
- Nested Items: Best if the folder contains subfolders, and you want to preserve that structure in Aeon Timeline.
Documents and folders can be set to the same or different item types.
Set them to the same item type if your entire structure is made up of the same kind of thing. For example, if you’re syncing nested locations, you can set:
- Folder = Location
- Document = Location
Or, set them to different item types if folders are only used to organize groups of items, and the documents contain the real information. For example, if you’re syncing characters grouped into folders, you can set:
- Folder = Character Group
- Document = Character
You can also customize each level of nesting if you have deeply nested documents.
Save Your Settings
- At the bottom right of the sync settings window, use the Next button to move through each screen, until it changes into an OK button.
- Click OK. Your settings will be saved and the sync settings window will close. Nothing will be synced yet.
Review and Customize Before Syncing
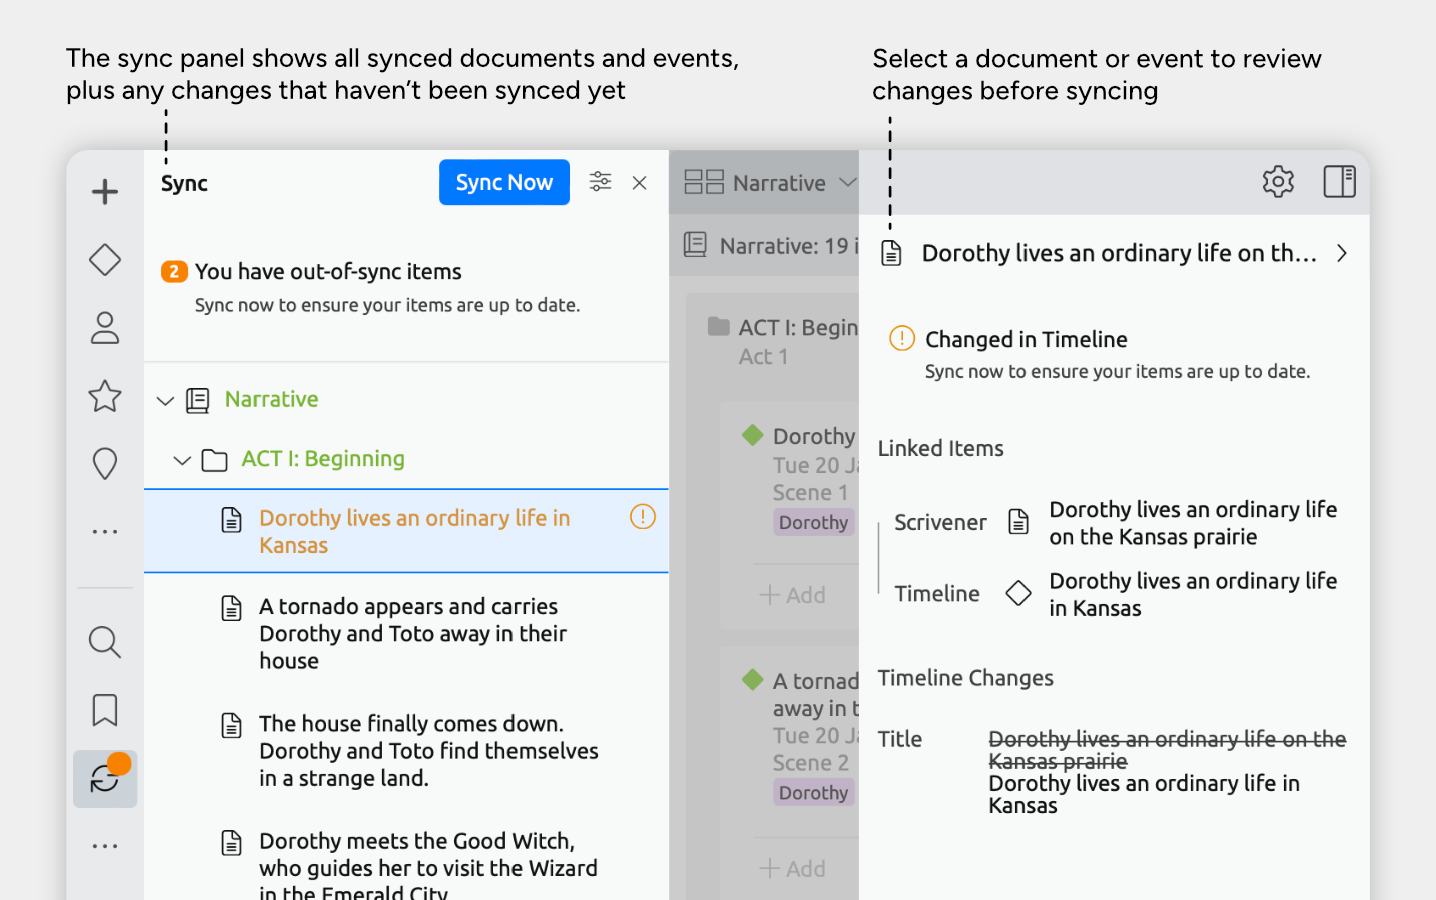
Once you've saved your settings, the sync panel will update to show a preview of what will happen when you run the sync.
Before you run your first sync, you can review what Aeon Timeline is about to create, update, move, or remove in both apps.
Reviewing and customizing your sync is especially important if:
- You already have matching events and documents in both apps
For example, you created events in Aeon Timeline and already wrote corresponding documents in Scrivener.
You’ll need to Match Documents and Events that Exist in Both Apps → - Some Scrivener documents shouldn’t sync to Aeon Timeline
For example, notes, drafts, or folders you want to keep Scrivener-only.
You’ll need to Keep Documents in Scrivener That Don't Sync →
Additionally, if you’re syncing folders of characters, locations, or other reference material, it’s a good idea to review the folder structure in the sync panel before running your first sync, especially if your Scrivener project uses nested folders.
- In the sync panel, find the folder for your reference material.
- Click the arrow next to the folder to expand it and show its documents and subfolders.
- Check that the documents and folders are nested the way you expect.
A good way to confirm this is to compare the structure shown in the sync panel with the structure in your Scrivener Binder. - If anything is missing or nested incorrectly, adjust your sync settings before running the sync.
Backup Your Files
We recommend creating manual backups of both your timeline and your Scrivener project before your first sync, or before making major settings or structural changes.
This gives you a fallback in case some documents and events aren’t matched correctly, or sync settings aren’t configured as expected, helping you avoid duplicates, incorrect nesting, or other unintended changes.
Run the Sync
You’re all set! Now it’s time to sync your timeline with Scrivener.
- Click Sync Now at the top of the sync panel.
- If Scrivener is currently open, it will automatically close and reopen so any updates can be applied.
Once your Scrivener project and Aeon Timeline file are linked, you can work in either app. Any edits you make to synced fields will be detected, and you can sync again at any time to keep both files up to date.
Stay in Sync
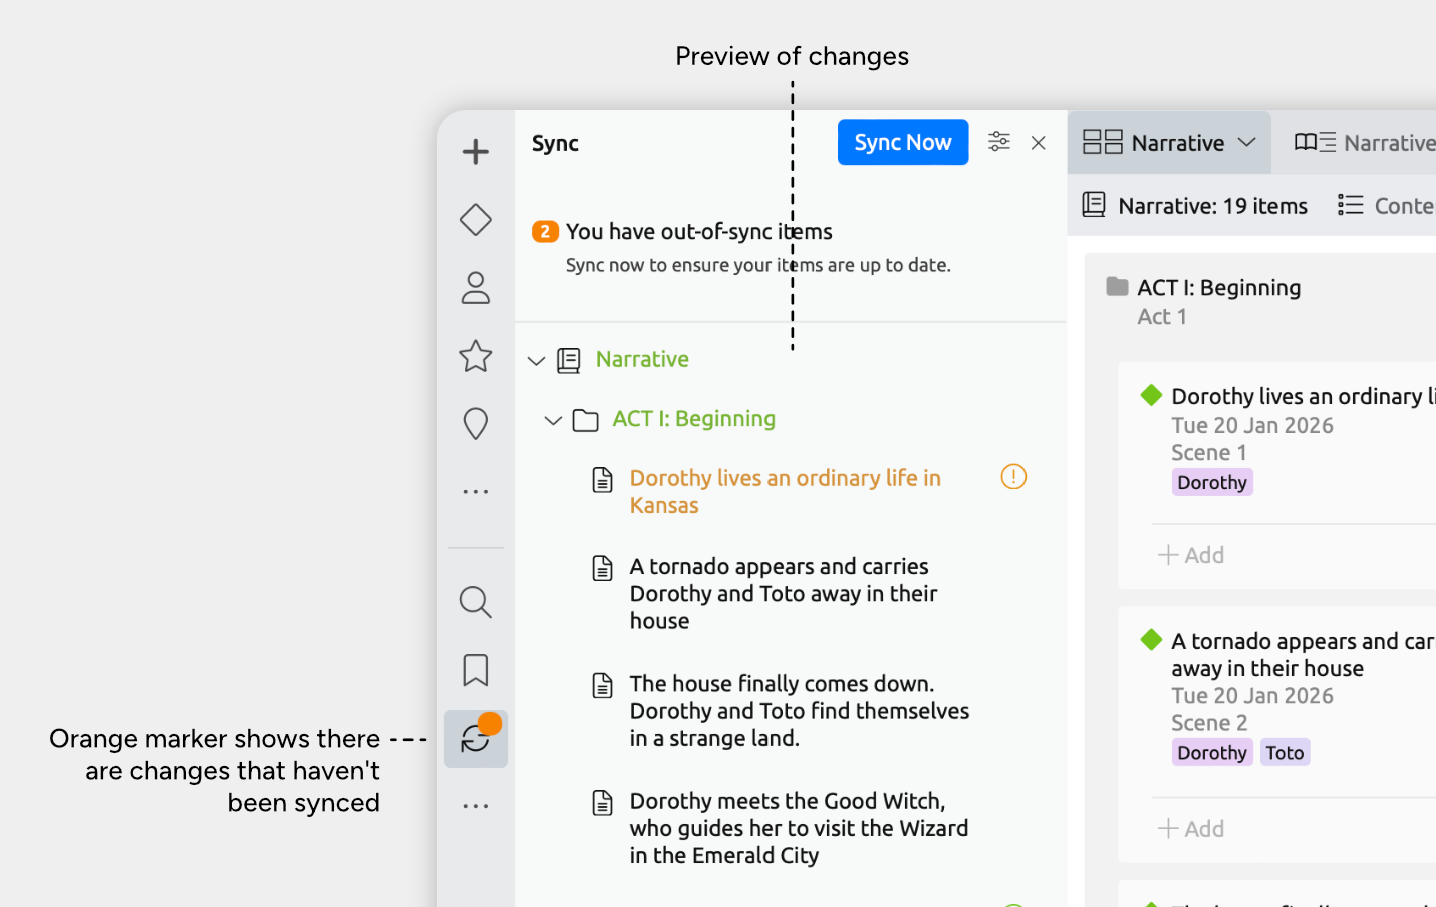
Aeon Timeline shows an orange marker on the sidebar sync icon when it detects changes to synced fields in either app.
To keep things simple, sync regularly as you work. This helps avoid a pile-up of changes and makes review easier.
Ideal times to sync include:
- Before switching between Aeon Timeline and Scrivener.
- After outlining or drafting a section of your story.
- After making structural changes like reordering documents in your narrative.
You can also click the options icon at the top of the sync panel to adjust your sync settings at any time.
Review, Customize, and Troubleshoot
Before you run each sync, it's recommended to check the sync preview is as you expect.
Using the Sync Preview
The sync panel highlights updates that are waiting to be synced. Colored text and icons indicate there are changes that can be synced.
In general:
- Green: Something new has been added. Syncing will create it in the other app.
- Orange: Something changed, moved, or removed. Syncing will update, move, or remove it in the other app.
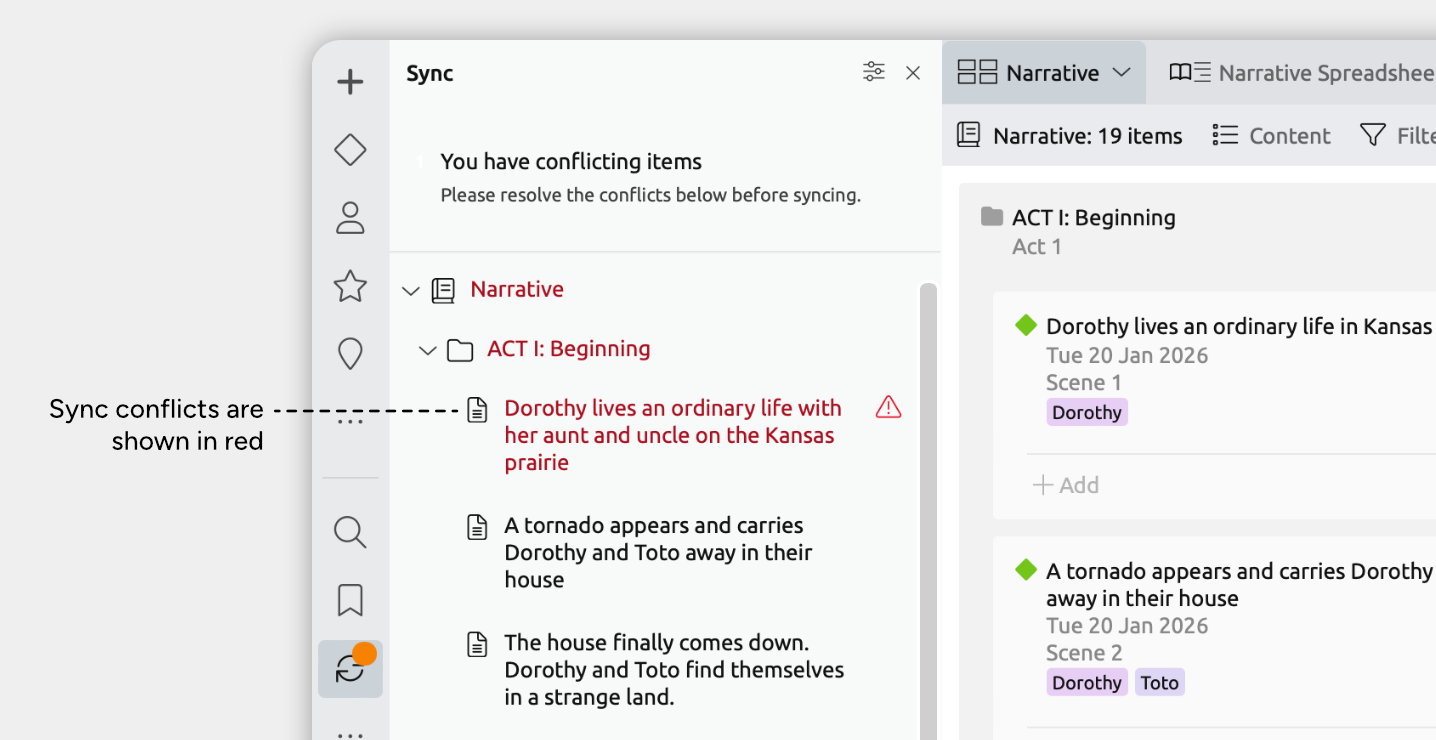
- Red: A conflict needs your attention before you can sync.
When you select an event or document in the sync panel, the inspector shows what has changed, and what app the change was made in.
For a full breakdown of what each status means and what will happen when you sync) see Reference: Sync Preview Messages →
You’ll need to customize how things will sync if:
- You changed the same field in both apps
For example, you renamed the linked event and document in both Aeon Timeline and Scrivener.
See Resolve Conflicts → - You added the same scene or item in both apps
For example, you created both a Scrivener document and an Aeon Timeline event that represent the same scene.
See Match Documents and Events That Exist in Both Apps → - You have Scrivener documents that shouldn’t sync to Aeon Timeline
For example, notes, drafts, or folders you want to keep only in Scrivener.
See Keep Documents in Scrivener That Don't Sync →
We recommend following those steps to ensure you don't unintentionally duplicate or trash documents in Scrivener as you work. If this has already happened, you can troubleshoot using the steps below.
- If you created both a Scrivener document and an Aeon Timeline event for the same scene and didn’t match them before syncing, syncing will treat them as two separate scenes and create both in the other app — resulting in two events for the same scene.
See Fix Duplicate Events → - If you remove an event or folder from the narrative in Aeon Timeline and don't set the sync to keep it in Scrivener, the linked Scrivener document will be moved to Scrivener’s Trash. If this isn't what you intended, you can restore it and set the sync to keep it in Scrivener.
See Restore Trashed Scrivener Documents →
Resolve Conflicts
A sync conflict happens when you change the same field for the same item in both apps — for example, changing an event’s label in Aeon Timeline, then changing the matching document title in Scrivener to something different.
When there's a conflict:
- You’ll see a warning message at the top of the sync panel.
- The affected document will show a red exclamation mark in the sync panel.
- You won't be able to sync until all conflicts are resolved.
To resolve a conflict:
- In the sync panel, select a conflicted synced item with a red exclamation mark.
- In the inspector, Aeon Timeline will show what changed in each app.
- For each conflicting field, choose which version to keep by selecting either Use from Timeline or Use From Scrivener.
Match Documents and Events That Exist in Both Apps
The first time a document or event is synced, Aeon Timeline assumes that it is new.
That means:
- Documents in Scrivener will be treated as needing new events created in Aeon Timeline, and
- Events in Aeon Timeline will be treated as needing new documents created in Scrivener.
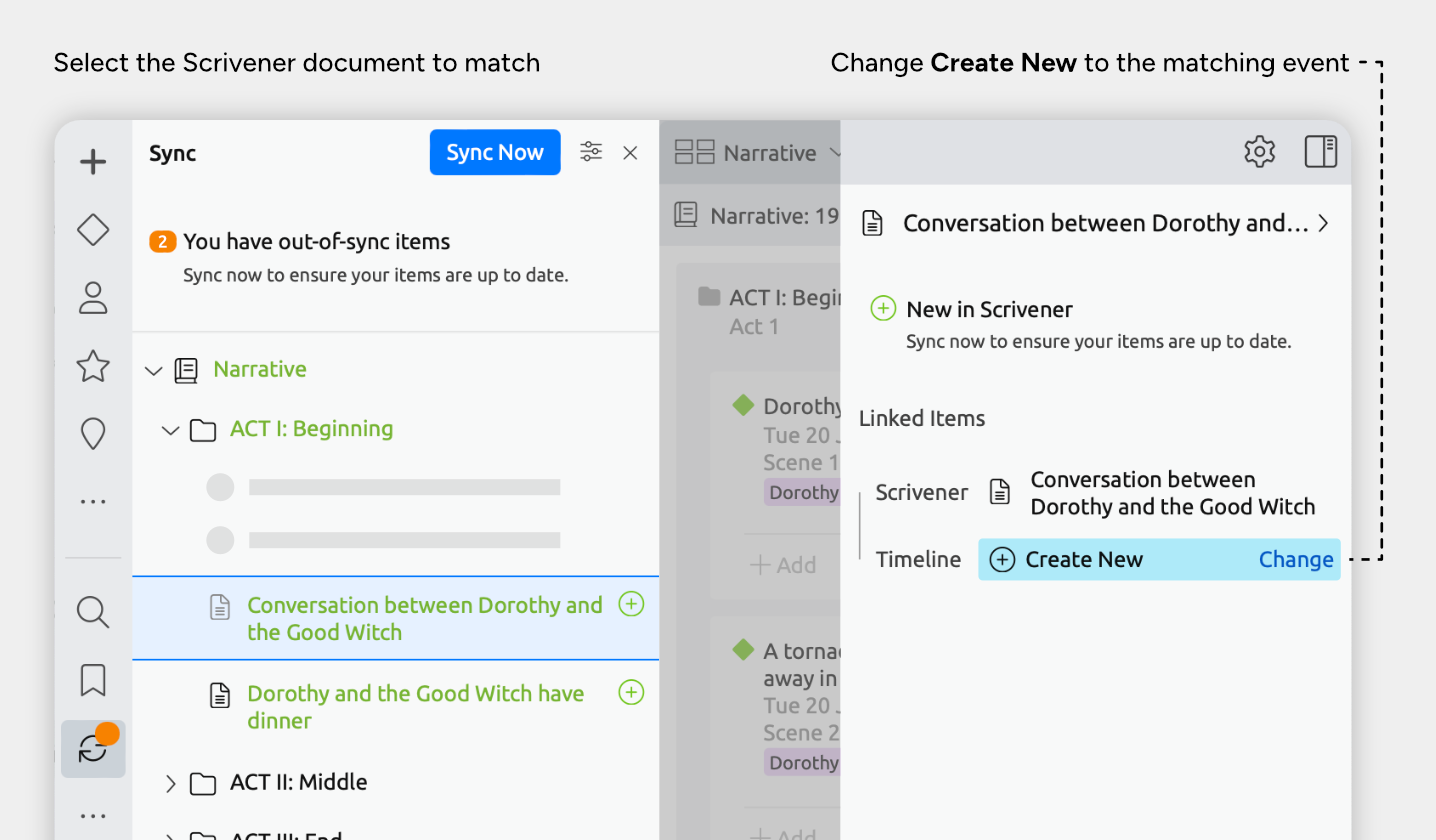
If you’ve already created both a Scrivener document and an Aeon Timeline event for the same part of your story, you’ll need to match them so they sync as one linked pair.
- In the sync panel, select the Scrivener document you want to match.
- In the inspector, next to Create New, click Change.
- Choose the existing Aeon Timeline event that matches this Scrivener document.
- If the Scrivener document and Aeon Timeline event have different titles or other sync fields, you’ll see a conflict message. Choose Use from Scrivener or Use from Timeline to keep the version you prefer.
Keep Documents in Scrivener That Don't Sync
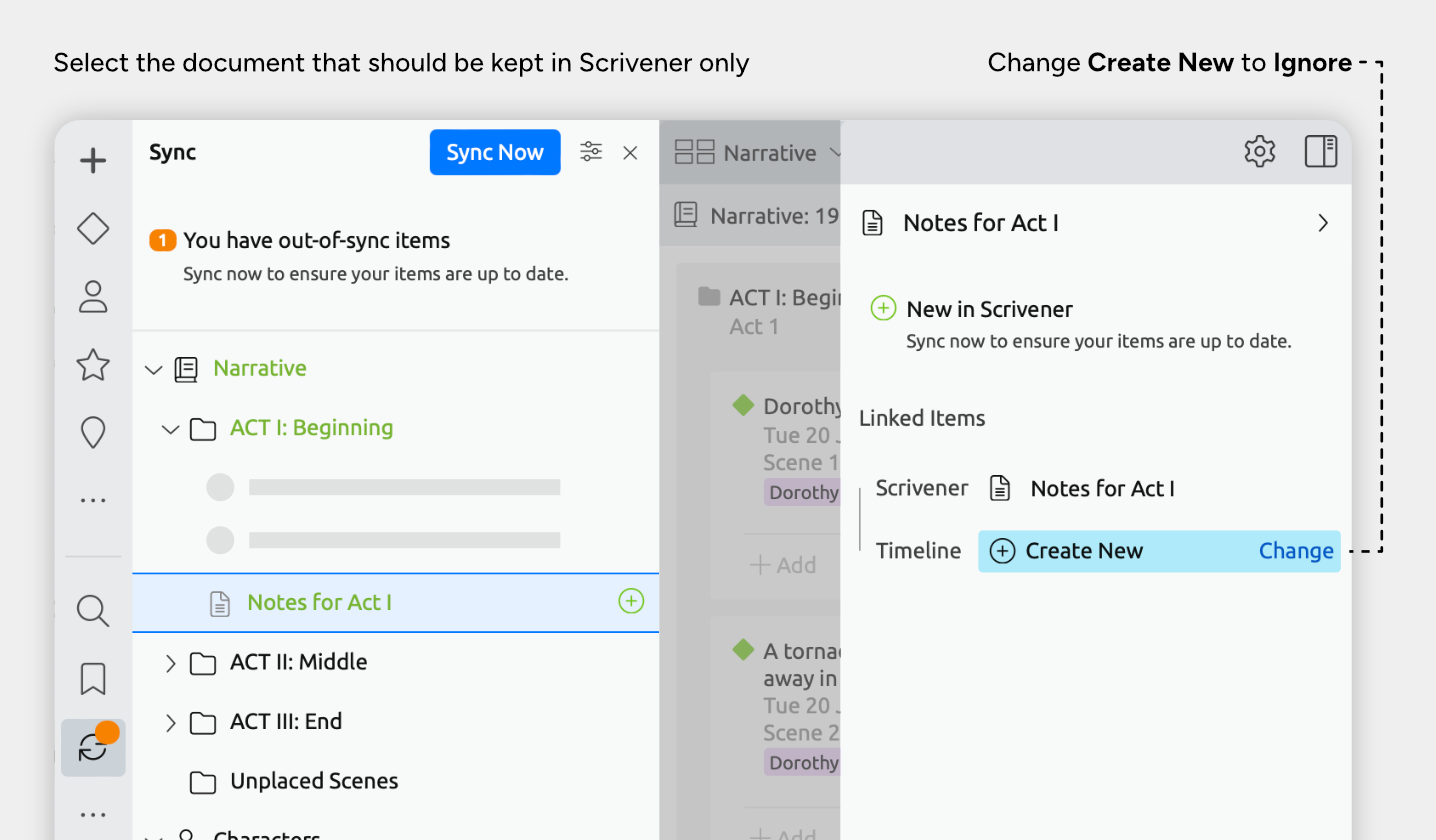
If there are Scrivener documents you don’t want to be brought over into Aeon Timeline as events, you can mark them to be ignored.
Ignore a Document That Hasn’t Been Synced Yet
- In the sync panel, select the Scrivener document you want to ignore.
- In the inspector, next to Create New, click Change.
- Choose Ignore.
Ignore a Document That Has Already Been Synced
- In Aeon Timeline, select the document's matching event:
- Click the event in any view, or
- Select the matching document in the sync panel, then in the inspector click the event under Aeon Timeline.
- Delete the event.
- In the sync panel, select the matching document.
- In the inspector, next to Delete, click Change.
- Choose Ignore.

Fix Duplicate Events
Duplicated items usually happens when both the Scrivener project and timeline file start with documents and events that represented the same scene, but they were not linked before syncing.
To fix duplicates, you’ll choose a version of the event to keep, and remove the rest.
- Check for synced duplicates
In the sync panel in Aeon Timeline, check through the synced documents/events and identify if there are any duplicates.
If there are duplicates in Scrivener, check these documents and note which, if any, contains your main body of writing. - Check for additional duplicates
In Aeon Timeline, use the search sidebar panel or any of your views to check if more duplicates exist. - Decide which version to keep
In most cases, you’ll want to keep the version that’s linked to Scrivener. If there's more than one synced version, you'll most likely want to keep the version that contains your body of writing. - Copy any missing information
In either Scrivener or Aeon Timeline, copy over any information that you want to keep from the duplicate(s) into the version you’re keeping. - Delete the duplicates
Delete the extra documents/events once you’ve confirmed the kept version contains everything you need. - Run a sync
If there were synced duplicates, running a sync should now remove them.
Restore Trashed Scrivener Documents
Only events that appear in Aeon Timeline’s narrative are synced with Scrivener. If you remove an event from the narrative:
- The link to its paired Scrivener document is broken, and
- The next time you sync, the linked Scrivener document is moved to Scrivener’s Trash.
The document is not permanently deleted unless you empty Scrivener’s Trash yourself.
Restore the Document
If the document was trashed by accident, you can restore it by:
- Open Scrivener’s Trash folder.
- Drag the document out of Trash and back into another folder.
Avoid Creating Duplicates After Restoring a Document
If you restore a document from Scrivener’s Trash back into a synced folder, when you next sync Aeon Timeline will treat it as a new document and create a new paired event.
To avoid this, you can either:
- Relink it to the original Aeon Timeline event if you removed that event from the narrative but didn't delete it, or
- Have Aeon Timeline ignore the document so it stays in Scrivener only.
Option A: Relink the Restored Document to the Original Aeon Timeline Event
If the original event still exists in Aeon Timeline, you can relink it with the restored document.
- Open the sync sidebar panel.
- Select the restored Scrivener document. If it has just been restored in Scrivener, it will be shown in green.
- In the inspector, next to Create New, click Change.
- Select the original event from the list.
Option B: Have Aeon Timeline Ignore the Document so it Stays in Scrivener Only
If you want to keep the restored document in Scrivener, but don’t want it to sync back into Aeon Timeline, you can mark it to be ignored. This prevents Aeon Timeline from creating a new event for it during the next sync.
- Open the sync sidebar panel.
- Select the restored Scrivener document. If it has just been restored in Scrivener, it will be shown in green.
- In the inspector, next to Create New, click Change.
- Choose Ignore.
Frequently Asked Questions
Will syncing edit the text in my Scrivener documents?
Syncing doesn’t touch the body of your documents. It can be set to keep your document titles, synopses, labels, and other fields up to date with Aeon Timeline, but it never touches the main writing in your documents.
Does syncing happen automatically?
No. Aeon Timeline automatically helps detect when synced fields have changed, but it won’t sync until you click Sync Now.
Can I undo a sync if something goes wrong?
When you sync, the sync may need to update information across both apps. As such, syncing doesn’t support a one-click undo, and it's best to treat each sync as a save point.
If you need to revert to a previous version, you can:
- Restore a backup of your Aeon Timeline file, or
- Restore a backup of your Scrivener project.
We recommend creating manual backups of both files before your first sync, or major settings or structural changes, in case the sync ends up not being configured as intended.
Can I sync my timeline with more than one Scrivener project?
Not at the same time.
A single Aeon Timeline file is designed to sync with one Scrivener project as its linked writing project. If you want to sync the same timeline to another Scrivener project, you would need to set up a separate Aeon Timeline file, or change the linked Scrivener project (which may require redoing your sync settings, or rematching documents and events).
Can I sync on iPhone or iPad?
No. Due to limitations on iOS, syncing is only available on Mac and Windows.
What version of Scrivener can I sync with?
Aeon Timeline supports syncing with:
- Scrivener 2 and Scrivener 3 on Mac
- Scrivener 1.9 and Scrivener 3 on Windows
Can I turn off syncing?
Yes. To do so, open your sync settings, and choose Remove Current Sync.
Reference: All Fields That Can Be Synced
These are the fields that you can choose to sync between Scrivener documents and Aeon Timeline events:
Aeon Timeline Field
Optionally Sync to Scrivener Field
Label
Document title
Summary
Synopsis
Color
- Label (color), or
- Status, or
- List custom metadata
Start Date
- Date custom metadata with Ignore time zone changes checked, or
- Text custom metadata with wrap text unchecked
End Date
- Date custom metadata with Ignore time zone changes checked, or
- Text custom metadata with wrap text unchecked
Custom single-line text property
Text custom metadata with wrap text unchecked
Custom multiline text property
Text custom metadata with wrap text checked
Custom option list property
- Label (color), or
- Status, or
- List custom metadata
Custom yes/no property
Checkbox custom metadata
Custom number property
Text custom metadata with wrap text unchecked
Relationships
- Keywords, or
- Text custom metadata with wrap text unchecked
And these fields are automatically synced whenever syncing is enabled:
Aeon Timeline Field
Automatically Sync to Scrivener Field
Tags
Keywords
Date vs Text Format for Start and End Dates
Dates can be synced to either Date or Text custom metadata fields.
Whether you use date or text formats in Scrivener affects how Scrivener displays the field, and what kinds of dates it can support.
If you choose to have Aeon Timeline create a new metadata field for you when you sync, the app will try to choose an appropriate option. However, you can customize your metadata settings as needed.
It's best to use a Date metadata field if:
- You want to use Scrivener’s date/time picker, and
- All of your documents can use standard full dates, and
- You don’t need any of the date or calendar features below.
It's best to use a Text metadata field if your project uses:
- Dates with year-only or month-and-year-only precisions (e.g. 2020 or Jan 2020)
- Dates with large timescales (5+ digit years)
- BC dates
- A relative calendar (e.g. Day 1, Week 1, or timestamps only)
- A custom or fantasy calendar
Reference: Sync Preview Messages
When changes have been made since your last sync, the sync panel shows what’s currently different between your synced documents and events.
Colored text and icons indicate items that have changes ready to sync.
When you select an event or document in the sync panel, the inspector will show a message explaining what changed, and which app the change was made in.
Below are the possible sync preview messages and what they mean.
+ New in Narrative
What This Means
You created this event or folder in Aeon Timeline’s Narrative, but it isn't synced to Scrivener yet.
What Will Happen When You Sync
A matching document or folder will be created in Scrivener.
If you don’t want to create a new document:
If a matching document already exists in Scrivener, you can link it instead:
- Select the event or folder in the sync panel.
- In the inspector, next to Scrivener: Create New, click Change.
- Select the matching Scrivener document or folder.
+ New in Scrivener
What this means
You created this document or folder in Scrivener, but it isn't synced to Aeon Timeline yet.
What Will Happen When You Sync
A matching event or folder will be created in Aeon Timeline.
If you don’t want to create a new event:
If a matching event already exists in Aeon Timeline, you can link it instead:
- Select the document or folder in the sync panel.
- In the inspector, next to Timeline: Create New, click Change.
- Select the matching Aeon Timeline event or folder.
Alternatively, if you want to keep the document only in Scrivener and don't want it to sync to Aeon Timeline:
- Select the document or folder in the sync panel.
- In the inspector, next to Timeline: Create New, click Change.
- Choose Ignore.
- Deleted from Narrative
What This Means
This event or folder was deleted or removed from the Narrative in Aeon Timeline, but the matching document or folder still exists in Scrivener.
What Will Happen When You Sync
The linked Scrivener document or folder will be moved to the Trash.
If you don’t want Scrivener to trash it:
If you want to keep the document in its place in Scrivener but still removed the linked event or folder in Aeon Timeline:
- Select the event or folder in the sync panel.
- In the inspector, next to Timeline: Delete, click Change
- Choose Ignore
- Deleted from Scrivener
What This Means
This document or folder was deleted or removed from Scrivener, but the matching event or folder still exists in Aeon Timeline.
What Will Happen When You Sync
- If the event or folder is part of your narrative in Aeon Timeline, deleting it in Scrivener will remove it from the narrative. The item itself will still exist in your Aeon Timeline file, so it may continue to appear on the timeline or in other views.
- If the item lives in an additional synced folder (for example, a folder of character sheets), deleting it in Scrivener and syncing will also delete it from Aeon Timeline.
→ Moved to new position
What This Means
This event or document was moved in one or both apps (for example, into a different folder, or above/below other events or documents). Order is synced for documents in your narrative folder, but not for additional synced folders such as reference material.
What Will Happen When You Sync
Aeon Timeline will update the other app so the linked document and event are in the same place.
If you moved the linked document and event in both apps, its Scrivener position will take precedence.
! Changed in Timeline
What This Means
You changed one or more synced fields for this event or folder in Aeon Timeline (such as the label, summary, or other synced details).
What Will Happen When You Sync
Those changes will be copied into the linked Scrivener document or folder.
! Changed in Scrivener
What This Means
You changed one or more synced fields for this document or folder in Scrivener (such as the document title, synopsis, or other synced details).
What Will Happen When You Sync
Those changes will be copied into the linked Aeon Timeline event or folder.
! Conflict
What This Means
You changed the same synced field(s) for both this Scrivener document or folder and its linked Aeon Timeline event or folder.
What Will Happen When You Sync
Before you can sync, you'll need to:
- Select the document or event in the sync panel.
- In the inspector, Aeon Timeline will show what changed in each app.
- For each conflicting field, choose which version to keep by selecting either Use from Timeline or Use From Scrivener.
Where to Next?
Organize a Separate Story Structure
Learn more about organizing your story using the narrative.
Try Aeon Timeline free for 14 days
Get Aeon Timeline and easily visualize and organize your project.