Add and Customize Dates
Dates and timing are the backbone of any timeline. In Aeon Timeline, you can work with exact calendar dates or flexible relative dates, and layer on additional features to control how those dates are recorded and managed.
With Aeon Timeline, you can:
- Choose the calendar that fits your project
- Control how precise dates are, and how they’re displayed
- Record date ranges, uncertainty, and ongoing events or items
- Use nesting and dependencies to manage more complex timelines
Below we’ll go over the settings that define how dates are handled, then step through how to add, edit, and manage dates as your timeline grows.
Customize Your Calendar
Your calendar settings define how time works in your file and how dates are shown throughout Aeon Timeline. These settings apply across all views, events, and items.
You can decide whether your timeline uses real-world calendar dates, a custom or fantasy calendar, or relative numbering.
Choose How Dates are Formatted and Displayed
Change Between DD/MM and MM/DD
Choose the date format that matches your region or preference.
This setting controls how typed dates are interpreted when you enter them, and how numeric short dates are displayed when your date display is set to use short formats.
- Open Preferences
- On macOS: Go to Aeon Timeline → Settings… in the top menu bar
- On Windows: Go to Tools → Options from the top menu
- Select the Appearance tab.
- Choose an option under Date Format.
This setting applies app-wide and affects all files you work on.
Choose the Date Display Format
You can control how dates are shown throughout the app.
This affects how dates appear in places such as:
- The timeline header (depending on the current timescale zoom)
- Date fields shown in table columns or item cards
- Date fields shown in the inspector when an item is selected
To change the date display format:
- Open Settings.
- Select the Dates tab.
- Under Date Format, choose your preferred:
- Date length
- Time format
- Whether weekday names are shown
Rename Weekdays or Months
You can rename weekdays or months to use abbreviations, alternate names, or a different language for those parts of your calendar.
- Open Settings.
- Select the Dates tab.
- Choose Edit Calendar to open the calendar panel.
- Select the Weekdays or Months tabs.
Choose a weekday or month from the list on the left, then edit its name in the panel on the right
Choose the Level of Date Detail
If you only care about broader dates, such as years or months, and don’t need precise times, Aeon Timeline lets you control how much date detail is used in your file.
Limit the Maximum Date Precision
You can set a maximum level of date precision for your timeline. This defines the most detailed dates that can be entered, while still allowing items to use less precision if needed.
For example, you might allow dates down to months, but not specific days or times.
When this setting is in place:
- Dates can’t be entered with more detail than what you’ve allowed
- Any existing dates in your file that were more precise will be adjusted to match the new limit
- Events and items can still use broader dates, such as years only
To set the maximum date precision:
- Open Settings
- Select the Dates tab
- Using the Maximum Date Precision dropdown, choose the highest level of detail you want to allow:
- Years
- Months
- Days
- Dates with times
Adjust the Timeline’s Timescale
Date precision controls how dates are recorded. The Timeline view’s timescale controls how time is laid out across the timeline canvas. Zooming in or out changes the spacing between items and the time headers, without changing any underlying dates or event data.
Learn more about setting the timescale →
Use Relative Dates like Day 1, Day 2
Aeon Timeline supports two main approaches to tracking time:
- Calendar dates: Dates like 12 March 1942.
- Relative dates: Dates like Day 1, Day 2, etc.
Relative dates can be:
- Day count
Day 1, Day 2, etc.
Times can also be included, such as 5pm Day 1. - Week count
Week 1, Week 2, etc.
You can also use weekdays and times, such as Monday, Week 1, 5:00 pm. - Timestamps
Clock-style times like 00:10:15.
Switch Between Date Styles
You can switch between the different calendar styles any time. Aeon Timeline will automatically convert all existing dates in your file.
To change the date style:
- Open Settings.
- Select the Dates tab.
- Choose an option under Calendar Style.
If you switch from calendar dates to relative dates, you’ll be asked to choose which calendar date should be treated as Day 0, Week 0, or Hour 0.
If you switch from relative dates to calendar dates, you’ll be asked which calendar date the starting point (Day/Week/Hour 0) should map to.
This lets you easily change calendar style without needing to re-enter or adjust your dates.
Create a Custom Calendar
If your project doesn’t follow the standard Gregorian calendar, you can define your own.
Custom calendars can be useful for fictional worlds, academic timelines, or any project that uses its own system for tracking dates.
- Open Settings.
- Select the Dates tab.
- Choose Edit Calendar to open the calendar panel.
From here, you define how dates are measured and displayed throughout the timeline.
Define the Calendar Structure
When creating a custom calendar, you can:
- Set how many months are in a year, and how many days are in each month.
- Rename the months and weekdays (and choose how many of each your calendar has).
- Choose which day the week starts on.
- Set up eras (for example, labels like BC/AD or your own custom ones).
- Choose whether or not to use leap years.
Once saved, the custom calendar is used everywhere dates appear, including date fields, date pickers, and timeline views.
Important Note For Existing Timelines
Custom calendars can only be edited when your timeline does not yet contain dated events or items. This helps prevent existing dates from being reinterpreted unexpectedly.
If you already have dated items, you can:
- Use custom templates to create a new file with your existing settings.
Learn more about exporting → - Update your calendar in that new file.
- Import your existing data into the file with the updated calendar.
Learn more about importing →
Customize the Timeline View
You can zoom the timeline’s timescale in or out at any time, or limit the visible date range to focus on a specific period.
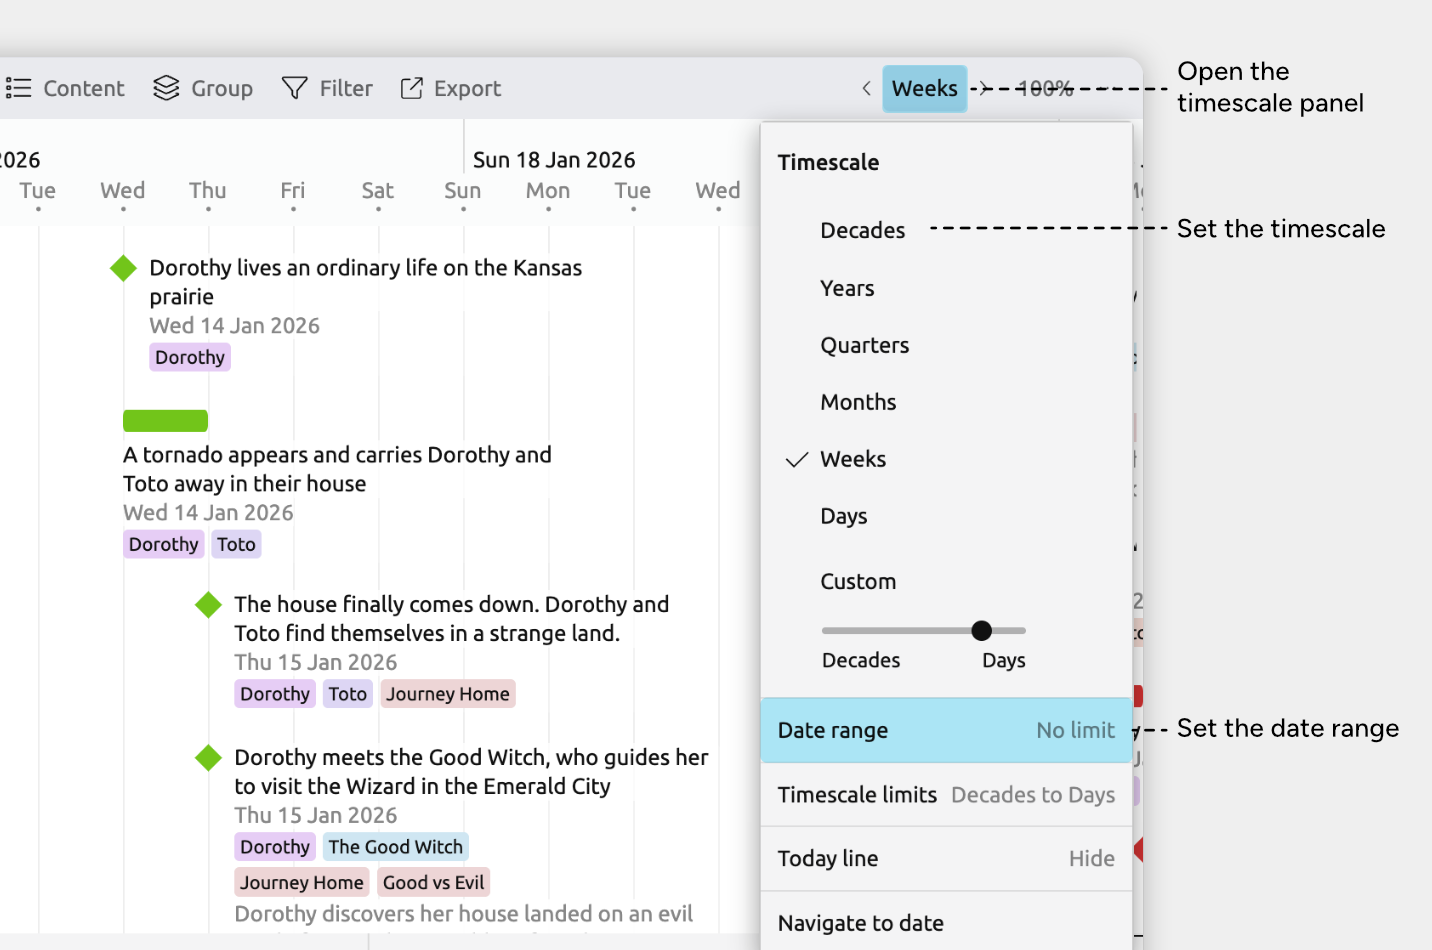
Set the Timescale
To choose a specific timescale:
- Open the Timescale panel in the view header. It’s labelled with the current timescale, such as Years, Months, or Custom Timescale.
- Select one of the preset scales (such as Decades or Years), or adjust the slider under Custom Timescale.
You can also zoom the timeline using scrolling or gestures:
- Hold Cmd (macOS) or Ctrl (Windows) and scroll with the mouse; or
- Use a pinch gesture on a trackpad or touchscreen.
Set Timescale Limits
How far you can zoom in or out is controlled by the timescale limits.
To change these limits:
- Open the Timescale panel in the view header. It’s labelled with the current timescale, such as Years, Months, or Custom Timescale.
- Select Timescale Limits.
- Set the minimum and maximum zoom levels.
This ensures that zooming only allows timescale levels that are appropriate for your work.
Set the Date Range
You can limit the visible date range of the timeline to focus on a specific period.
To set a date range:
- Open the Timescale panel in the view header. It’s labelled with the current timescale, such as Years, Months, or Custom Timescale.
- Select Date Range.
Enter dates in the From and To fields, or clear them to allow the timeline to scroll infinitely.
Set Dates and Durations
Set an Item's Date
Events and items can have their dates set in multiple ways. Below are two common methods: using the timeline and the inspector.
Set a Date in the Timeline View
- Select the event or item.
- Drag it left or right to change its date.
Tip: Hold Shift while dragging to snap to increments (such as 1 hour or 1 day), based on your current timescale zoom.
Set a Date in the Inspector
- Select the event or item.
- In the inspector, find the Dates field.
If it isn’t shown, scroll to the bottom of the inspector and click Add and Edit Fields to add it. - Set the date by either:
- Typing directly into the start or end fields, or
- Clicking the calendar icon and choosing a date from the picker
Dates can be as broad or as precise as you need — from just a year to an exact time. For example:
- 2020
- Jan 2020
- Jan 10 2020 2:15 pm
Set an Item's Duration
Events and items in Aeon Timeline can represent a single moment in time or span a longer period.
Set a Duration in the Timeline View
- Select the event or item.
- Hover over the left or right edge until a resize cursor appears.
- Drag the edge left or right to extend or shorten the duration.
Tip: Hold Shift while dragging to snap to increments (such as 1 hour or 1 day), based on your current timescale zoom.
Set a Duration in the inspector
- Select the event or item.
- In the inspector, find the Dates field.
If it isn’t shown, scroll to the bottom of the inspector and click Add and Edit Fields to add it. - Enter a value in the Duration field.
Durations can be entered using a combination of units, for example:
- 1 year, 2 months
- 3 weeks, 5 days, 2 hours
Choose How Durations Are Counted
You can control whether a duration is measured to the start or the end of the end date.
For example:
- From 2010 to the start of 2020 = 10 years
- From 2010 to the end of 2020 = 11 years
To change how durations are counted:
- Select the event or item
- In the inspector, find the Dates field
If it isn’t shown, scroll to the bottom of the inspector and click Add and Edit Fields to add it - Click More
- Choose an option under Duration counts to
Record Uncertain Dates
Sometimes you don’t know the exact start or end date for an event or item. If you only know the earliest and latest possible dates, you can record the start or end as uncertain and enter a range instead of a single date.
To record an uncertain start or end date:
- Select the event or item.
- In the inspector, find the Dates field.
If it isn’t shown, scroll to the bottom of the inspector and click Add and Edit Fields to add it. - Click More.
- Choose Show uncertain start date or Show uncertain end date.
When enabled:
- An uncertain start date is shown as Earliest start and Latest start fields.
- An uncertain end date is shown as Earliest end and Latest end fields.
This lets you record partial information — such as a likely window of time — without having to put in a specific date.
Record Ongoing Dates
Ongoing events or items are those that have started but haven’t ended yet. This is useful for things like in-progress tasks, or the lifespan of a living person.
To mark an item as ongoing:
- Select the event or item.
- In the inspector, find the Dates field.
If it isn’t shown, scroll to the bottom of the inspector and click Add and Edit Fields to add it. - Click More.
- Select Ongoing.
When an item is set to ongoing:
- Its end date is shown as Present
- Its duration is calculated from the start date up to today
Set the Date to Use as “Today”
You can choose which date Aeon Timeline treats as “today” when calculating ongoing durations. This is especially useful when working with relative dates or a custom calendar.
- Open Settings
- Select the Dates tab
- Choose a date for Date used as today
Order Events and Items Without Known Dates
If you want to arrange events or items in a rough chronological order before all dates are known, Aeon Timeline lets you do this using flexible ordering.
To enable flexible date ordering:
- Select or create a tab set to the Spreadsheet, List, or Relationship views
- Open the Sort panel in the view header
- Sort rows by Date
- Enable Flexible ordering
With flexible ordering turned on, you can drag and drop items to arrange them relative to each other. Items with dates will stay in date order, while undated items can be placed before, after, and between them.
This makes it easier to establish the overall sequence of events first, and fill in exact dates later.
Note on the narrative: If you’re using a spreadsheet view set to show the narrative (shown by the Narrative label in the view header), the rows will always be sorted by your narrative order. To sort by date, create a new spreadsheet tab that doesn’t use narrative order.
Prevent Dates From Being Changed
Once parts of your timeline are finalized, you may want to prevent further changes to key dates or mark them as being fixed. Aeon Timeline lets you lock an event or item’s dates, so they can’t be moved or edited until you unlock them.
To lock an event or item:
- Select the event or item.
- In the inspector, find the Dates field.
If it isn’t shown, scroll to the bottom of the inspector and click Add and Edit Fields to add it. - Click the Lock button.
Add Calendar Markers
Calendar markers let you highlight important dates on your timeline and easily return to them later.
You can use calendar markers to:
- Show colored icons in the timeline header, to mark your important dates
- Jump to specific dates, similar to bookmarks
- Optionally show coloured sections in the timeline background
- Optionally show repeat markers in the timeline header, to highlight recurring events
Add or Edit Calendar Markers
- Click the Calendar Markers icon in the sidebar to open the calendar marker panel.
- To add a new marker, type a label in the New Calendar Marker row and press Enter.
- To edit an existing marker, select it from the list.
When you select a calendar marker, in the inspector you can:
- Choose the marker’s icon and color
- Choose whether to draw a colored section on the timeline background
- Set the marker’s date, and whether it repeats
Customize Date Editing Behaviors
You can choose how Aeon Timeline handles various types of date changes.
- Open Settings
- Select the Dates tab
- Choose your preferred options under Date Editing
These options control how Aeon Timeline handles common date-editing situations:
- When an item has a duration, you can choose whether changing its start date moves only the start, or moves the entire item.
- When an event or item contains nested items, you can choose whether moving it also moves its nested items.
- When using dependencies and constraints, you can choose whether Aeon Timeline automatically adjusts the dates of dependent items to keep them valid when items are moved.
If this option is turned off, Aeon Timeline highlights violations instead, so you can review and resolve them yourself.
Note on nested dates: When you nest items, the dates of nested items affect their containing item. Nested items must fit within the date range of the item that contains them. Learn more about nesting →
Where to Next?
Nest Items and Manage Hierarchy
Learn about how nested items and dates work together, including how containing item's set their date range based on nested items.
Try Aeon Timeline free for 14 days
Get Aeon Timeline and easily visualize and organize your project.