Manage Dependencies and Event Order
As your timeline evolves, certain events, tasks, and other items may need to stay in a specific order. Setting up rules between them helps ensure that key events happen in the right sequence as you plan, revise, and refine your work.
Why Use Dependencies and Constraints
Dependencies and constraints help keep your timeline logically consistent as it grows and changes.
As you edit your timeline’s dates, they prevent events and items from drifting into the wrong order. Instead of constantly manually rechecking dates, you can rely on these rules to help maintain the sequence and timing you intended.
Common Scenarios
You might use dependencies and constraints to:
- Document how items rely on each other
Record and capture which events, tasks, and items must occur in a particular order, making your timeline easier to understand and maintain. - Enforce a specific order
For example, ensuring one task can’t start until another has started or finished. - Align events precisely
For example, setting an event to begin exactly two days after another ends. - Reduce manual updates
Automatically keep dependent items in the correct order when one moves, so you don’t have to adjust dates by hand.
You’re not limited to these examples. You can use dependencies and constraints in whatever way best matches how your timeline needs to behave.
Enable Dependencies and Constraints
Before you can use dependencies or constraints, the item type you want to use them with must allow dates and show the needed field.
To set this up:
- Open Settings.
- Select the Item Types tab.
- Select the item type you want to enable dependencies for.
- Make sure Allows dates is enabled.
- Under the Fields section, add the Dependencies field.
How Aeon Timeline Shows Dependencies and Constraints
Aeon Timeline shows dependencies and constraints in several places, making them easy to see and manage as you work.
In the Inspector
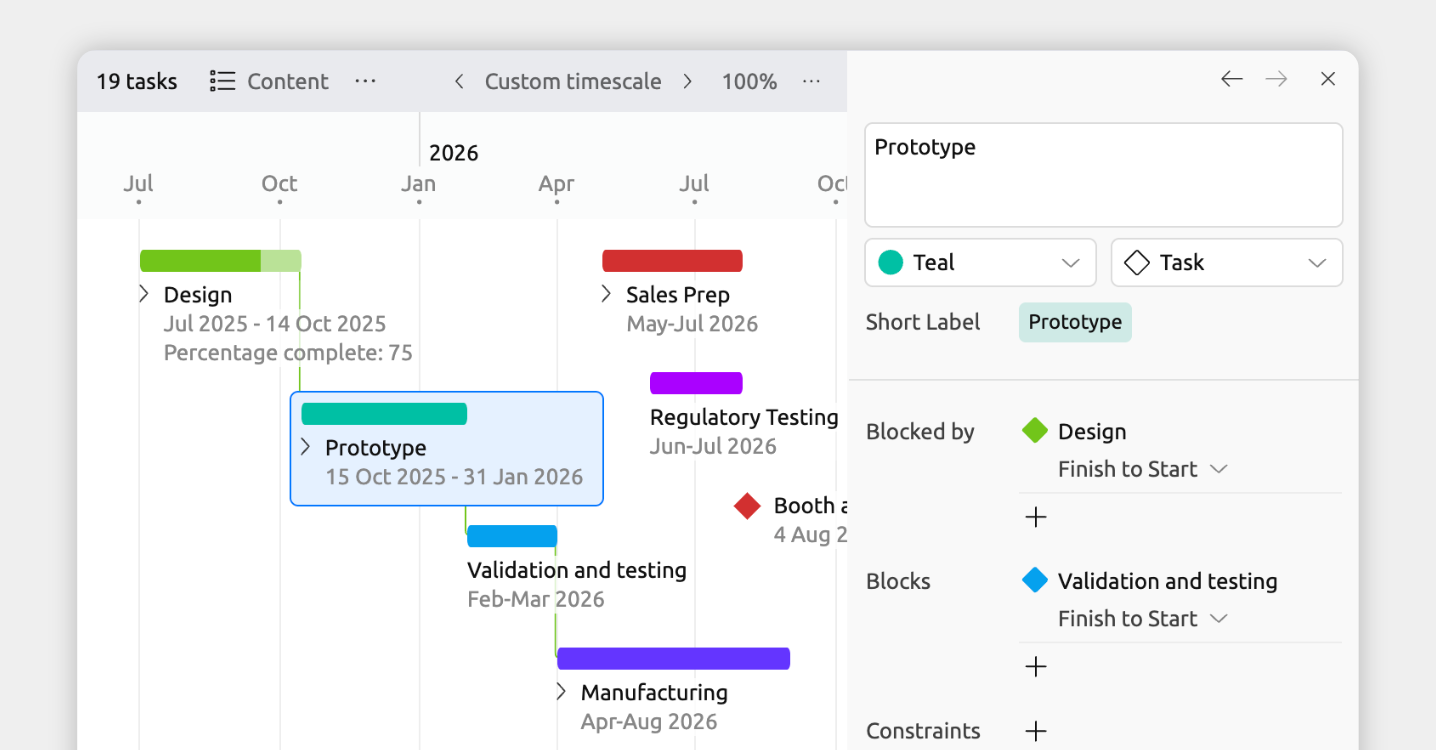
When you select an event, task, or item, the inspector shows its dependencies and constraints. This is the main place to add or manage them.
If the field isn’t visible, click Add and Edit Fields at the bottom of the inspector to add it.
Lines on the Timeline
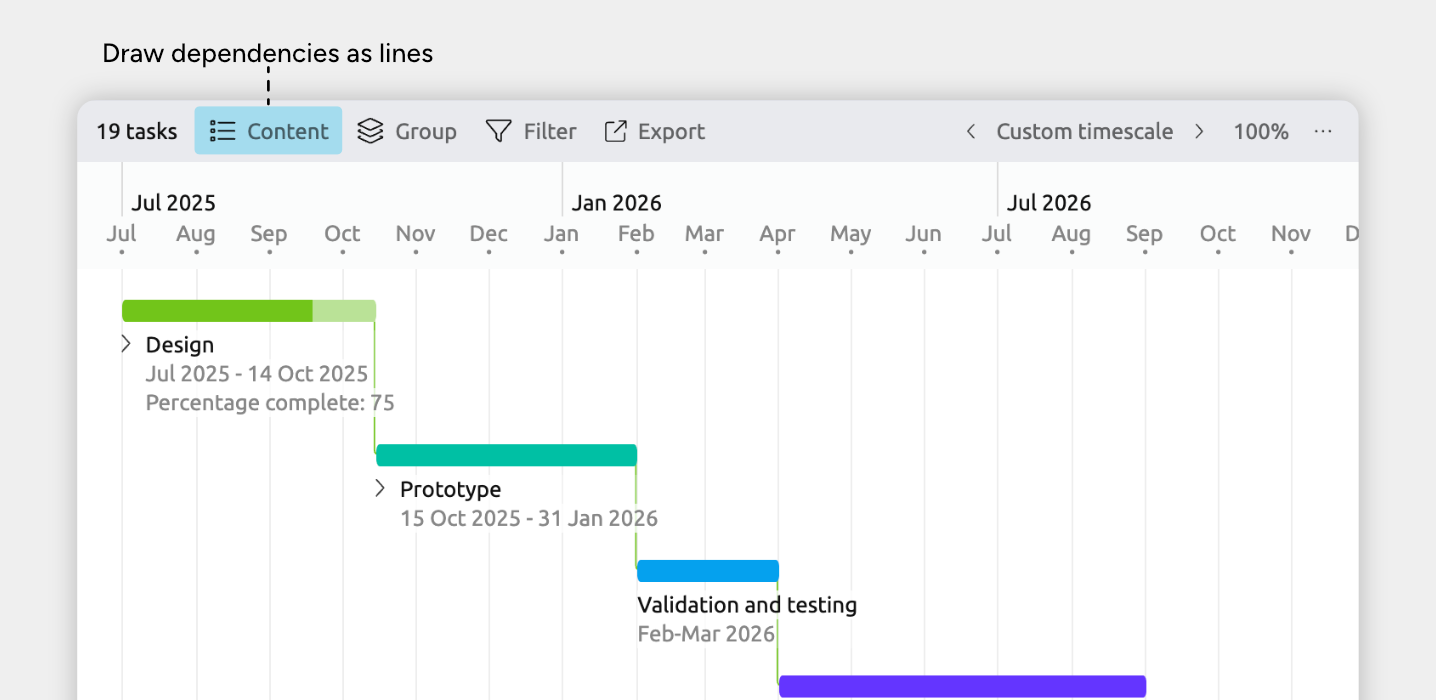
In the Timeline view, dependencies and constraints can be displayed as connecting lines between items.
- Green lines indicate the rule is being met
- Red lines indicate a violation
To show dependency lines on the timeline:
- Select or create a tab set to the Timeline view
- Open the Content panel in the view header
- Open Card options
- Enable Draw dependency lines on the timeline
Columns in the Spreadsheet
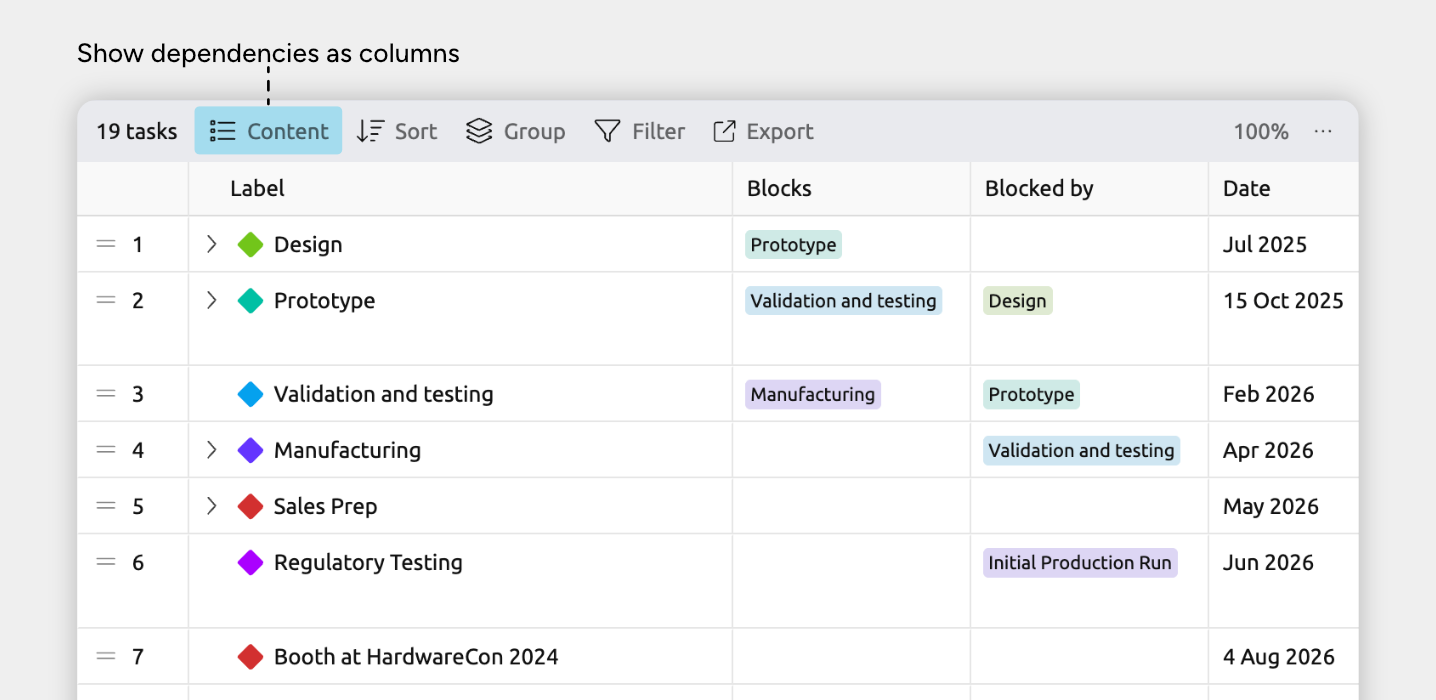
Dependencies can be shown as columns, making this the fastest way to review or edit dependencies across many items at once.
To show dependency columns:
- Select or create a tab set to the Spreadsheet view
- Open the Content panel in the view header
- Under Columns, enable Blocks and/or Blocked by.
These may appear under See More, depending on your settings.
On Item Cards in the Timeline and More
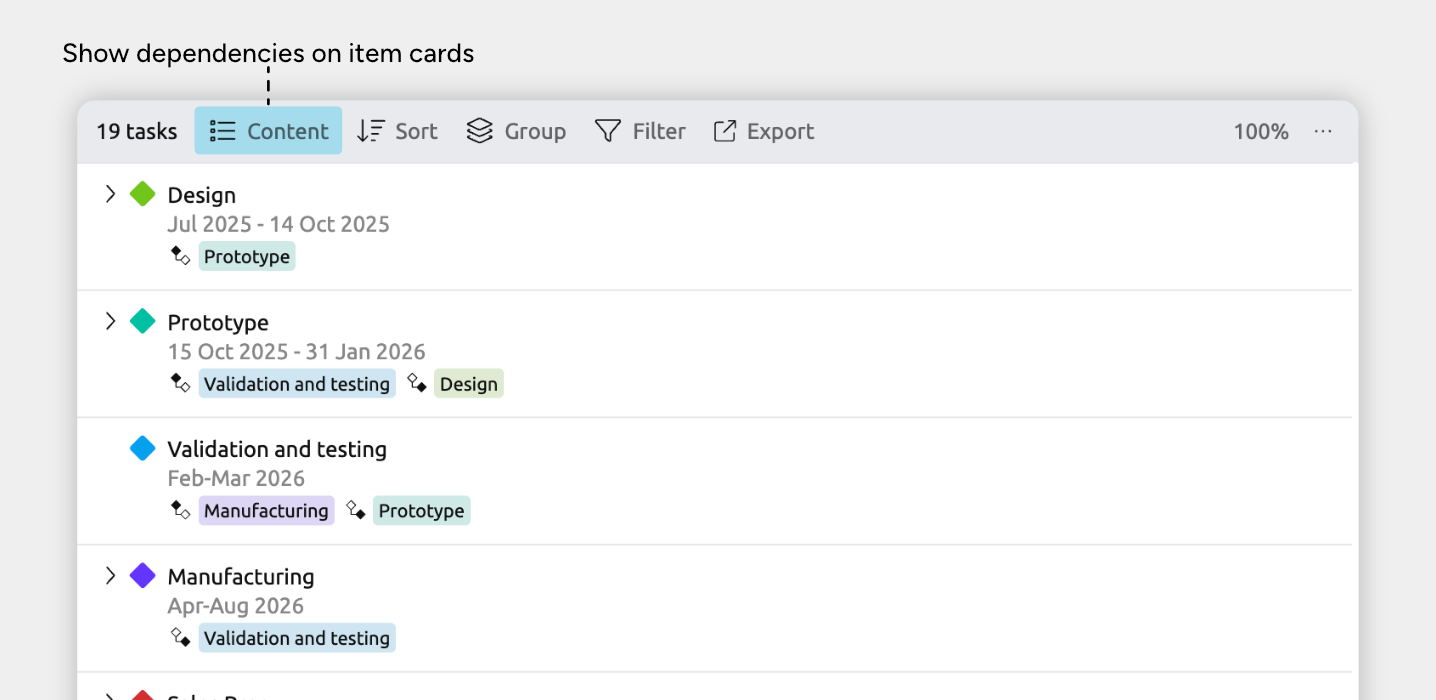
In views that use item cards, dependencies can be shown directly on each card. This lets you see what an item blocks or is blocked by while working in that view.
The views that use item cards are:
- Timeline View
- Relationship View rows
- List View
- Narrative View
- Mindmap View
To show dependencies on item cards:
- Select or create a tab set to the Timeline, Relationship, List, Mindmap, or Narrative view
- Open the Content panel in the view header
- Under Fields, enable Blocking Dependency and/or Blocked Dependency.
These may appear under See More, depending on your settings.
Dependencies Sidebar Panel
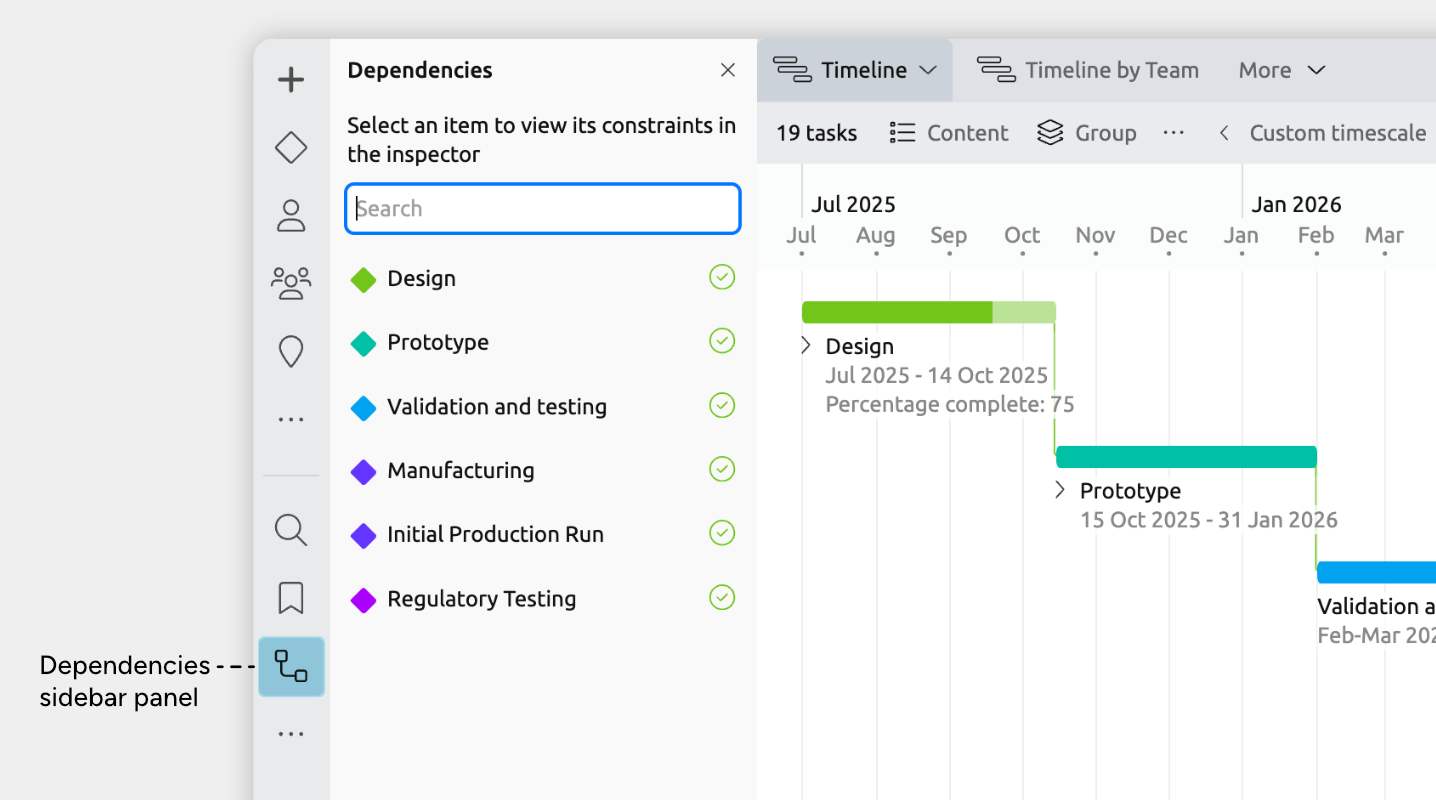
The dependencies sidebar panel shows a single list of all dependencies and constraints in your timeline. It’s useful for reviewing everything in one place and quickly finding any violations.
If you don’t see the dependencies panel in the sidebar, click the … button to enable it.
Dependency and Constraint Violations
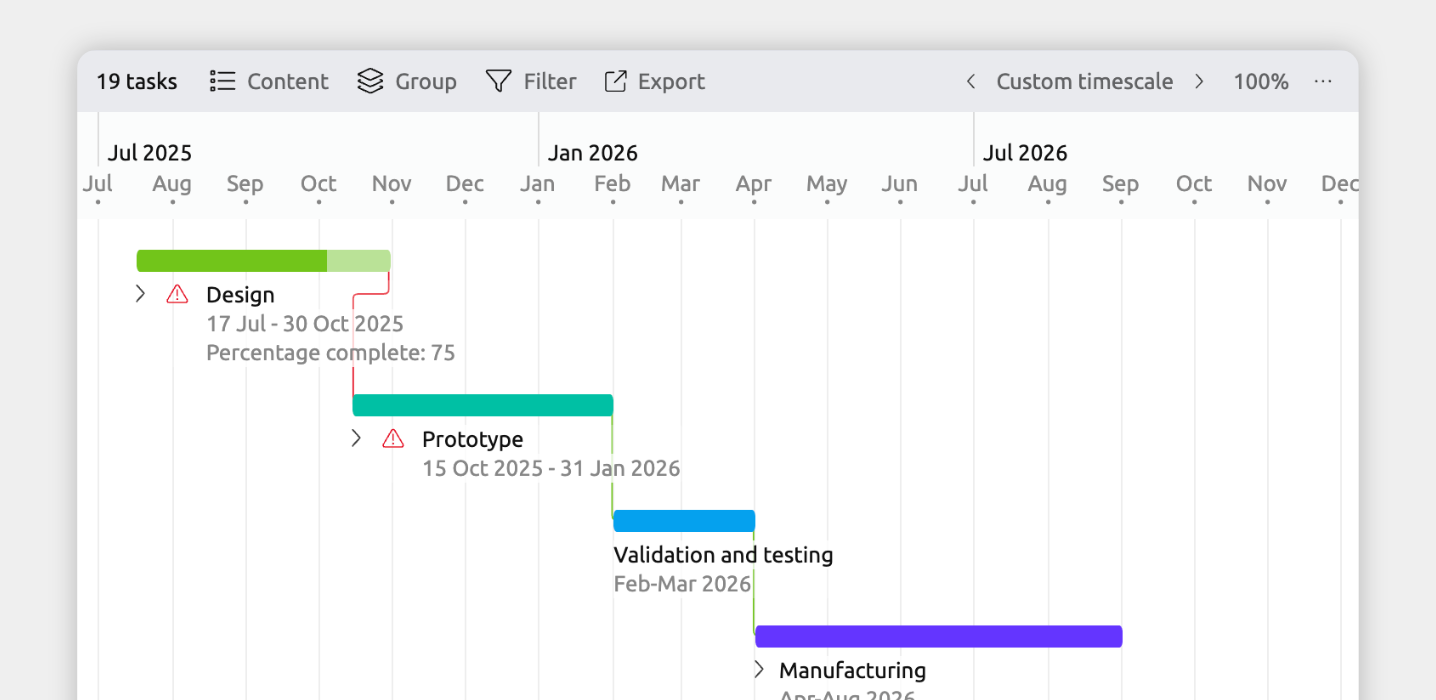
When a dependency or constraint is violated, Aeon Timeline shows a red warning icon to highlight the issue. Learn more about resolving violations →
Add Dependencies and Constraints
Dependencies and constraints are flexible tools, and there are several ways to use them depending on what you’re trying to achieve.
Here are some common ways they can be used, such as keeping items in order, aligning key moments, or enforcing gaps.
Keep Events, Tasks, or Items in a Certain Order
This is helpful when the order of events, tasks, or items matters more than the exact dates. If one item must always come after another, this keeps them in order even as you move things around on the timeline.
- Select one of the items you want to make dependent.
- In the inspector, find the Dependencies field.
If it isn’t shown, at the bottom of the inspector click Add and Edit Fields to add it. - To make the selected item come before the other, click Blocks → + Add.
To make it come after, click Blocked by → + Add. - Select the other item from the list.
Make an Item Start or Finish Before or After Another
This is helpful when an item has more specific requirements for when it should start or finish, based on another item beginning or ending.
- Create a dependency between two items.
- In the inspector, find the Dependencies field.
If it isn’t shown, at the bottom of the inspector click Add and Edit Fields to add it. - Change the dependency type to control how the timing between the two must happen. The available options are:
- Finish to Start
- Start to Start
- Finish to Finish
- Start to Finish
Prevent an Item from Starting Too Early or Late
This is helpful when an event, task, or item’s date can move, but only within certain limits. This is useful when adjusting an item during planning while still respecting known date restrictions.
- Select the item.
- In the inspector, find the Dependencies field.
If it isn’t shown, at the bottom of the inspector click Add and Edit Fields to add it. - Click Constraints → + Add.
- In the first dropdown, select whether the rule is for the selected item’s Start or End date.
- In the second dropdown, select either is after date or is before date, depending on the rule you want to set.
- Enter your boundary date.
Make Items Start or End Together
This is helpful when items need to stay perfectly aligned, so they always start or finish together even if their dates change.
- Select one of the items you want to constrain.
- In the inspector, find the Dependencies field.
If it isn’t shown, at the bottom of the inspector click Add and Edit Fields to add it. - Click Constraints → + Add.
- In the first dropdown, select whether the rule is for the selected item’s Start or End date.
- In the second dropdown, select either equals start of or equals end of, depending on the rule you want to set.
- In the third dropdown, select the other item.
Set Gaps or Buffers Between Items
This is helpful when there needs to be time between items, either to stop one event from happening too soon after another, or to ensure a required gap of time has passed.
- Select one of the items you want to constrain.
- In the inspector, find the Dependencies field.
If it isn’t shown, at the bottom of the inspector click Add and Edit Fields to add it. - Click Constraints → + Add.
- In the first dropdown, select whether the rule is for the selected item’s Start or End date.
- In the second dropdown, select either:
- Equals start of or equals end of to set an exact time gap
- Is before or is after another item’s start or end to set a minimum time gap
- In the third dropdown, select the other item.
Add Dependencies for Multiple Items
There are two ways to add dependencies for more than one item at a time.
Create a Chain of Dependencies
- Select multiple events or items to chain:
- Hold Cmd (Mac) or Ctrl (Windows) and click items one by one, or
- Hold Shift and click two items to select the range between them.
- From the top app menu, choose Item → Make Dependent.
The items are linked into a sequence, with each item depending on the one before it.
Make Multiple Items Depend on the Same Item
- Select multiple events or items:
- Hold Cmd (Mac) or Ctrl (Windows) and click items one by one, or
- Hold Shift and click two items to select the range between them.
- In the inspector, find the Dependencies field.
If it isn’t shown, at the bottom of the inspector click Add and Edit Fields to add it. - Add a dependency or constraint to add it for all selected items.
Resolve Violations
When a dependency or constraint is violated, Aeon Timeline highlights the issue with a red warning icon.
In most cases, there’s more than one way to fix a violation. Depending on the situation, either item involved may be able to move to resolve it.
You can fix violations one at a time, choosing how each item should adjust, or let Aeon Timeline resolve multiple violations for you in a single step.
As a general rule, it’s best to resolve violations regularly as you work. The fewer violations you have at once, the easier they are to consider and fix.
Resolve Violations Individually
Resolving violations one at a time gives you the most control. It lets you review what’s happening and decide which item should move, or whether the rule itself should be removed.
- Select the item with the violation.
- In the inspector, find the Dependencies field.
If it isn’t shown, at the bottom of the inspector click Add and Edit Fields to add it. - Click Resolve under the violation.
- Choose how to fix the issue:
- Move selected item — adjusts the selected item and leaves the other item in place
- Move other item to match selected — adjusts the other item and keeps the selected item where it is
- Remove dependency — leaves both items unchanged and deletes the dependency
Alternatively, you can fix the violation manually by editing the item’s dates.
Resolve Violations All at Once
You can also resolve multiple violations in one click from the Dependencies sidebar panel.
- Open the Dependencies sidebar panel.
If you don’t see the dependencies icon in the sidebar, click the … button to enable it. - Click Resolve All at the top of the panel
Aeon Timeline will attempt to resolve as many violations as it can automatically. This is especially useful after bulk edits or imports.
If certain items need to be handled in a specific way, it’s best to resolve those individually first using the inspector, then use Resolve All for the rest.
Automatically Resolve Dependencies and Constraints
Aeon Timeline can automatically adjust dates to prevent dependency and constraint violations as you work. This helps keep events, tasks, and items correctly ordered and aligned without you needing to resolve every issue manually.
Auto-resolve can be turned on or off, depending on how you prefer to work.
- When auto-resolve is on, moving an item can automatically shift other items that depend on it or are constrained by it.
- When auto-resolve is off, violations are allowed to occur and are highlighted with red warning icons so you can resolve them manually.
Turn Auto-Resolve On or Off
- Open Settings.
- Select the Dates tab.
- Scroll to the Date Editing section.
- Set When moving items with dependencies and constraints to Automatically resolve dependencies and constraints to turn auto-resolve on.
Choose Highlight violations without resolving to turn it off.
For timelines tied to real-world schedules—where automatically moving items into the past wouldn’t make sense—you can limit how far items are allowed to move backward past today using the Dependency and constraint resolution limits setting.
Where to Next?
Add and Customize Dates
Learn how to add, edit, and customize how your file's dates display and behave.
The Spreadsheet View
Use the Spreadsheet view to efficiently browse, sort, and edit your events and items.
Try Aeon Timeline free for 14 days
Get Aeon Timeline and easily visualize and organize your project.