Story Timelines
Organize, Categorize, and Add Detail to Events
Not every event in your story carries the same weight or the same purpose. Some belong to your main storyline, while others are backstories. Some are fully drafted, while others are just experimental ideas.
In Aeon Timeline, you have several ways to categorize events. Choose the approach that fits how you think and work, and stay on top of complex projects.
Organize Backstory Events
Your timeline can hold both the active storyline, and the history and background behind it.
There are two main ways you can organize backstory events in Aeon Timeline:
- Differentiate story and backstory events using item types
If you want a clean, structural distinction between what happens on the page and what happened before the story began, creating a separate item type for backstory events is the most organized approach.
This works especially well if your backstory is extensive — childhood histories, past conflicts, or historical context that shapes your present-day plot.
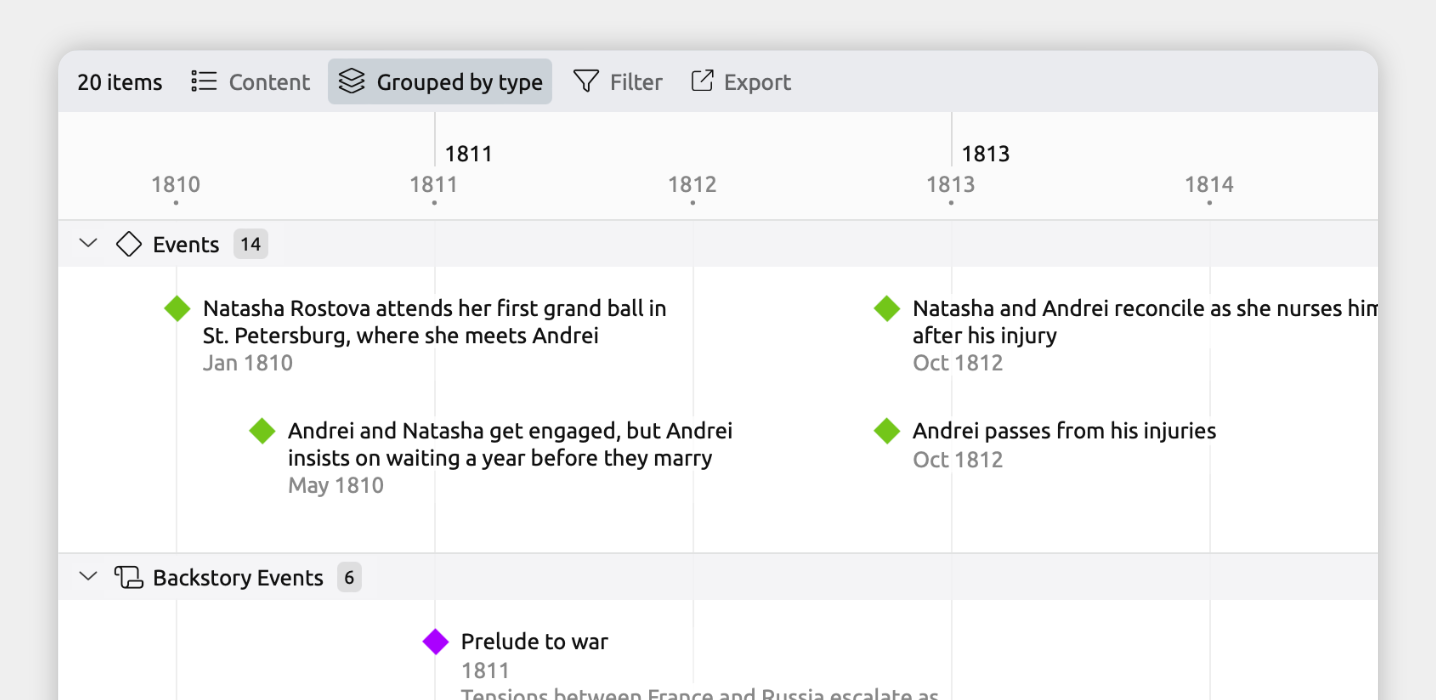
With a dedicated Backstory item type, you can:
- Set any view to show only story or backstory events, or both.
- Group your timeline to see story and backstory events on parallel timelines.
- Use different fields specifically for backstory events, such as research notes.
To check if your file already has a Backstory item type:
- Open [] Settings.
- Select the Item Types tab.
- In the left-hand list, see if you have a Backstory item type.
If your file doesn’t already have this, you can add it with these steps:
- Open [] Settings.
- Select the Item Types tab.
- Click + New at the bottom of the left-hand list.
- Set the following fields for the new item type:
- Name and plural
We recommend calling your item type Backstory Event / Backstory Events. - Icon
In this guide, we will use a scroll icon, but you can pick whichever icon you prefer. - Allows dates
Enable this so you can give your backstory events dates and so they can be shown on the timeline. - Visibility
Enable Sidebar so you can see and manage your backstory events in a sidebar panel.
Enable Narrative so you can optionally add backstory events to your narrative.
- Name and plural
You can also optionally set:
- Fields
Add fields to store key details about each backstory event. Common options include storing a summary to add notes about the event, or character relationships to track who was involved. These can be the same as or different to the fields stored for events. - Nesting
Nesting lets you organize events into a hierarchy. You can choose to allow backstory events to be nested in other backstory events, if you’d like to break down larger events into smaller ones.
- Open the [] Content panel in the view header
- Select to show either Events, Backstory Events, or both.
Note for narrative views: If you’re using a spreadsheet view set to show the narrative (shown by the Narrative label in the view header), the view will always show your narrative items and item types cannot be customized per view. Learn more in the Organize a Separate Story Structure guide.
If a view is set to show only backstory events, the app will automatically create backstory events when you add a new item to that view.
If a view is set to show both story and backstory events, you can choose which to create by:
- When creating an event, click the dropdown arrow when typing the new event’s label.
- Select either Event or Backstory Event.
- Type a label and press Enter.
You can also add backstory events from the sidebar:
- Click the + button in the sidebar.
- Select Backstory Event.
- Type a label and press Enter.
If backstory events are allowed in the current view, you can type the event's label directly into that view. Otherwise, the Backstory sidebar panel will open so you can add the event there.
Grouping lets you divide the view into separate sections for each item type.
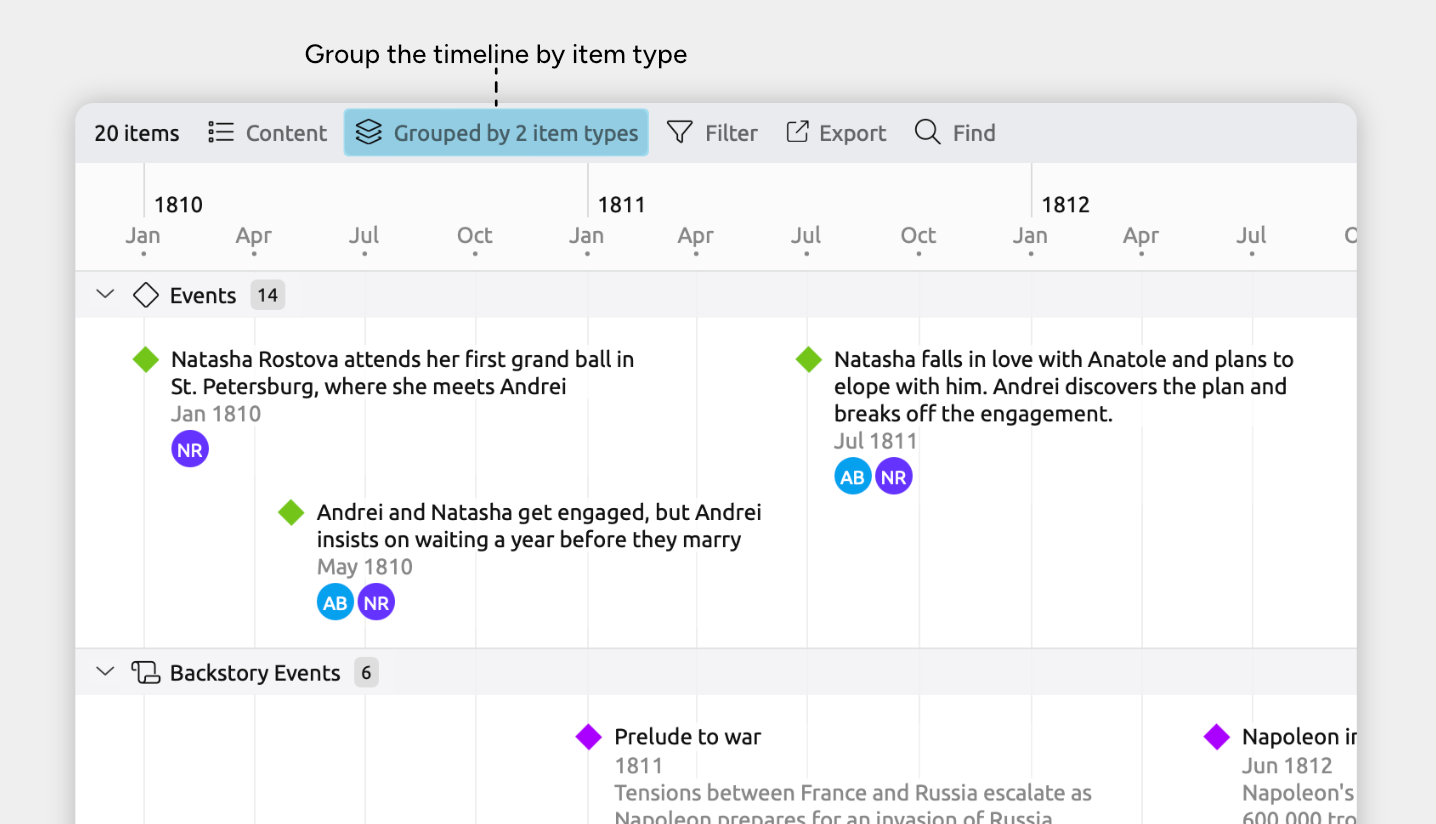
Grouping is available in:
- Timeline view
- Spreadsheet view
- Relationship view
- List view
- Item type sidebar panels
To enable grouping by story or backstory event:
- Open the view where you want to use grouping.
- Open the [] Group panel in the view header.
- Find the Item Type group, and expand its section if it is collapsed.
- Select Event and Backstory Event, or choose All to show groups for all item types.
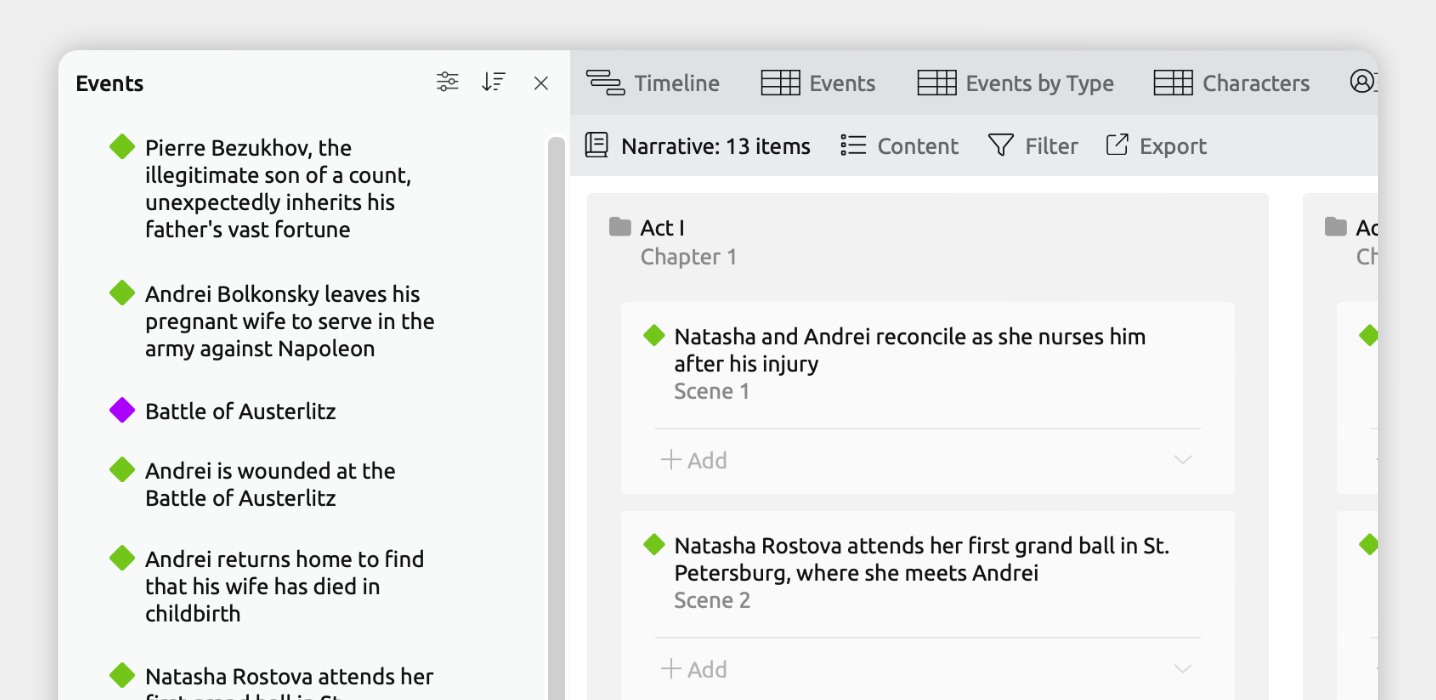
- Differentiate story events using the narrative
If you haven’t decided which are your story and non-story events yet, using the Narrative can give you room to experiment.
You simply choose which events to include in the narrative, which represents your story structure. Within the narrative, you can then arrange events out of chronological order without affecting your timeline, to determine how you want to tell your story.
This is especially helpful when:- You’re still discovering the shape of your story and aren’t sure what will make it onto the page.
- You want to experiment with flashbacks, pacing, or different storytelling structures.
To see how to use the narrative, see the Organize a Separate Story Structure guide.
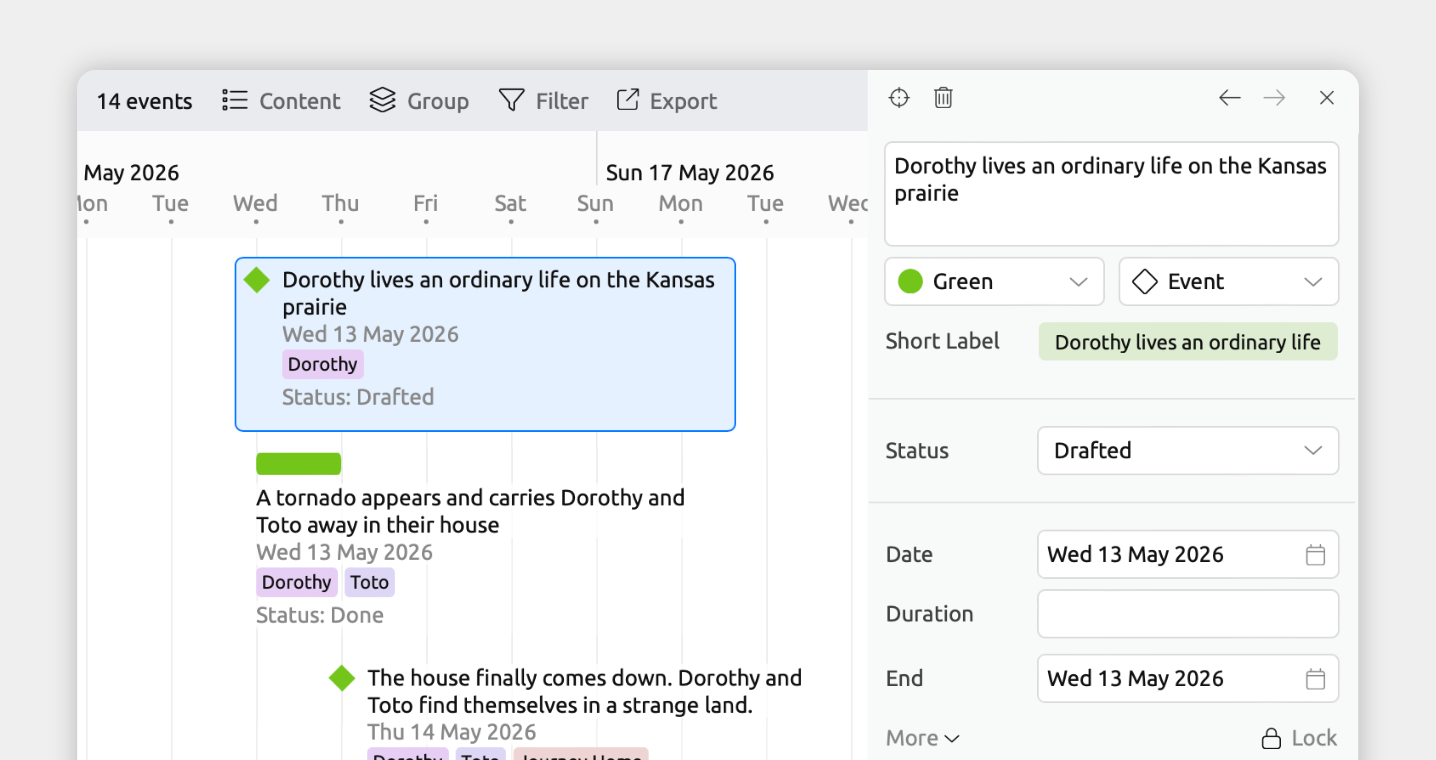
Track Writing Status, Incomplete Ideas, or Problem Areas
If you want to track the status of certain events — whether they’re drafted, revised, unresolved, or just a rough idea — Aeon Timeline gives you a few flexible ways to flag them.
- Track status using colors
If you want a quick, visual way to see what’s decided or complete and what still needs work, color-coding is the simplest option.
You can assign colors based on writing status — for example, one color for drafted scenes, and another for rough ideas. Then with a quick glance of your timeline, you can see which sections are solid and which ones need attention.
By using colors, you can also easily group your timeline by color to see each status in its own row.
- Open [] Settings.
- Select the Colors tab.
- Add, rename, or remove colors so you have one for each writing status you want to track. For example: Drafted, Revised, Rough Idea, Needs Research.
- Optional: Drag colors into your preferred order in the left-hand list.
To change an event or item’s color, select it and then choose a color from the dropdown in the inspector.
You can also change colors in bulk by selecting multiple events first, then choosing a color in the inspector.
- Select multiple events:
- Hold Cmd (Mac) or Ctrl (Windows) and click events one by one, or
- Hold Shift and click two events to select the range between them.
- In the inspector, choose a color from the dropdown.
The chosen color is applied to all selected events at once.
Note for the Spreadsheet view: Click the leftmost gutter cell of each row to select it, rather than clicking inside the row's content cells.
Note for iOS: Long-press to enter Edit mode, then tap each event you want to include in the selection.
Grouping lets you divide the view into separate sections for each color.
Grouping is available in:
- Timeline view
- Spreadsheet view
- Relationship view
- List view
- Item type sidebar panels
To group by color:
- Open the view where you want to use grouping.
- Open the [] Group panel in the view header.
- Find the Color field, and expand its section if it is collapsed.
- Select the colors you want to group by, or choose All to show groups for all colors.
Learn more in the Categorize and Group Events and Items guide.
- Track status using a checkbox or option list
Adding a status field to your events keeps tracking clean and built-in.
Use a checkbox for simple yes/no status — done vs not done, or confirmed vs uncertain.
Use an option list when your writing process has multiple stages, so you can choose from a custom set of statuses like Idea, Outline, Drafted, Revised, Needs Research, or Problem Area. These labels can be displayed across the various views, and you can filter to see all events at a specific status.
- Open [] Settings.
- Select the Properties tab.
- Click + New at the bottom of the left-hand list.
- Set the following fields for the new property:
- Name
Choose a name that reflects what you’re tracking, such as Drafted for a checkbox, or Writing Status for an option list. - Format
Select Checkbox or Option List. - Show for item types
Select Event (and any other item types you want this status to apply to).
- Name
- Optional: Enable Indicate item completion if you want events with a certain status to appear with a strikethrough across the app.
Once the property is set up, it will be shown in the inspector when you select an event, or your other chosen item types.
To set an event's status, select it and then tick the checkbox or choose an option from your status field in the inspector.
You can also assign statuses in bulk by selecting multiple events first, then setting the status in the inspector.
- Select multiple events:
- Hold Cmd (Mac) or Ctrl (Windows) and click events one by one, or
- Hold Shift and click two events to select the range between them.
- In the inspector, tick the checkbox or choose an option for your status field.
The status is applied to all selected events at once.
Note for the Spreadsheet view: Click the leftmost gutter cell of each row to select it, rather than clicking inside the row's content cells.
Note for iOS: Long-press to enter Edit mode, then tap each event you want to include in the selection.
To show your status property in the Spreadsheet view:
- Select or create a tab set to the Spreadsheet view.
- Open the [] Content panel in the view header.
- Under Columns, enable your status property.
This may appear under See More, depending on your settings.
To show your status property on item cards:
- Select or create a tab set to the Timeline, Relationship, List, Mindmap, or Narrative views.
- Open the [] Content panel in the view header.
- Under Fields, enable your status property.
This may appear under See More, depending on your settings.
Track Additional Story Elements
Beyond characters and story arcs, you can track any story element that matters to your project. This might include stages for a story framework, factions or guilds that exist in your story world, or magic systems or technologies for a fantasy or sci fi setting.
Aeon Timeline lets you create as many categories of information as you need and connect them to your story’s events, so you can keep everything organized in one place.
To track additional story elements:
- Open [] Settings.
- Select the Item Types tab.
- Click + New at the bottom of the left-hand list.
- Set the following fields for the new item type:
- Name, plural, and icon
Pick a name and icon that reflect what you’re tracking. For example, Faction / Factions with a flag icon, or Magic System / Magic Systems with a sparkle icon. - Allows dates
Enable this if your story elements have dates. For example, when a faction was founded or when a technology was invented. - Visibility
Enable Sidebar so you can manage your story elements from a sidebar panel.
Enable Relationship Comparisons if you want to use this item type as a column in the Relationship view or as a track in the Subway view.
- Name, plural, and icon
You can also optionally set up:
- Fields
Add fields to store key details about each element. This might be to add summary notes, or links to external resources. - Nesting
Nesting lets you organize items into a hierarchy. Set this if you want to group your story elements under broader categories.
- Click the new item type’s icon in the sidebar to open its panel.
- Focus the New input at the bottom of the list, then type a label and press Enter to create each item.
- Optionally select each item to set its color, dates, or any other details.
To connect an event with one of your new story elements:
- Select an event.
- In the inspector, find the field for your new item type.
If it isn’t shown, scroll to the bottom of the inspector and click Add and Edit Fields to add it. - Click Add, then:
- Select an existing item, or
- Choose Create to create and link a new one.
You can also show your new item type as a column in the Spreadsheet or Relationship views, as a group in the Timeline view, or as tracks in the Subway view — using the same approach you’d use for characters or story arcs.
Learn more in the Customize Item Types guide.
Break Down Larger Events With Nesting

Some events are too big to capture in a single entry. Nesting lets you break larger events into smaller, manageable parts while keeping them connected.
You can place smaller events inside larger ones to show how they fit together. For example, you might divide a war into individual battles, a heist into its various stages, or any other larger event into separate scenes.
Note on nested dates: A nested event’s dates must fit within the date range of its containing event. If you move a nested event outside that range, the containing event will expand to include it.
Learn more in the Nest Items and Manage Hierarchy guide.
Many starting templates already allow events to be nested within each other. To check if your file has this:
- Open [] Settings.
- Select the Item Types tab.
- Select the Event item type.
- Under Nesting, ensure that Event is selected so events can be nested under other events.
Under Fields, enable Nested Items and Nest Under so the relevant fields appear in the inspector.
You can nest events using drag-and-drop or the inspector.
To nest by dragging:
- In the Relationship or List views, or in the Events sidebar panel: Drag an event onto another event.
- In the Spreadsheet view: Drag an event onto another event using its leftmost gutter cell.
- In the Timeline view: Hold Cmd (Mac) or Ctrl (Windows) while dragging an event onto another event. This nests it instead of moving it in time.
To nest events using the inspector:
- Select the event you want to nest.
- In the inspector, find the Nest Under field.
If it isn’t shown, scroll to the bottom of the inspector and click Add and Edit Fields to add it. - Choose the event you want to place it inside.
You can also create a new event inside (or around) an existing one:
- Right-click an event in the Timeline, Spreadsheet, Relationship, or List views.
- Open the Create item menu.
- Choose:
- Create nested item to create a new event inside the selected one, or
- Nest under new item to create a new containing event and place the selected event inside it.
Add Notes, Links, and Custom Details
In Aeon Timeline, events and items can have notes, links, numbers, checkboxes, and other custom fields. This lets you store your project’s details directly with the events they relate to.
You might add a short description of what happens in a scene, link to background research, track tension with a numeric field, or mark a draft as completed with a checkbox. Because these details are built into your timeline, they stay organized and easy to access as your project grows.
To add notes and custom fields:
Aeon Timeline includes several built-in fields you can turn on for any item type:
- Summary for descriptive notes
- Tags for flexible labeling
- Image for reference visuals
- Links & Attachments for linking to research or attaching files
To enable these fields for your events:
- Open [] Settings.
- Select the Item Types tab.
- Select the item type you want to add fields to (for example, Event).
- Under Fields, add the fields you want to enable.
Once enabled, these fields appear in the inspector whenever you select an item of that type.
If the built-in fields don’t cover what you want to track, you can add custom properties — text, numbers, checkboxes, or option lists.
- Open [] Settings.
- Select the Properties tab.
- Click + New at the bottom of the left-hand list.
- Set the following:
- Name
What you want to call the field, such as Tension or Word count. - Format
Choose the kind of value to store: text, number, checkbox, or option list. - Options (For option list properties only)
Define the values you want to choose from, such as Low / Medium / High for tension. - Show for item types
Select the item types this property should appear for.
- Name
Once added, the field will appear in the inspector whenever you select an item of your chosen types.
Once your fields are set up, you can show them directly in your views as well as in the inspector, so the details you care about stay visible while you work.
- Select or create a tab set to a Timeline, Spreadsheet, Relationship, List, Mindmap, or Narrative view.
- Open the [] Content panel in the view header.
- Under Fields (in card-based views) or Columns (in the Spreadsheet view), enable the fields you want to show.
They may appear under See More, depending on your settings.
Note for the Subway view: The Subway view doesn't display item cards or property fields. To show properties, use one of the other views above.
For long summary or text fields, you can cap how many lines are shown on each card or row, so cards stay compact and easy to scan.
- Select or create a tab set to a Timeline, Spreadsheet, Relationship, List, Mindmap, or Narrative view.
- Open the [] Content panel in the view header.
- Open Card options (in card-based views) or set Max Lines Per Row (in the Spreadsheet view).
- Adjust the maximum number of lines per text field.
The full text is always available in the inspector when you select an item.
Try Aeon Timeline free for 14 days
Get Aeon Timeline and easily visualize and organize your project.