Story Timelines
Track Characters
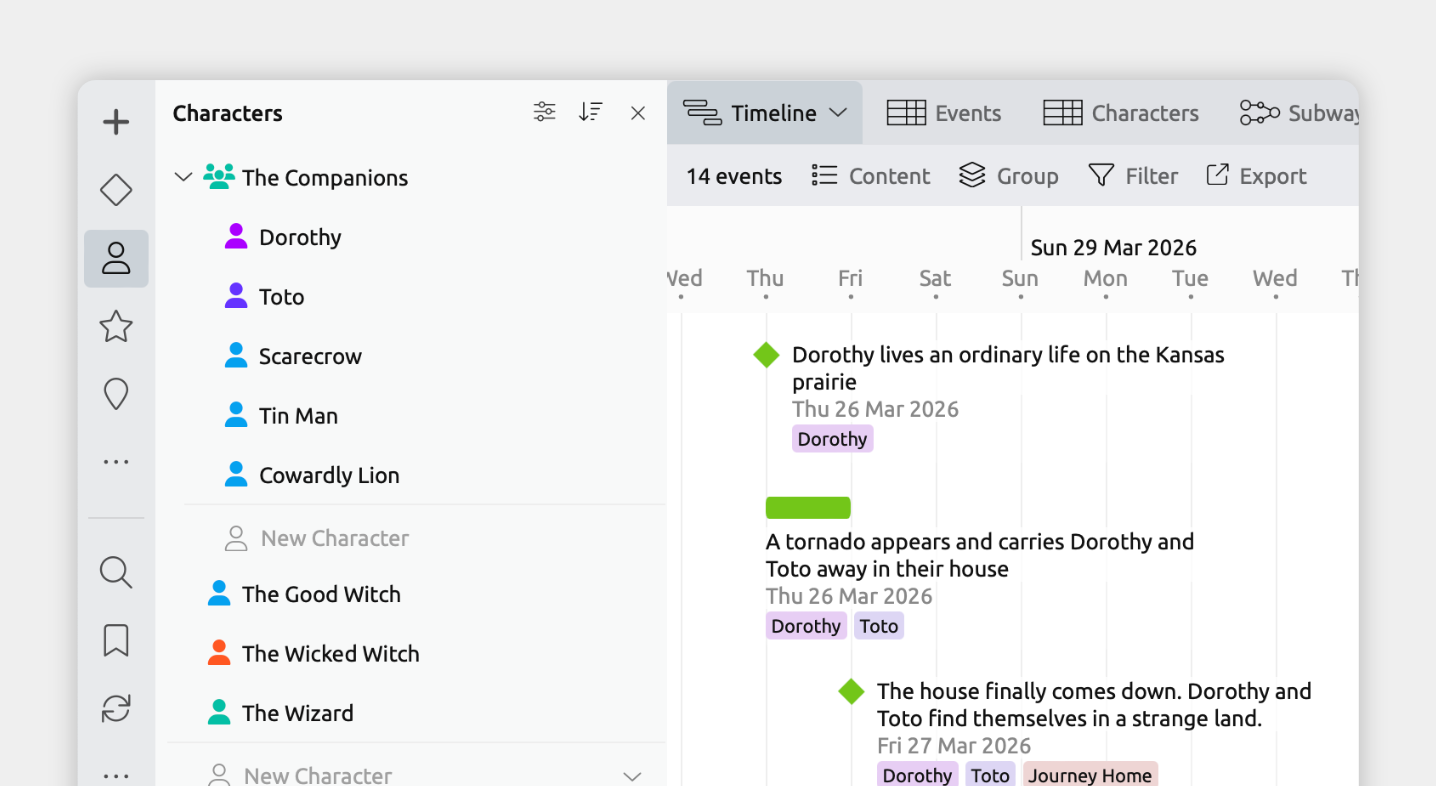
Aeon Timeline can help you organize more than just your story’s events. You can add and manage your characters, and give each their own details — such as notes, relationships, images, or any other information you choose to track.
You can link characters directly to the events they appear in, so it’s always clear who is involved in each moment.
You can also view a single character’s timeline to understand their story. This makes it easy to see:
- When they enter or exit the story, and where their key turning points occur
- Whether they’re absent from parts of the story
- How their arc overlaps, intersects, or conflicts with other characters
Or you can compare timelines for different characters side by side.
By tracking characters this way, you can manage complex casts, balance character presence, and ensure each character’s progression reflects the story you’re trying to tell.
Add and Track Characters
Many starting templates include an item type to track people or characters. To check if your file has this:
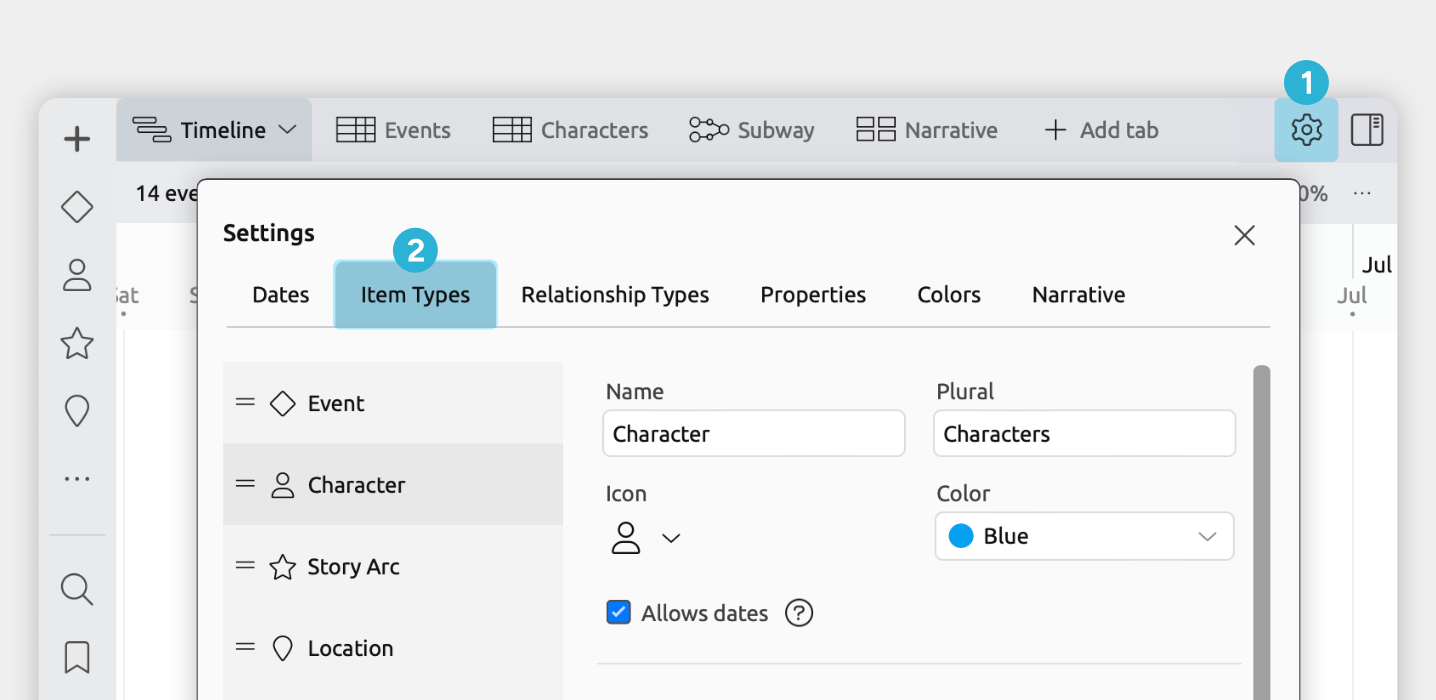
- Open [] Settings.
- Select the Item Types tab.
- In the left-hand list, see if you have a Character or Person item type.
If your file doesn't already track people or characters, you can add it with these steps:
- Open [] Settings.
- Select the Item Types tab.
- Click + New at the bottom of the left-hand list.
- Set the following fields for the new item type:
- Name, plural, and icon
We recommend calling your item type Character / Characters and using a person icon. - Allows dates
Enable this if you want to track your characters' birthdays and ages. - Visibility
Enable Sidebar so you can see and manage your characters in a sidebar panel.
Enable Relationship Comparisons so you can easily see and track which characters are assigned to which events in the Relationship and Subway views. - Compact Display
Choose how characters appear across views when assigned to events:- Avatar works well if you want to see images or initials for characters.
- Short Label is better if you prefer to show their names
- Name, plural, and icon
You can also optionally set up:
- Fields
Add fields to store key details about each character. Common options include storing a character's birthdays, image, familial relationships, or notes about their personality or motivation.
Learn more in the Store and Manage Character Information section. - Nesting
Nesting lets you organize characters into a hierarchy.
Learn more in the Organize Characters into Character Groups section.
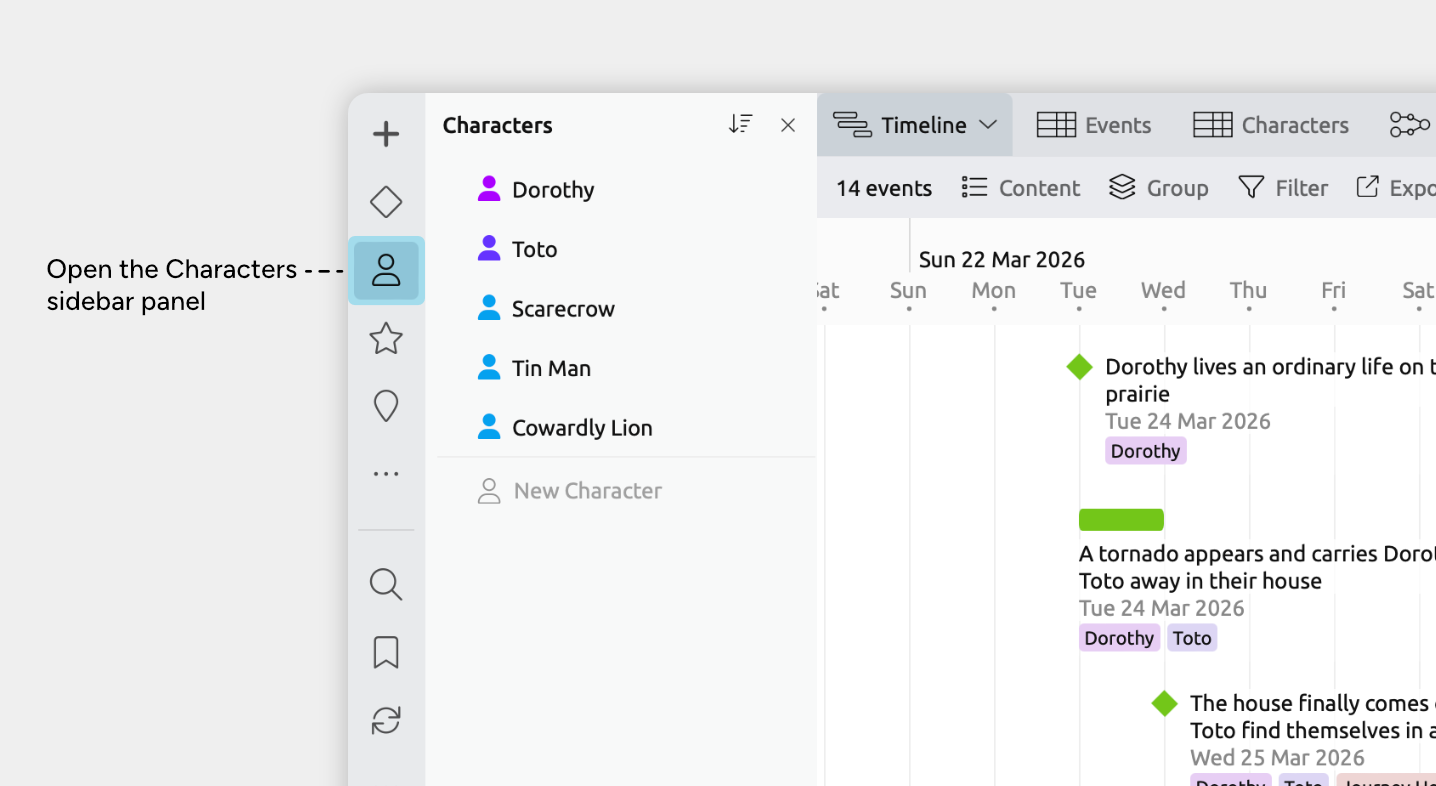
- Click the character icon in the sidebar to open the Character panel.
- Focus the New Character input, and type and press enter to create each character.
- Optionally select each character to set their color, birthday, or any other details important to your story.
If you're managing a large cast of characters, see the Organize Characters into Character Groups section.
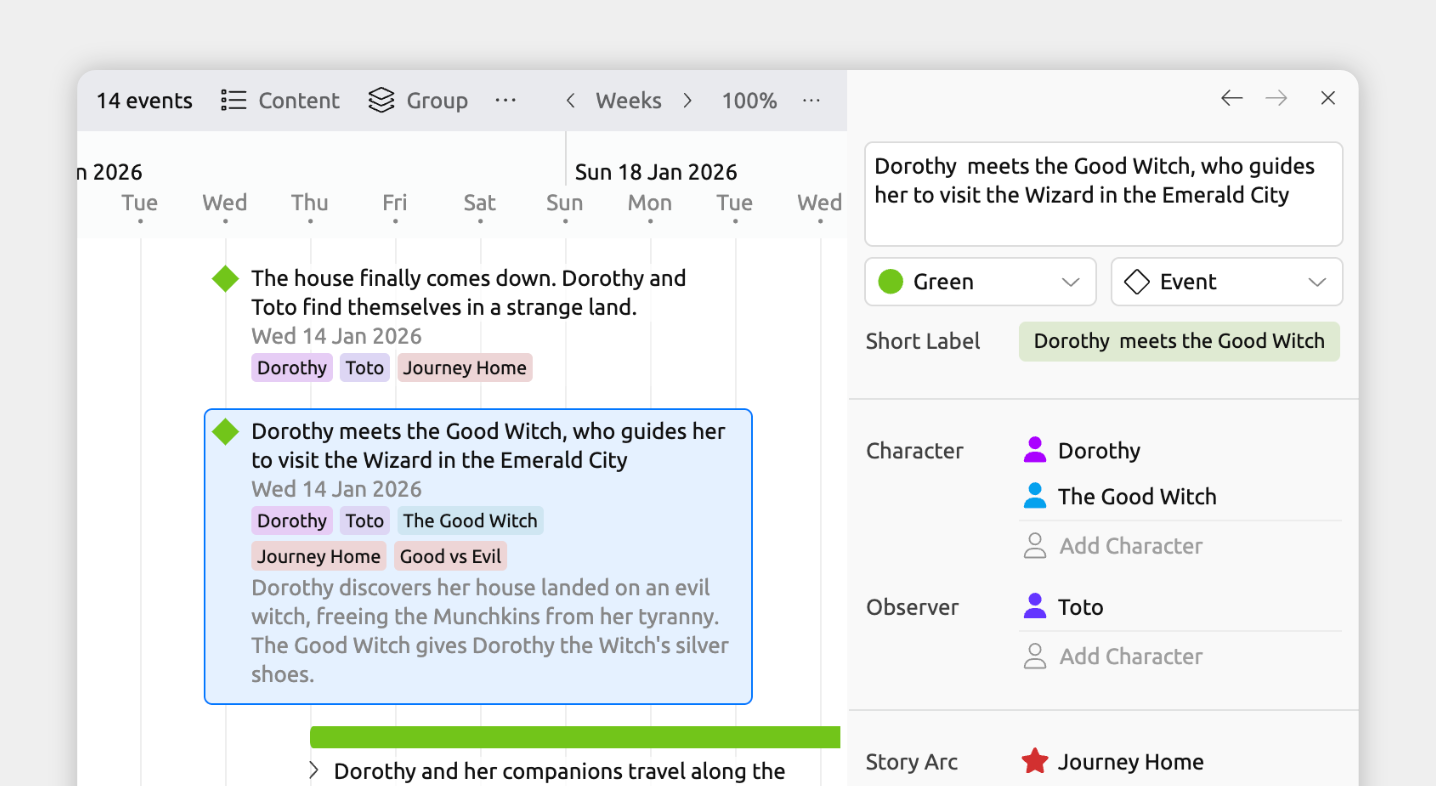
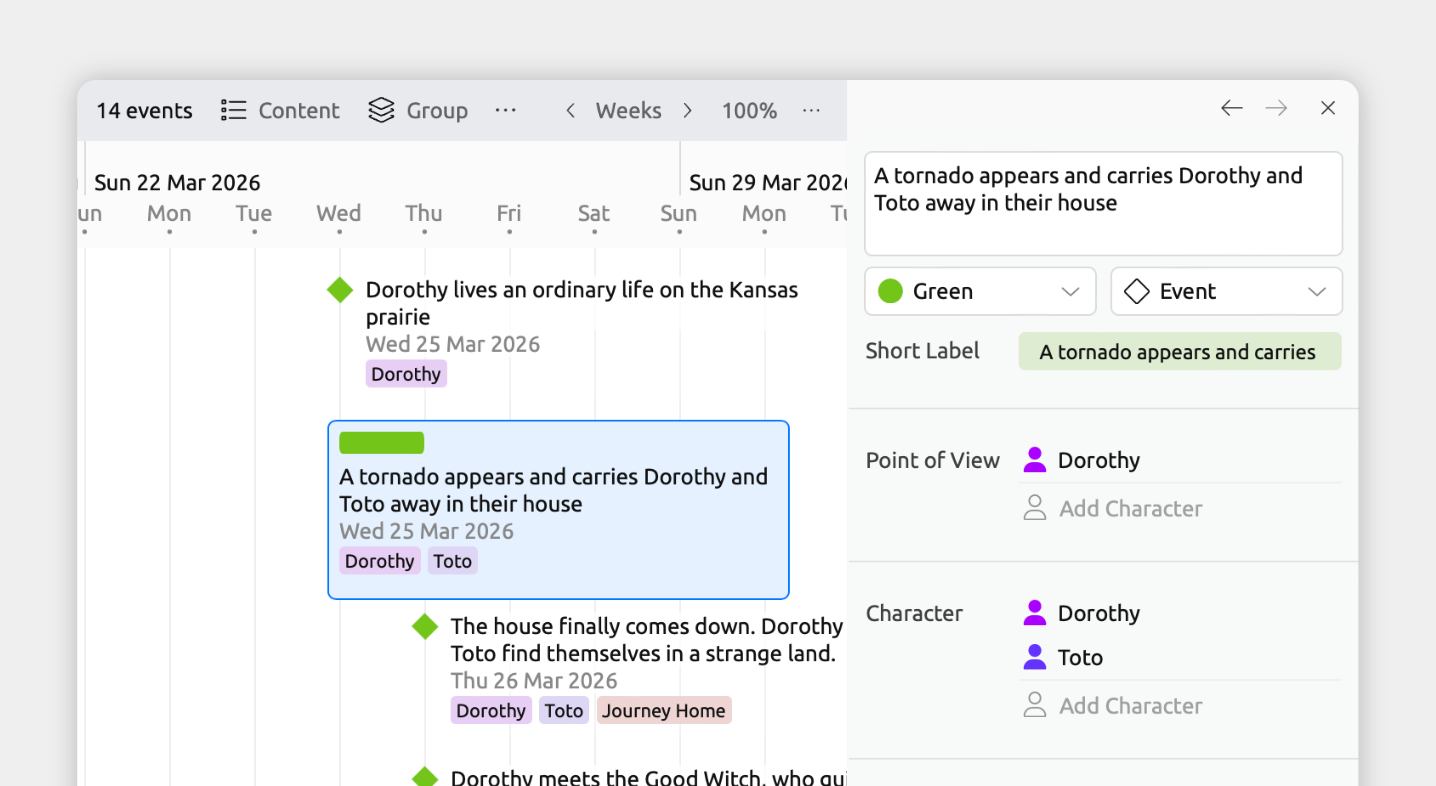
Connections between events and characters, or other items, are referred to as relationships.
When you select an event or item in any view, the inspector shows all of its relationships in one place.
Add a character to an event from the inspector
- Select an event or item.
- In the inspector, find the Characters field.
If the field isn’t shown, scroll to the bottom of the inspector and click Add and Edit Fields to add it. - Click Add, then:
- Select an existing character, or
- Choose Create to create and link a new character.
Aeon Timeline gives you two ways to set up relationships, depending on what you need.
Item type relationships are just straightforward links between items — for example, connecting a person to an event.
Custom relationships add a bit more detail by explaining how two items are connected. They let you define the type of connection — such as if a character is the point-of-view character for an event, or if they witnessed it vs being an active participant.
Add and Edit Custom Relationships
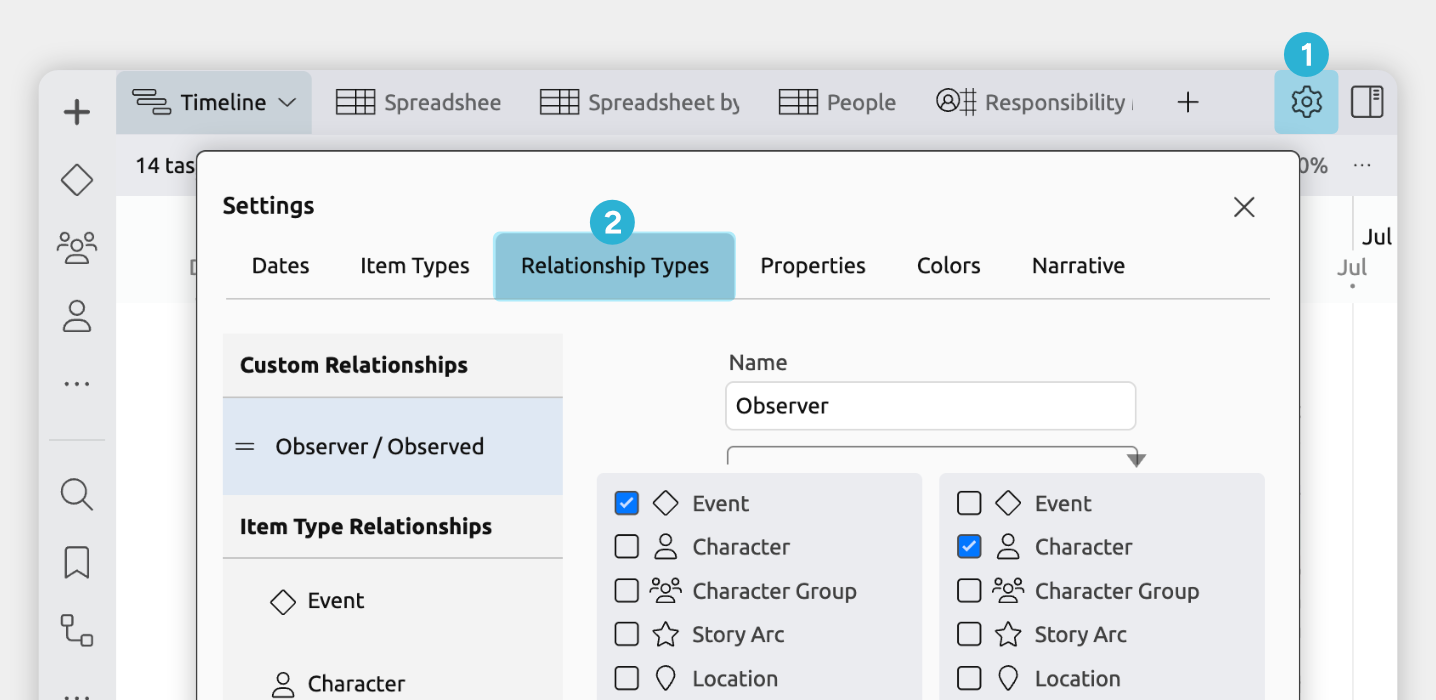
- Open [] Settings
- Select the Relationship Types tab
From here you can:
- Edit an existing relationship type
Select it from the list on the left. - Create a new relationship type
Click Add at the bottom of the left list.
To create a custom relationship to track a character's specific involvement in an event, you would then set these settings:
- Name
What you want to call this relationship, for example Witness or Point of View. - Item Types
Choose which item types to connect. To track an event's related characters, select Event on one side and Character on the other. - Inverse (Optional)
This lets you define how the relationship reads from the other direction.
For example, if the relationship is called Narrated by (An event is narrated by a character), the inverse could be Narrates (A character narrates an event). - Show for item types
Choose which item types display this relationship as a field in the inspector.
In most cases, you’ll want to enable the same item types you selected under Item Types. This lets you view and edit the relationship from either side.
- Group relationship under item type fields (Optional)
When enabled, the relationship is shown alongside the main item type field instead of in its own section.
For example, you might have a single Characters field, with Witness and Participant shown within it. This keeps related information together and easier to scan.
If not enabled, each relationship appears as its own separate field. This gives you more control — you can show, hide, and reorder each relationship independently.
Once the relationship has been created, you'll then see a new field in the inspector when selecting events:
Once you've connected your story's events to your characters, you can show those connections throughout the app in several ways.
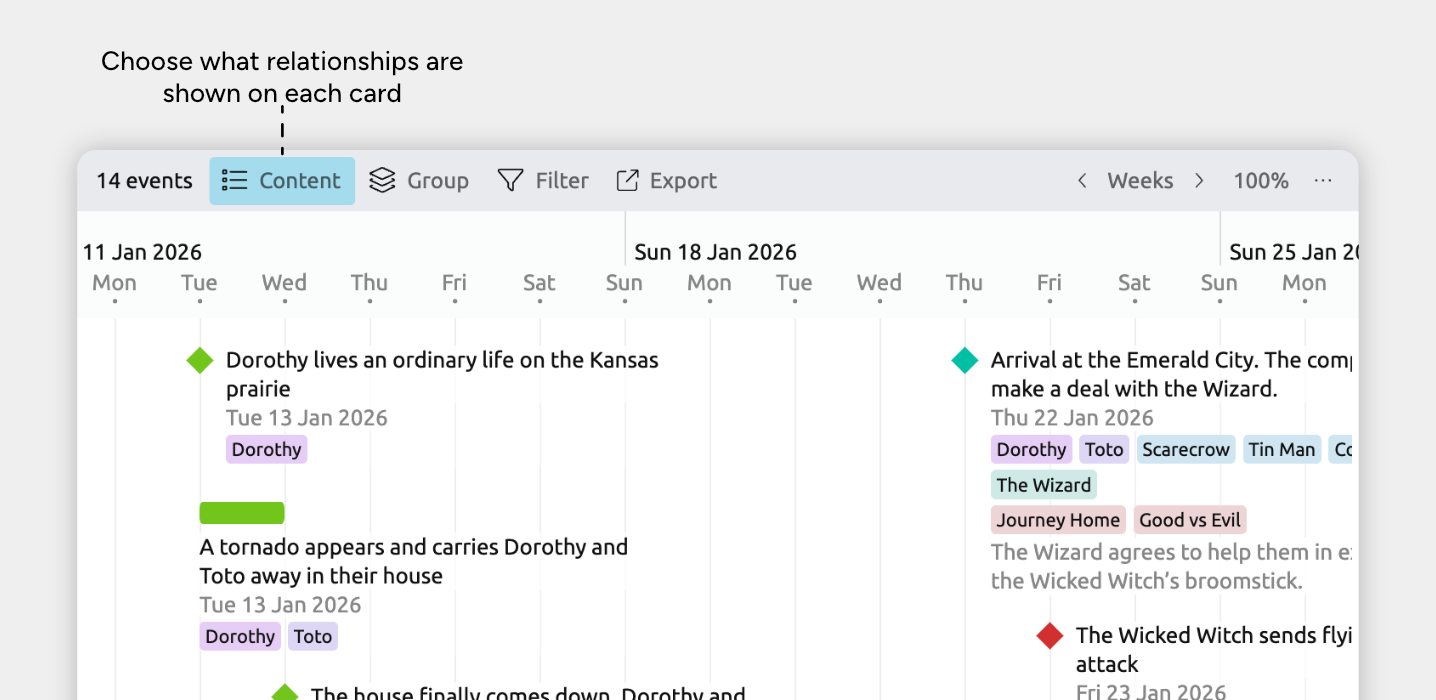
In views that use item cards, you can show related items on each item’s card, so important connections stay visible as you work.
The views that use item cards are:
- Timeline View
- Relationship View rows
- Narrative View
- List View
- Mindmap View
To show relationships on item cards:
- Select or create a tab set to the Timeline, Relationship, List, Mindmap, or Narrative view.
- Open the [] Content panel in the view header.
- Under Fields, enable the Character field.
This may appear under See More, depending on your settings.
You can also show characters as:
- Groups in the Timeline view, to see a categorized timeline.
See how to do this in the Categorize and Group Your Timeline by Character section. - Columns in the Spreadsheet or Relationship views, to easily manage each characters' events.
See how to do this in the Review and Manage Which Characters Appear in Which Events section. - Tracks in the Subway view, to visualize when characters cross paths.
See how to do this in the Visualize When Characters Cross Paths section.
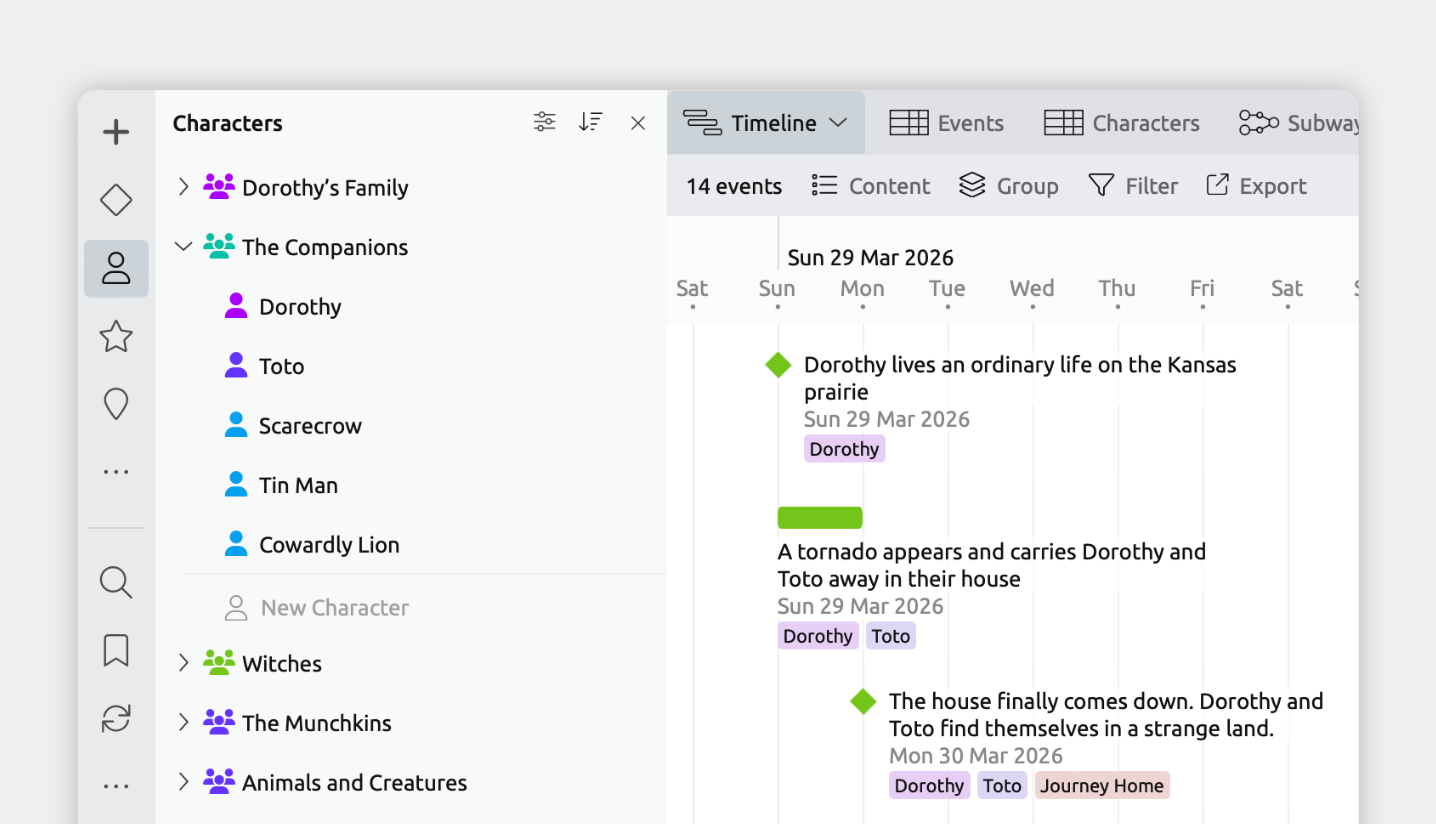
Categorize and Group Your Timeline by Character
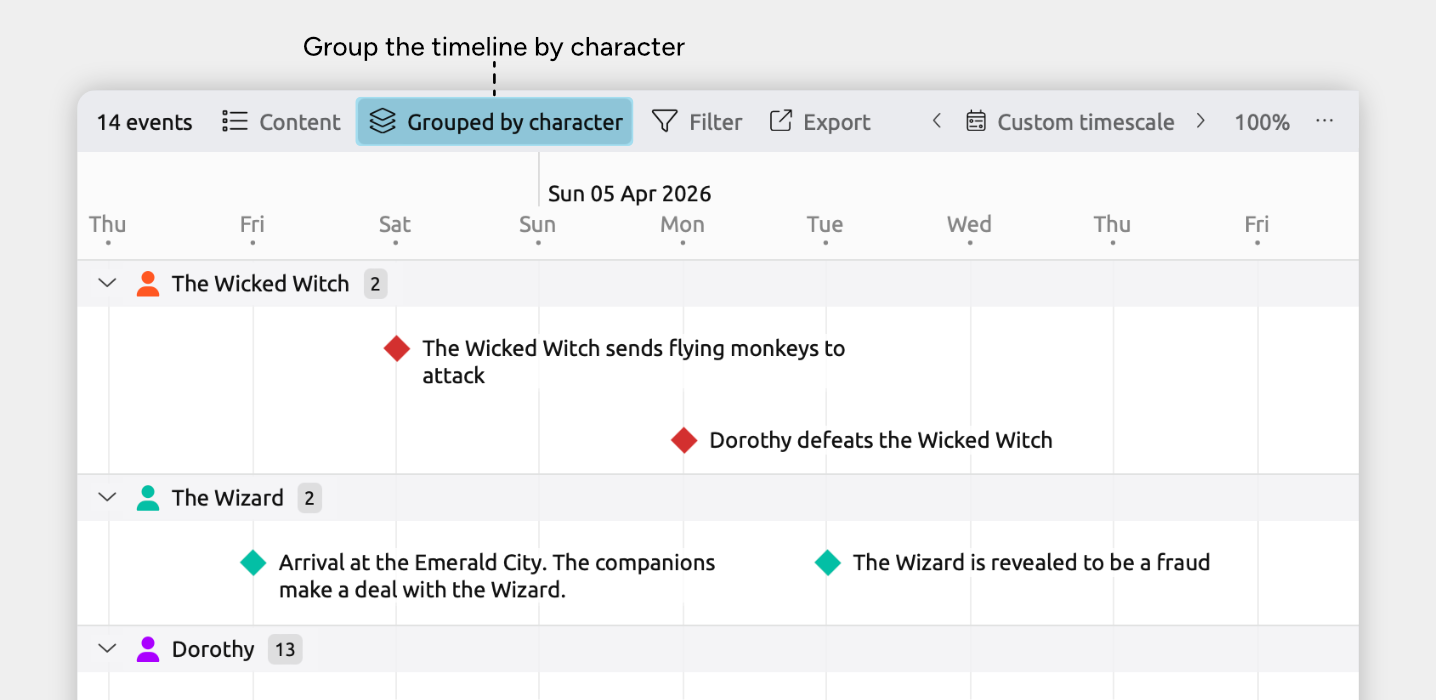
The view can be divided into separate sections for each character.
Grouping your timeline by character lets you see who appears when and how their storylines run alongside each other, making it easier to compare their presence and progression across your story.
Grouping is available in:
- Timeline view
- Spreadsheet view
- Relationship view
- List view
- Item type sidebar panels
To enable grouping in a view:
- Open the view where you want to use grouping.
- Open the [] Group panel in the view header.
- Find the Character relationship, and expand its section if it is collapsed.
- Select the related characters you want to group by, or choose All to show groups for all characters.
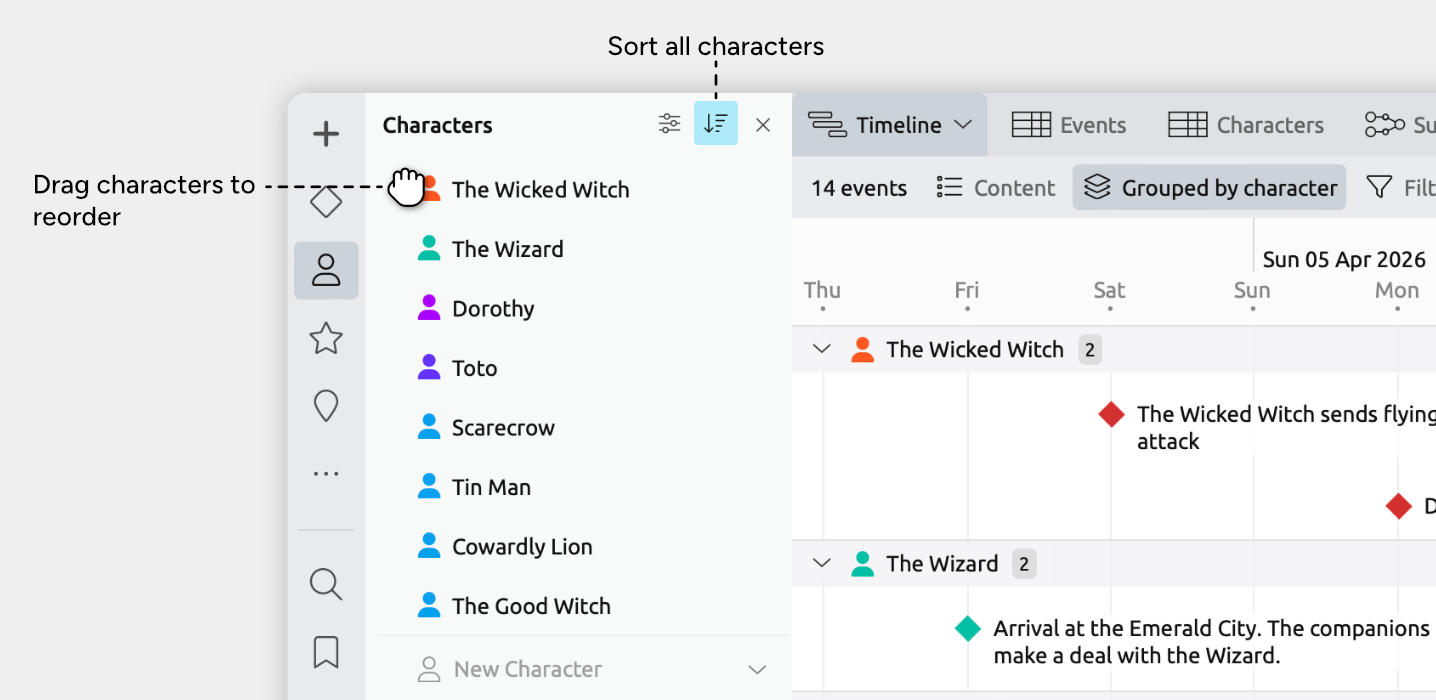
When you group by character, the order of the groups follows the order of the related characters.
To change how characters are ordered:
- Open the Character panel in the sidebar.
- Reorder characters by dragging them into your preferred order, or
- Use the panel’s sort options to automatically sort characters by label or color.
Learn more about grouping in the Categorize and Group Events and Items guide.
Review and Manage Which Characters Appear in Which Events
As your story grows, so does the value of being able to clearly track your characters.
In the Spreadsheet and Relationship views, you can quickly review and edit which characters are connected to which events. This makes it easy to check who’s involved in each scene, update appearances, or spot events where a key character may be missing.
Manage Assigned Characters in the Spreadsheet View
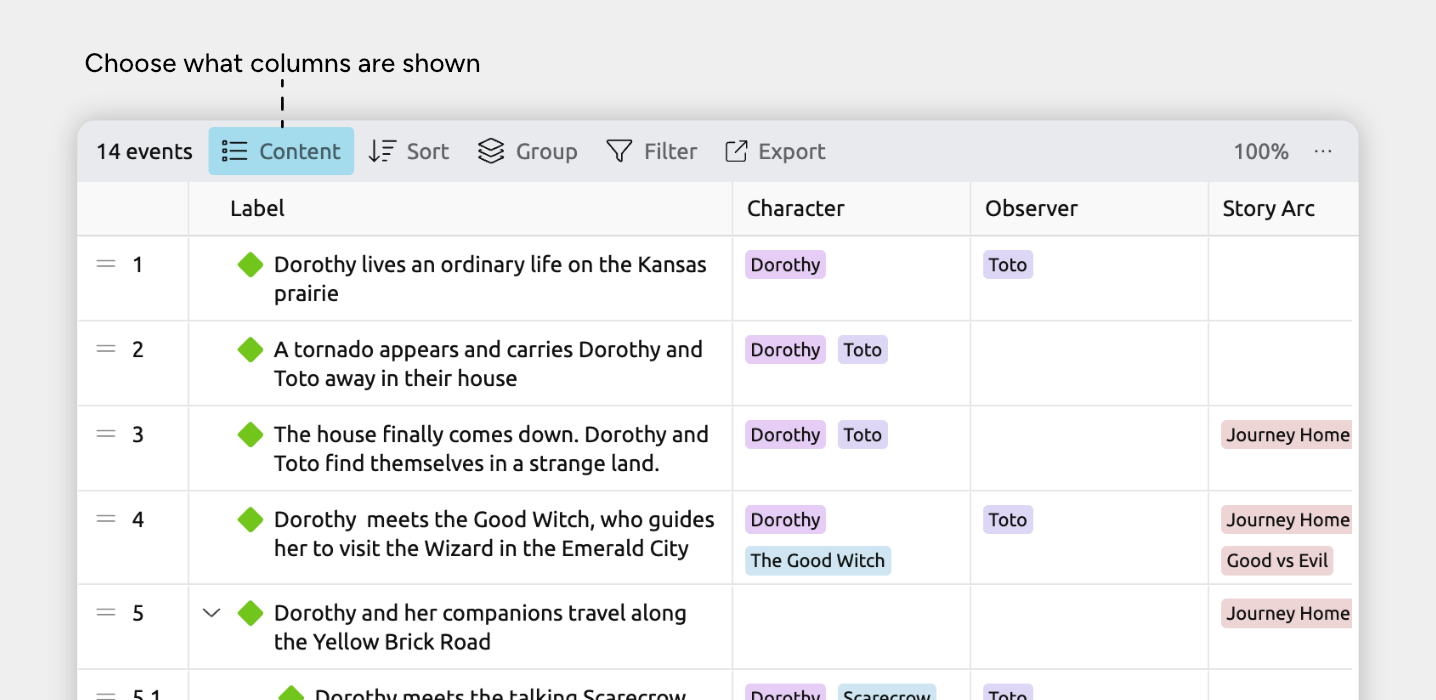
The Spreadsheet view makes it easy to manage relationships in bulk. Relationship types can be shown as columns, so you can quickly link characters, or update them for multiple rows.
- Select or create a tab set to the Spreadsheet view.
- Next, set up what the spreadsheet shows:
- Open the [] Content panel in the view header.
- Under Rows, select Events (or any other item type you’re using for your story events).
- Under Columns, select Characters (or any other custom relationship you're using to track character involvement).
- In the spreadsheet, click a cell in the Characters column.
- Select an existing character to relate, or choose Create to create and link a new character.
You can control how related characters appear in these cells — as short labels or avatars — by customizing the compact display settings for the item type. Learn how to set this in the Customize Item Types guide.
Select more than one row so you can work with several items at once.
- Hold Cmd (Mac) or Ctrl (Windows) and click the rows’ leftmost gutter cells one by one, or
- Hold Shift and click two row gutter cells to select the range between them.
When multiple events or items are selected, you can change dropdown values in the table for all of them at once, or edit their details together in the inspector.
Note for iOS: Long-press to enter Edit mode, then tap the leftmost gutter cells for the rows you want to select.
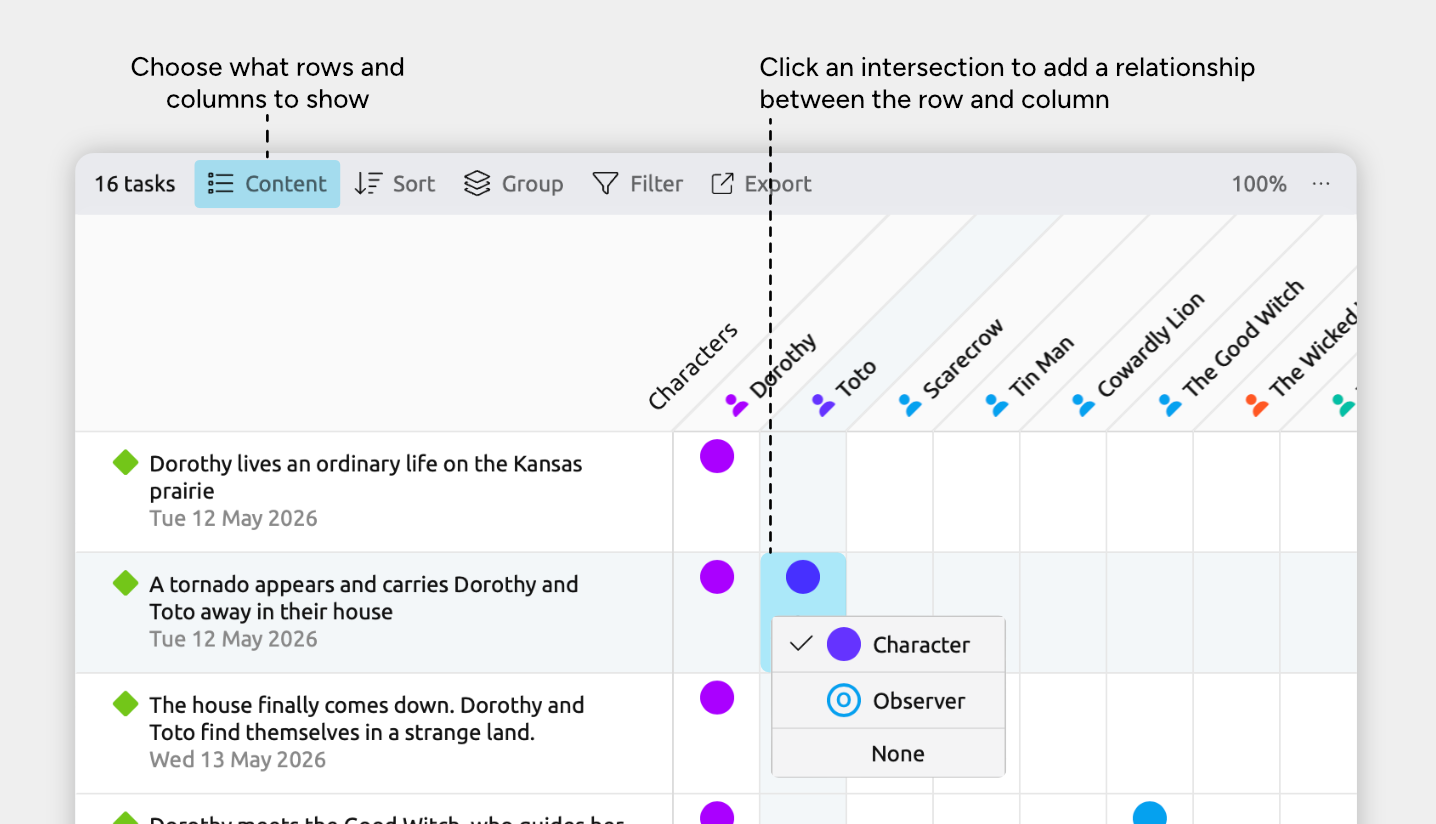
The Relationship view shows connections in a grid, making it easy to explore which events and characters link to each other.
- Select or create a tab set to the Relationship view.
- Next, set up what the relationship grid shows:
- Open the [] Content panel in the view header.
- Under Rows, select Events (or any other item type you’re using for your story events).
- Under Columns, select Characters.
- In the grid, click an intersection between an event and a character to add or remove relationships between them.
Tip: If both the event and character have dates, the grid intersection also shows the character's age at that event.
Learn more in the Relationship View guide.
Visualize When Characters Cross Paths
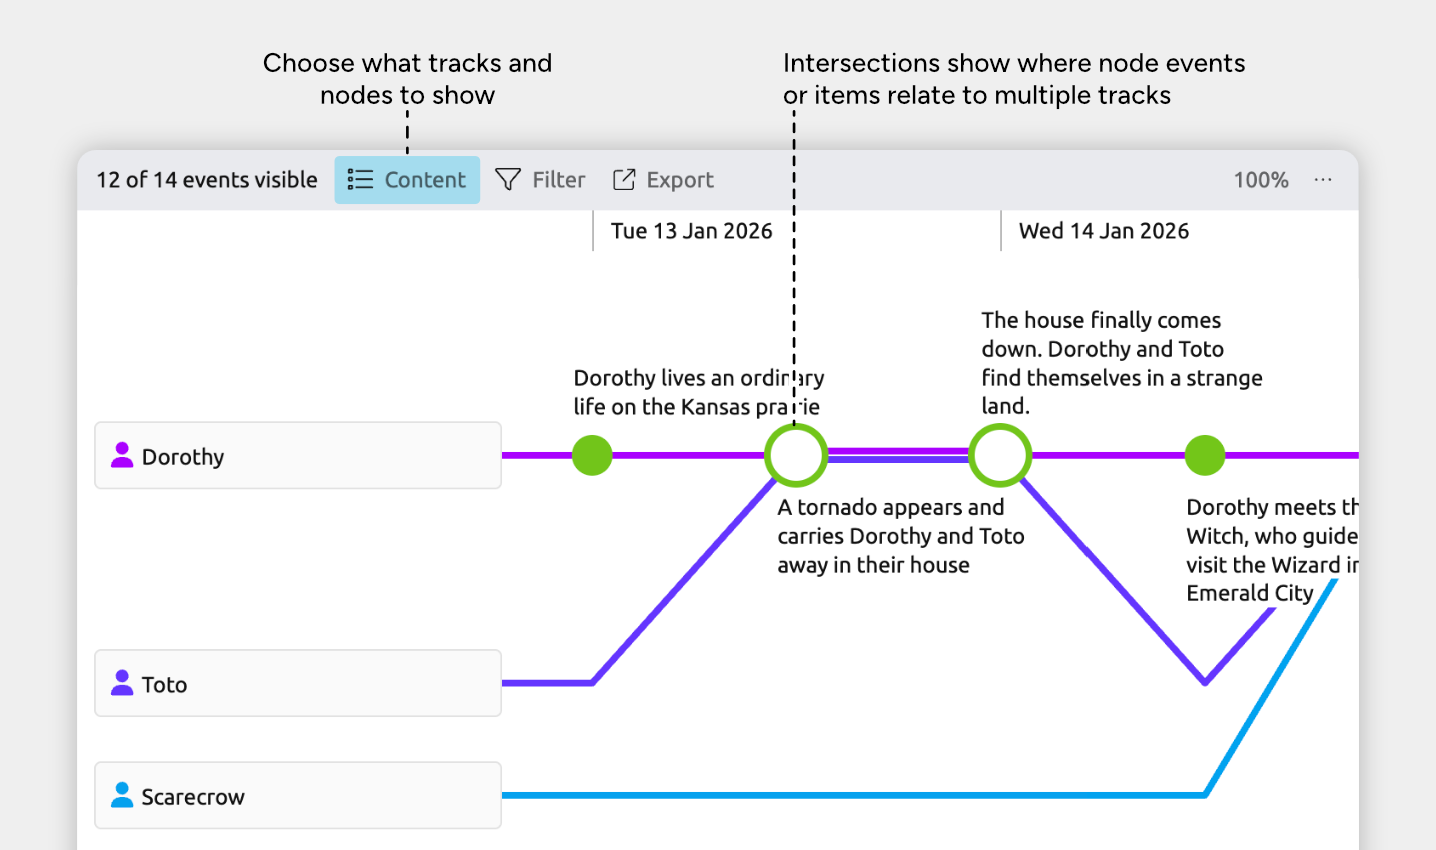
The Subway view makes it easy to visualize how characters move through your story and where their paths cross.
Each horizontal track represents a single character’s timeline. Events appear as nodes along that track. When two or more characters are involved in the same event, their tracks intersect, making shared moments instantly visible.
Tip: To see an example of visualizing characters in the Subway view, explore the Story Timeline template in the app.
Tracks are the main lines shown in the view. To show your characters and events in the Subway view:
- Select or create a tab set to the Subway view.
- To show tracks for your characters:
- Open the [] Content panel in the view header.
- Under Tracks, select Characters. Or, use the Characters dropdown to select individual characters.
- To show your events on each track:
- Open the [] Content panel in the view header.
- Under Nodes, select Events.
Learn more about customizing the view in the Subway View guide.
Note for narrative views: If you’re using a subway view set to show the narrative (shown by the Narrative label in the view header), the nodes will always be based on your narrative structure and can’t be customized per view. Learn more in the Organize a Separate Story Structure guide.
See a Timeline of Characters’ Lifespans
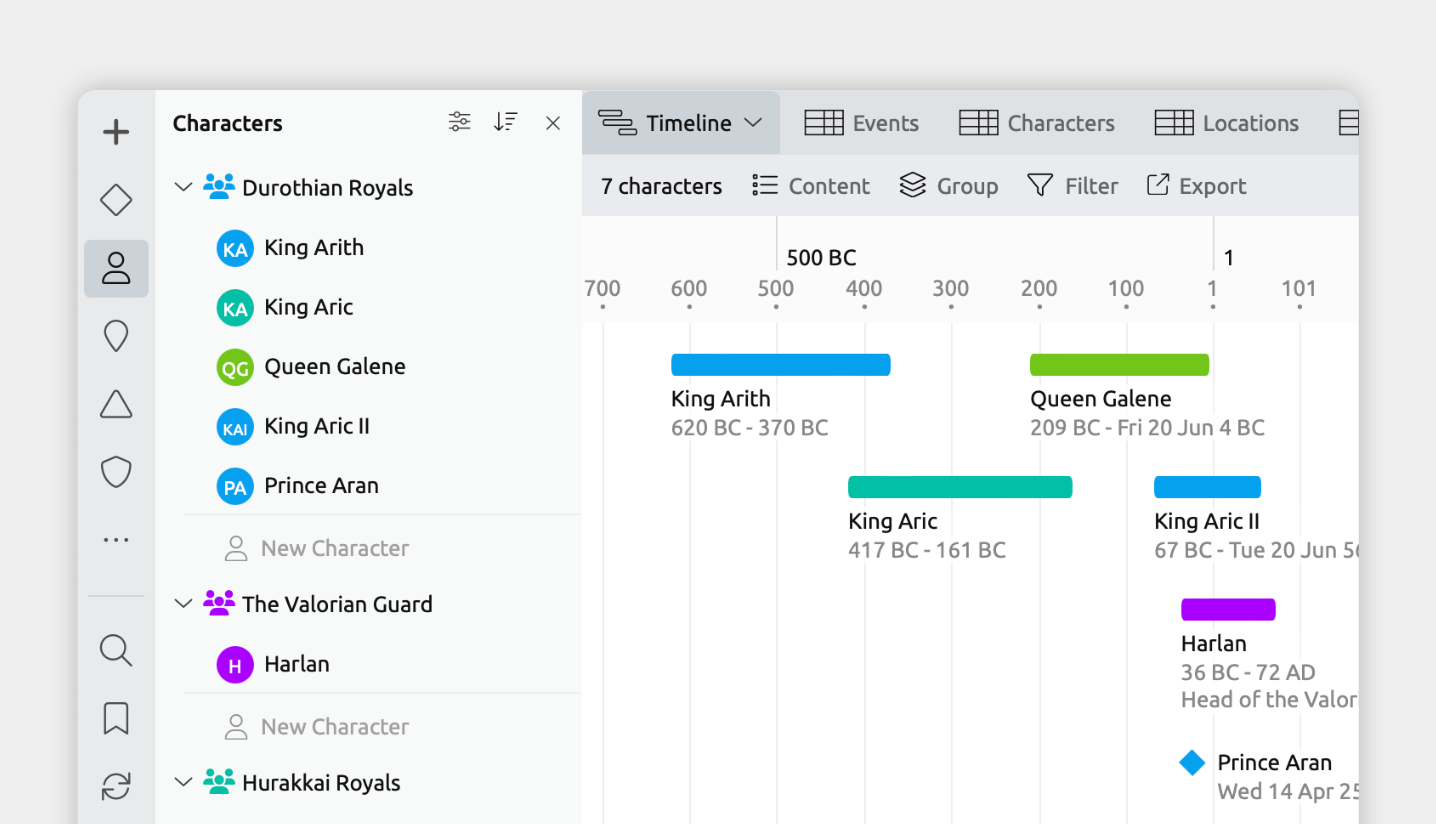
If you've added birth and death dates to your characters, Aeon Timeline can display all their lifespans together on one timeline. This gives you a clear visual of who was alive when, and how your characters' lives overlap.
To show all your characters' lifespans as bars on the timeline:
- Select or create a tab set to the Timeline view.
- Open the [] Content panel in the view header.
- Under Cards, check the Character item type.
- Uncheck any other item types you want to hide.
Note: The Character item type will only be available if it supports dates, since the Timeline view displays items positioned in time. This can be set under [] Settings in the Item Types tab.
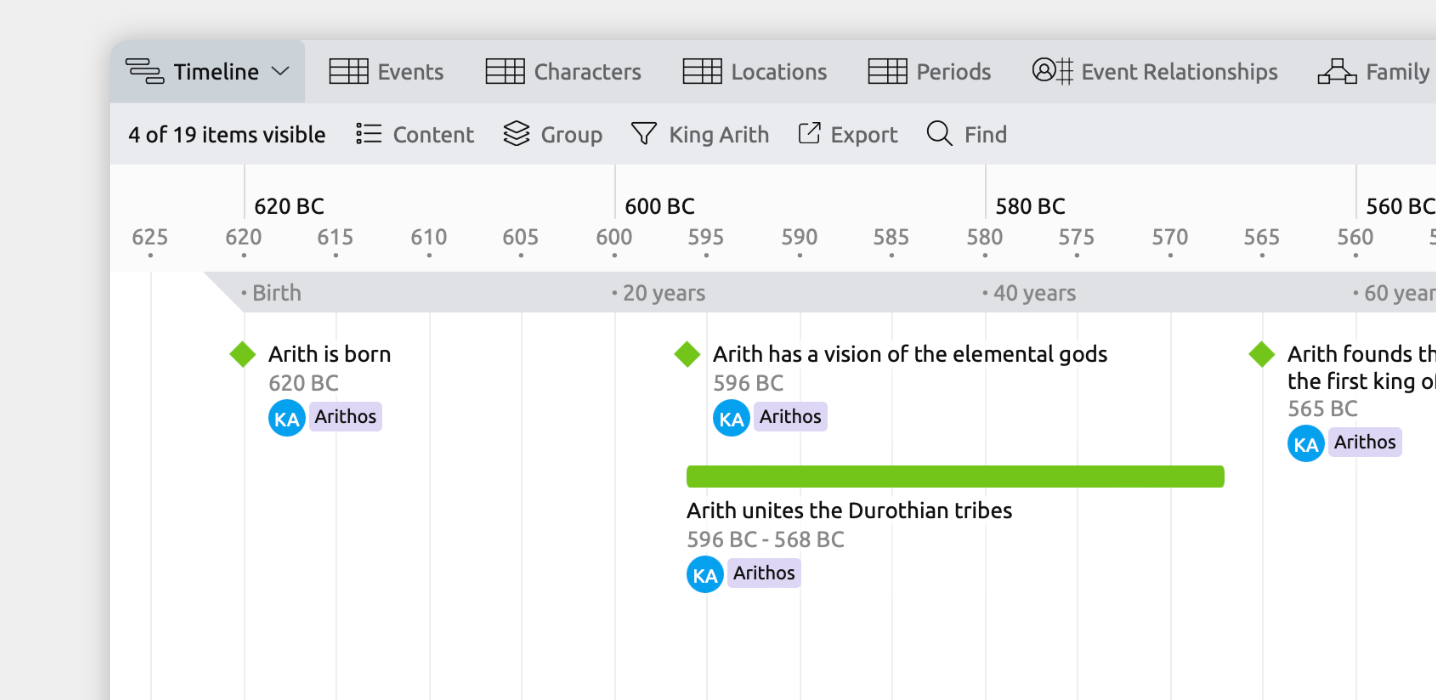
You can show a single character’s lifespan across the top of the Timeline view. This is useful for seeing how the events in your story line up with different points in that character’s life.
- Select or create a tab set to the Timeline view.
- Open the [] Filter panel in the view header.
- Select to filter the view by a single character.
A bar will be shown across the top of the view, showing the character’s age at the current timeline position.
Organize Characters into Character Groups
If you have a large cast of characters, organizing them into groups can make them easier to manage.
You might divide main and supporting characters, or organize by family, faction, team, or any other division important in your story.
To organize characters into groups:
Many fiction templates include an item type to track character groups. To check if your file has this:
- Open [] Settings.
- Select the Item Types tab.
- In the left-hand list, see if you have a Character Group item type.
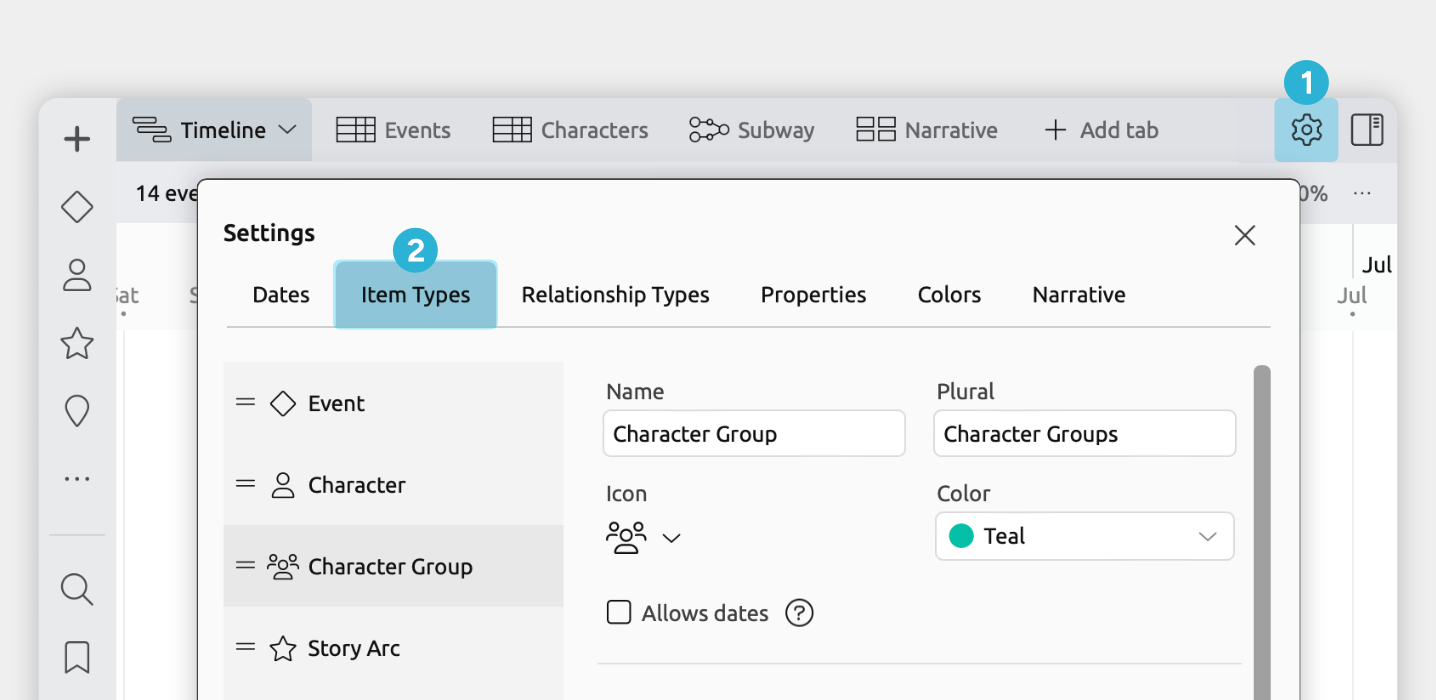
If your file doesn't already have character groups, you can add them with these steps:
- Open [] Settings.
- Select the Item Types tab.
- Click + New at the bottom of the left-hand list.
- Set the Name, Plural, and Icon fields for the new item type.
We recommend calling your item type Character Group / Character Groups and using the icon for multiple people. - Allow Characters to be nested under character groups.
- Select the Character item type from the left-hand list.
- Scroll down to the Nesting section, and ensure Character Group is selected.
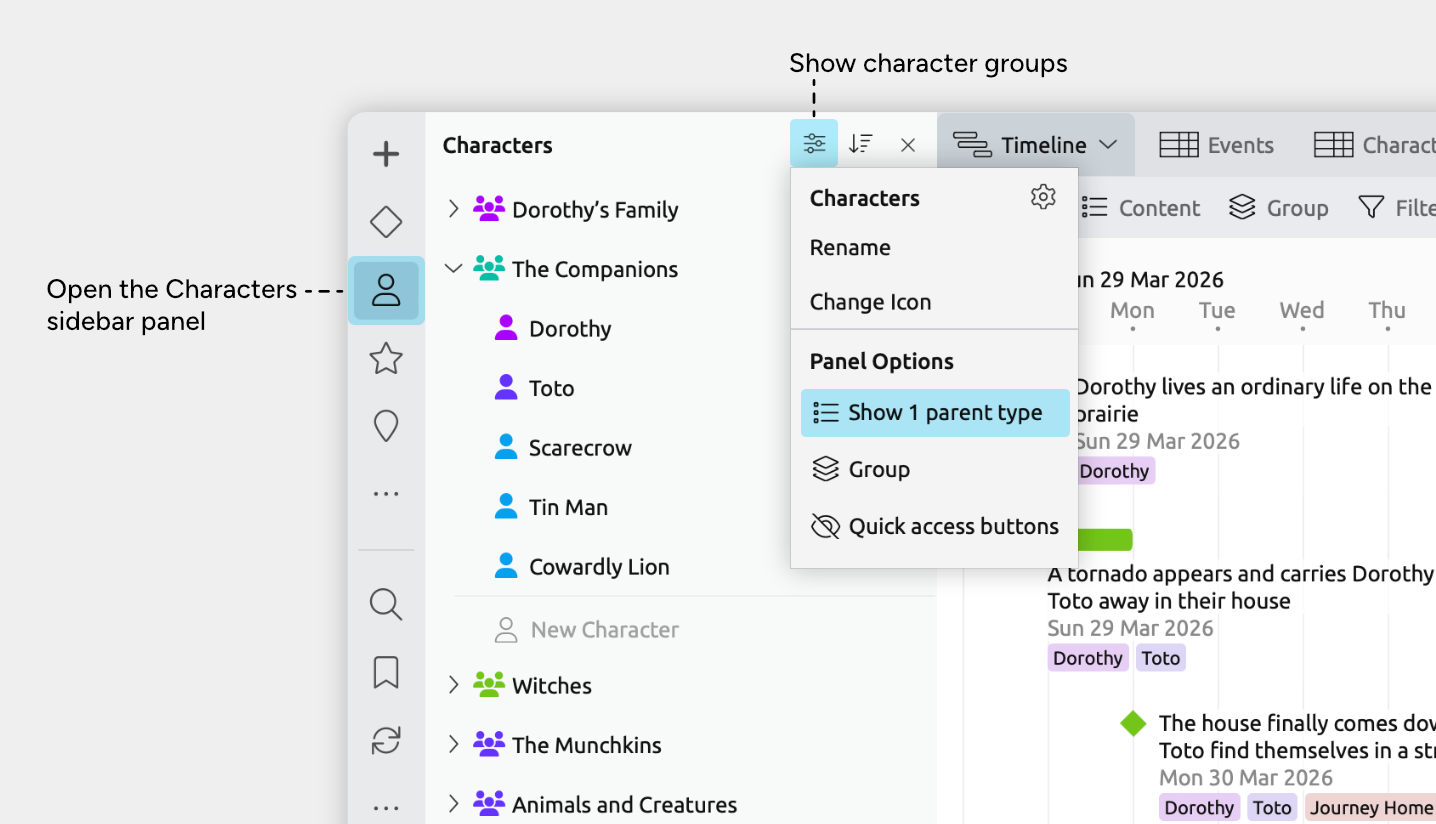
- Click the character icon in the sidebar to open the Characters panel.
- Set the panel to show character groups.
- Click the [] options icon at the top right of the Characters panel.
- Select Show parent types
- Enable the Character Group item type
- Create a new character group.
- Scroll to the New Character field at the bottom.
- Click the dropdown arrow on the right.
- Select Character Group, then type a name and press Enter.
- Nest characters by dragging characters into their appropriate groups.
Store and Manage Character Information
You can store as much, or as little, character information as you need to keep your story organized.
- Add dates, notes, or other fields
You can add dates, as well as text, numeric, option list, or checkbox fields to store character details.
For example, you might track birthdates, personality traits, goals, or any other information that matters in your story.
To enable the dates field for characters:
- Open [] Settings.
- Select the Item Types tab.
- In the left-hand list, select the Character item type.
- Tick Allow Dates if it isn't already checked.
- Click Add Fields and select Dates.
- Optional: If you'd like to customize what the start and end date fields are called, for example to call them Birth and Death, set the Date Label options at the bottom of the panel.
To enable notes or other fields:
- Open [] Settings.
- Select the Properties tab.
- Click Add at the bottom of the left-hand list.
- Set the following fields for the new property:
- Name and format
Choose a name and property format (e.g. text, checkbox, etc) that suits the information you want to store. - Show for item types
Select Character.
- Name and format
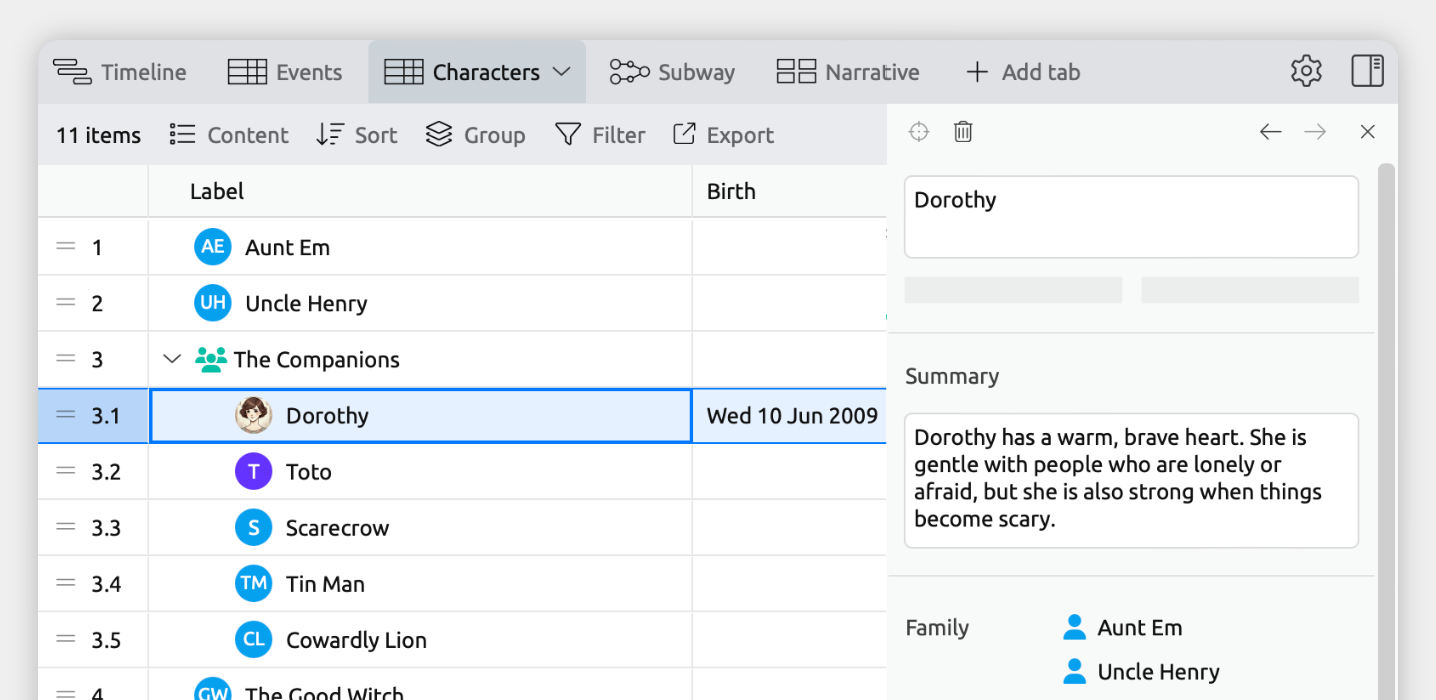
Now that your fields have been set up, you can add information to your characters by selecting a character, and adding to the fields in the inspector.
You can also choose to show these fields when showing characters on the timeline. Learn how in the Timeline View guide.
You can also create a table of characters to more easily manage all character information. Learn how in the Spreadsheet View guide.
- Add character images
You can assign an image to each character, and optionally use it as their avatar throughout the app.
To enable the image field for characters:
- Open [] Settings.
- Select the Item Types tab.
- In the left-hand list, select the Character item type.
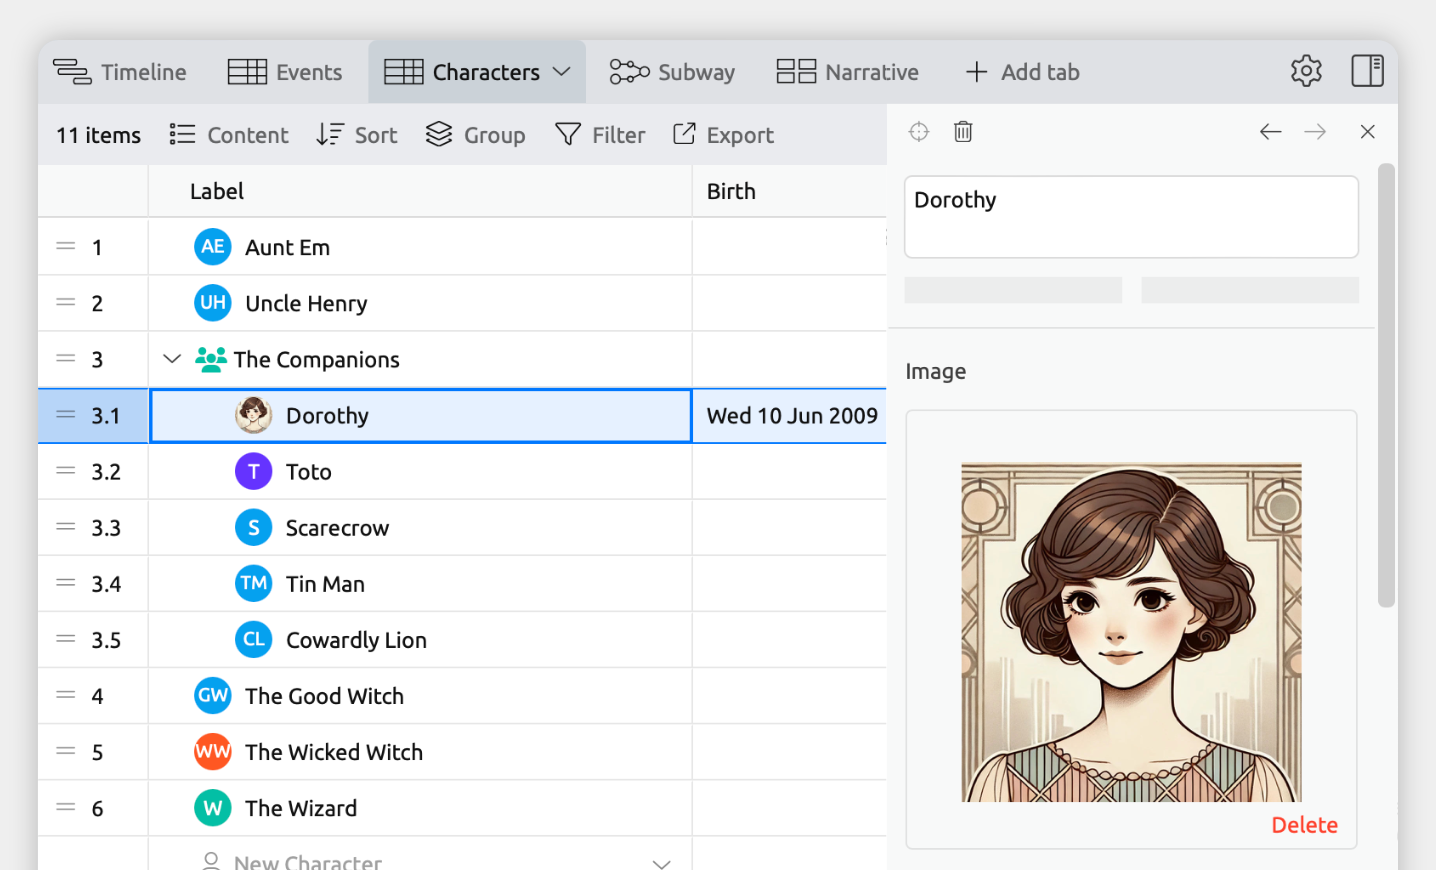
- Click Add Fields and select Image.
- Optional: If you would like your characters' images to also be used as their avatar around the app, you can also set the Compact Display option to Avatar: Use Images.
Now when you select a character, an image field will be shown which allows you to attach or link to an image.
- Track how characters are related to each other
To track relationships between characters — such as family ties, rivalries, or alliances — you can set up custom relationship types to suit your project.
To add custom relationship fields for characters:
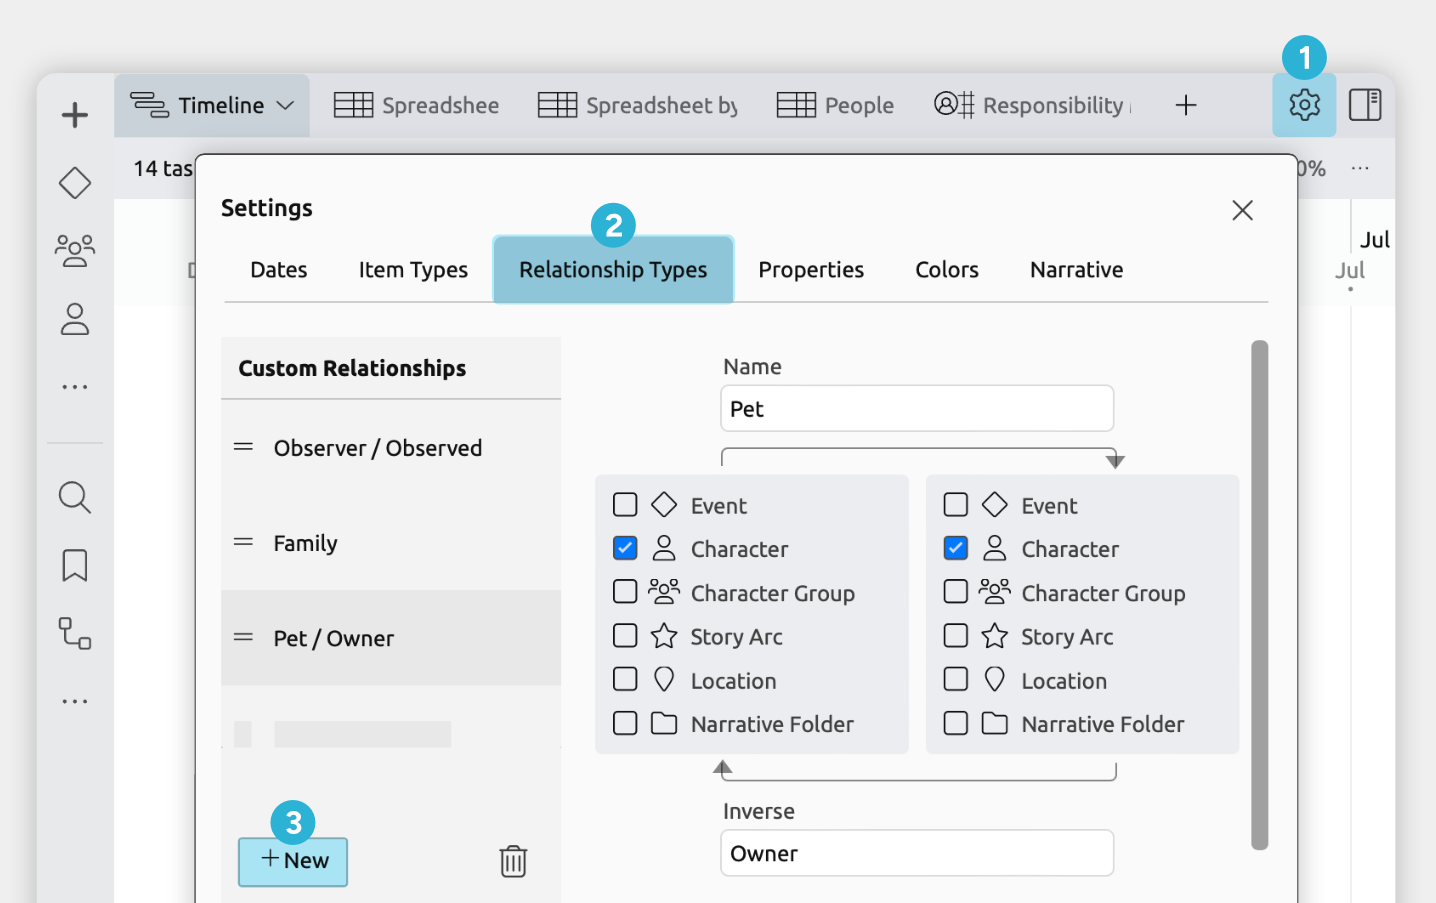
- Open [] Settings.
- Select the Relationship Types tab.
- Click + New at the bottom of the left-hand list.
- Set the following fields for the new relationship:
- Name
Name how the characters are related. For example, Friend, or Partner. - Inverse
If the relationship has a different name when viewed from the reverse, enter it here. For example, the inverse of Grandparent would be Grandchild. - Item types
Select Character from both lists. - Show for item types
Select Character.
- Name
Now when you select a character, your new relationship field will be shown in the inspector, allowing you to use it to connect other characters.
You can also use the Mindmap view to visualize these connections.
Tip: To see an example of visualizing characters in the Mindmap view, explore the Worldbuilding template in the app.
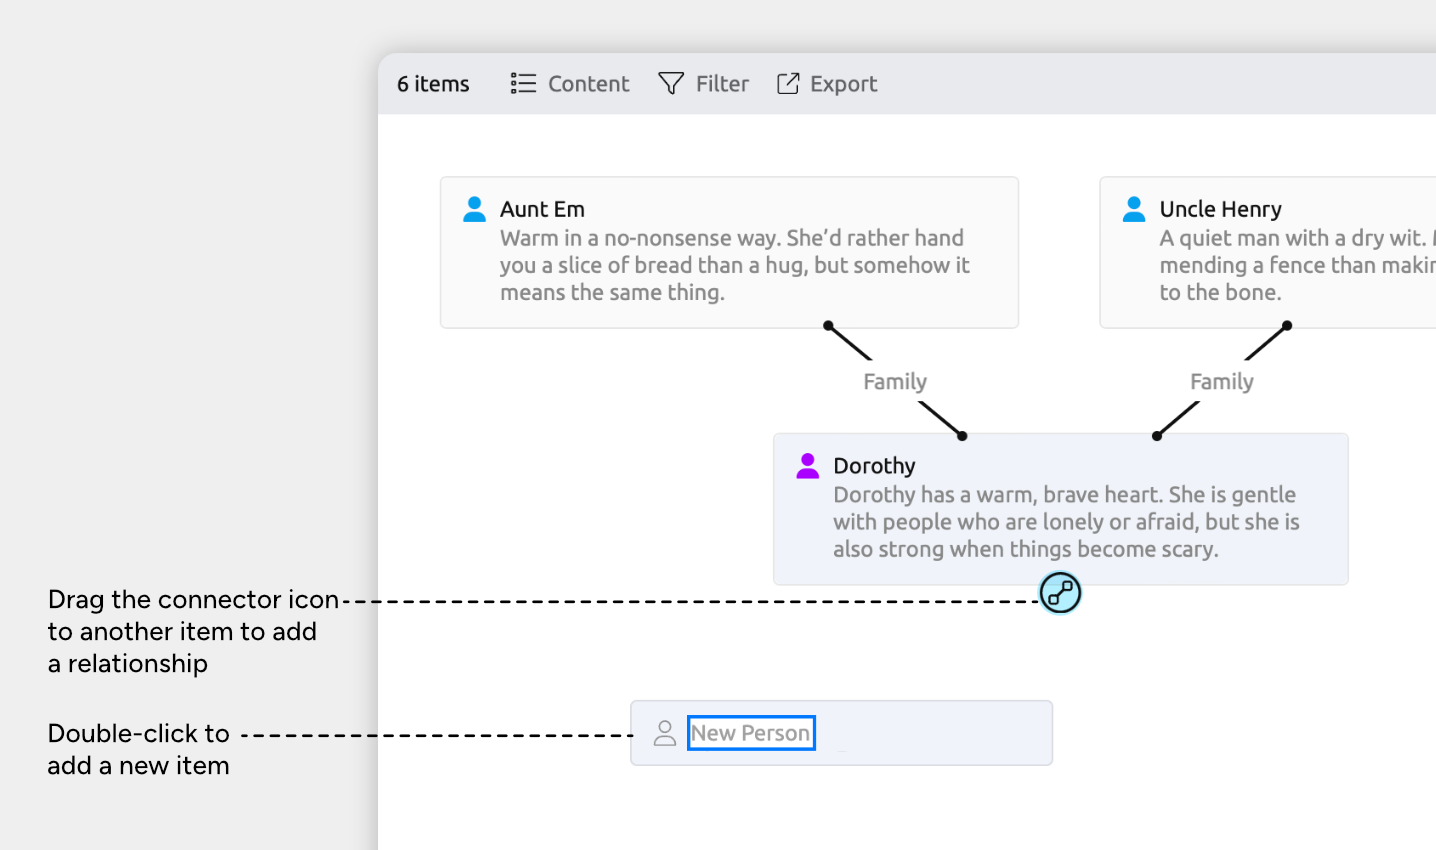
- Select or create a tab set to the Mindmap view.
- Click the character icon in the sidebar to open the Characters panel.
- Drag characters from the panel into the mindmap.
- To add a relationship between two characters, show the connector icon for one of the characters you want to connect:
- Mac or Windows: Hover over the item to show the icon
- iOS: Tap the item once to show the icon.
- Drag the connecting line to the other character you want to connect.
- Manage characters in a spreadsheet
As your cast of characters grows, the Spreadsheet view lets you easily review and edit all character information in a table.
To create a spreadsheet of your characters:
- Select or create a tab set to the Spreadsheet view.
- Open the [] Content panel in the view header.
- Under Rows, check the Character item type. Uncheck any other item types you want to hide.
- Under Columns, select the fields you want to show for each character.
Learn about customizing the spreadsheet in the Spreadsheet View guide.
Try Aeon Timeline free for 14 days
Get Aeon Timeline and easily visualize and organize your project.