Story Timelines
Outline Your Story
Aeon Timeline lets you organize your story’s events from two different angles:
- When events happen and in what order (your timeline)
- How events are arranged in the story (such as into acts, chapters, or other sections)
You can use either one or both, depending on what you want to focus on.
And whichever structure you choose, you can still track characters, story arcs, and any other details that matter to your project.
Create a Timeline of Your Story’s Events
A timeline lets you lay out your story in chronological order, so you can step back and see how everything fits together from beginning to end.
It lets you shape the flow of events as you plan, and catch timing or continuity issues as you revise.
Create a Visual Timeline
The Timeline view lays your events out on a visual canvas across time. You can scroll left and right to move through your story, and zoom the timescale in to focus on a single day or week, or out to see your story unfold across years, decades, or even centuries.
To create a visual timeline:
- If you already have a tab with a Timeline view, select it.
- Otherwise, click the + Add Tab button at the end of the tab bar, and select the Timeline view.
If you have more tabs that can fit on the screen, this may be within a More dropdown menu at the end of the tab bar.
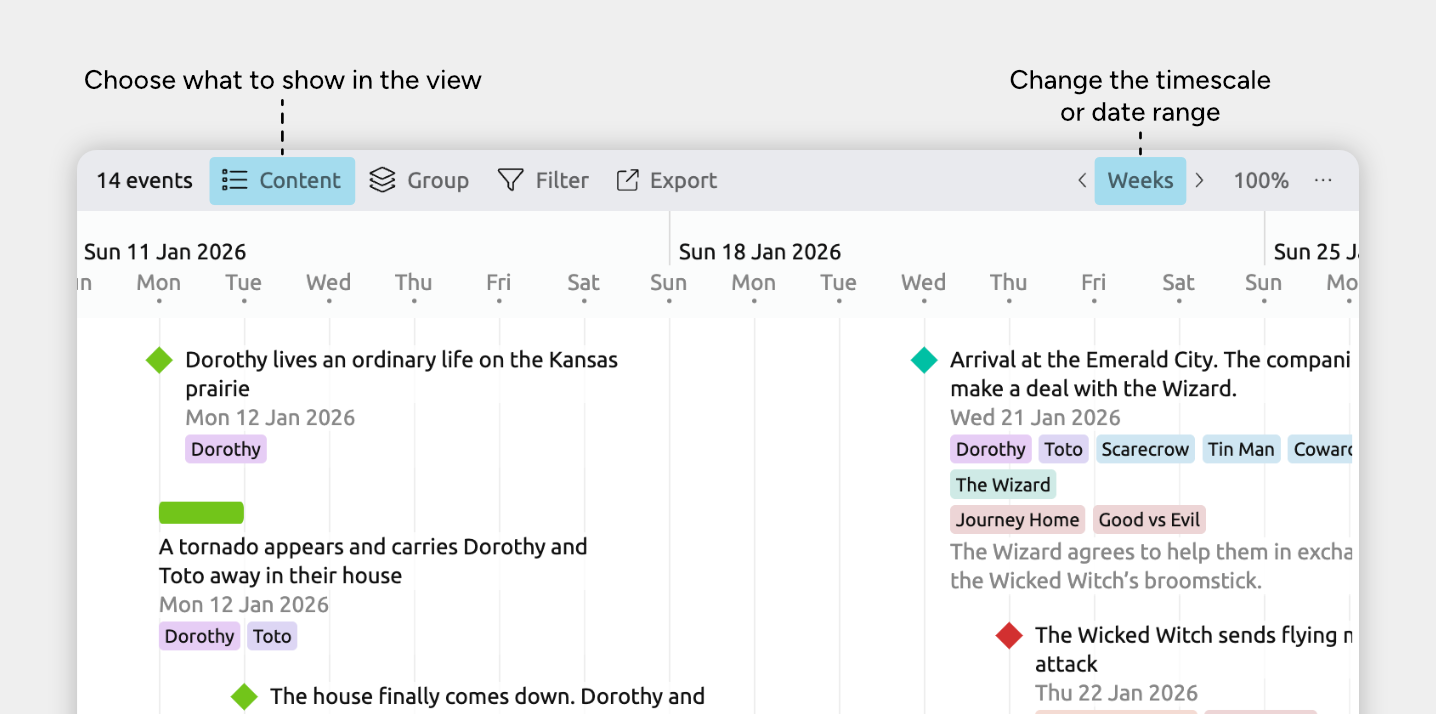
Choose Which Item Types to Show
To outline your story, you will likely want to select to show Events on your timeline. What other types are available depends on your file's settings.
- Open the [] Content panel in the view header.
- Under Cards, check or uncheck the item types you want to show or hide.
Only item types that support dates will be available, since the Timeline view displays items positioned in time.
To learn more about using item types to categorize your information, see the Customize Item Types guide.
You can adjust the timeline’s timescale to zoom in for detail or zoom out for a broader overview. You can zoom in to work with precise dates, or zoom out to view months, years, or longer spans.
You can also limit the visible date range to focus on a specific time period.
If you want to change the underlying calendar or date system used by your entire project, see the Add and Customize Dates guide.
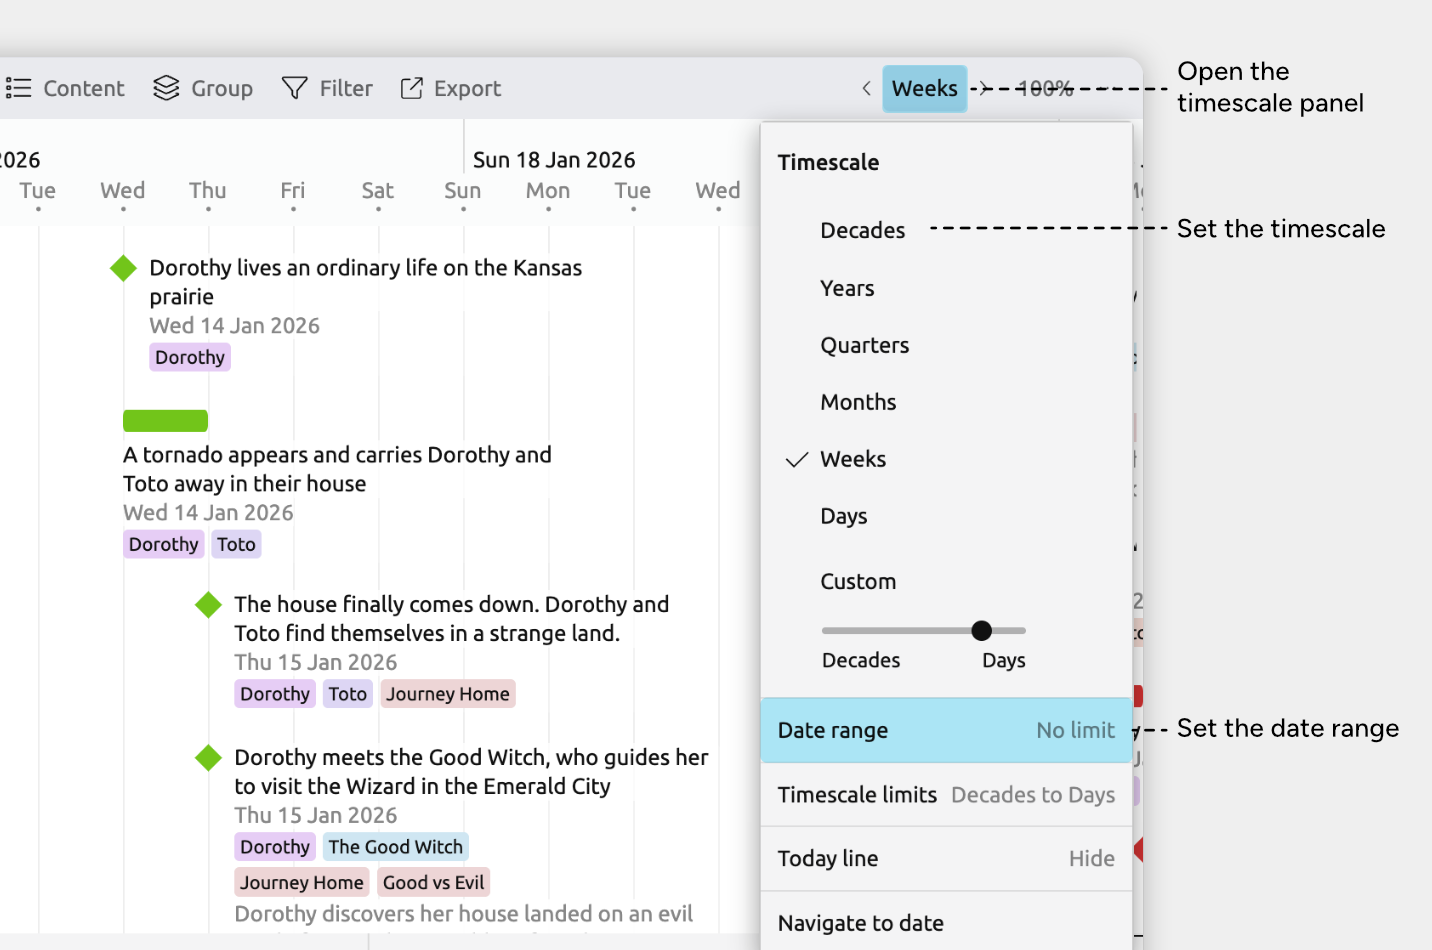
Set the Timescale
To choose a specific timescale:
- Open the [] Timescale panel in the view header. It’s labelled with the current timescale, such as Years, Months, or Custom Timescale.
- Select one of the preset scales (such as Decades or Years), or adjust the slider under Custom Timescale.
You can also zoom the timeline using scrolling or gestures:
- Hold Cmd (macOS) or Ctrl (Windows) and scroll with the mouse; or
- Use a pinch gesture on a trackpad or touchscreen.
Set Timescale Limits
How far you can zoom in or out is controlled by the timescale limits.
To change these limits:
- Open the [] Timescale panel in the view header. It’s labelled with the current timescale, such as Years, Months, or Custom Timescale.
- Select Timescale Limits.
- Set the minimum and maximum zoom levels.
This ensures that zooming only allows timescale levels that are appropriate for your work.
Set the Date Range
You can limit the visible date range of the timeline to focus on a specific period.
To set a date range:
- Open the [] Timescale panel in the view header. It’s labelled with the current timescale, such as Years, Months, or Custom Timescale.
- Select Date Range.
- Enter dates in the From and To fields, or clear them to allow the timeline to scroll infinitely.
Scroll Horizontally
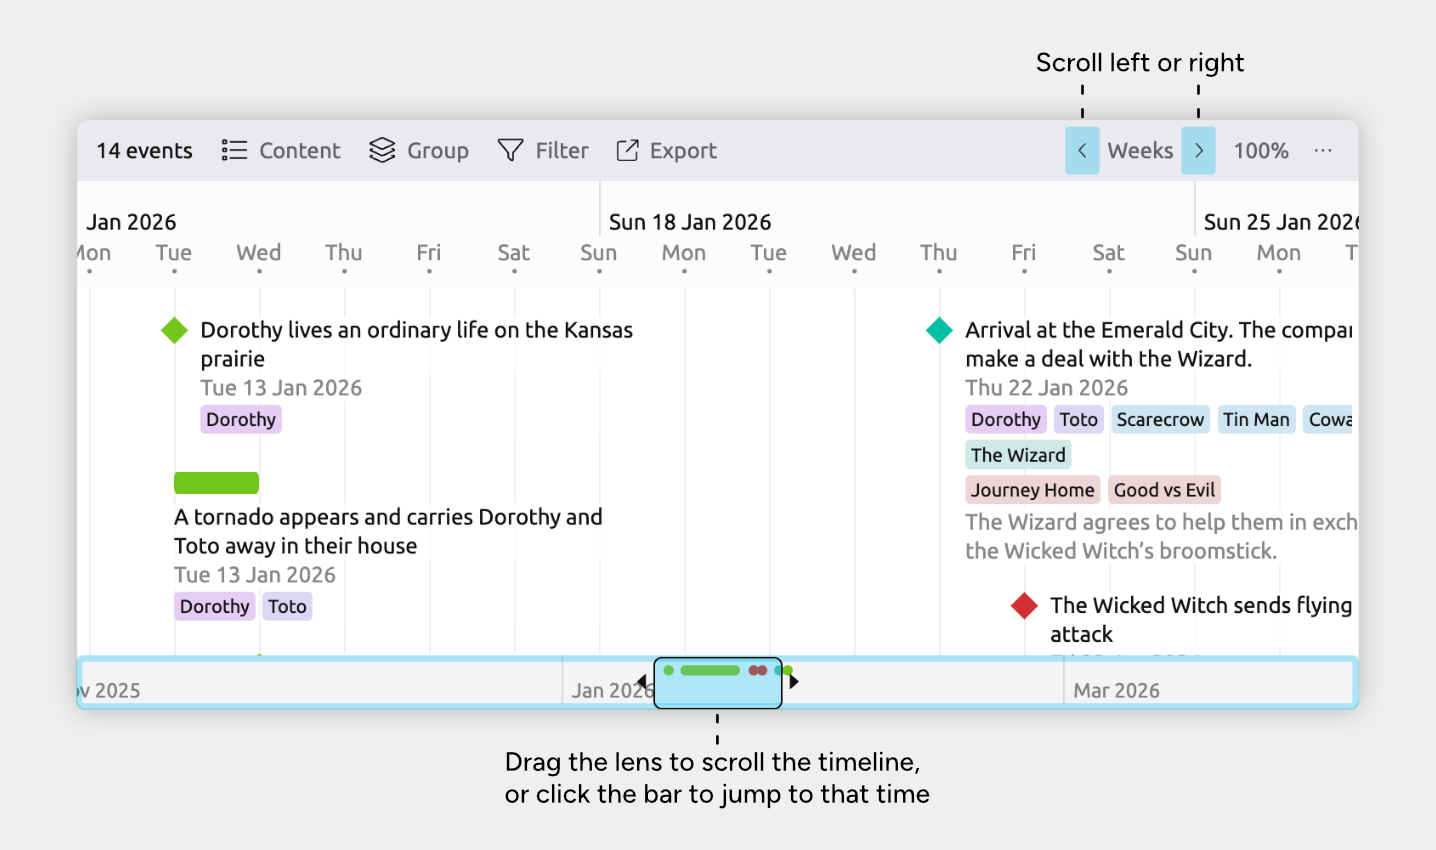
There are several ways to move left and right through the timeline.
From the interface:
- Click the left and right arrow buttons in the view header to move left or right by a screen’s width.
- The context bar shows a condensed overview of the timeline and lets you jump quickly to a different point in time. Click in the context bar to jump to that part of the timeline.
Using a mouse, trackpad, or touchscreen:
- Hold Shift and scroll with the mouse
- Swipe left or right on a trackpad or touchscreen
Jump to Dates
- Open the [] Timescale panel in the view header. It’s labelled with the current timescale, such as Years, Months, or Custom Timescale.
- Open the Navigate to date section.
- Select to scroll to a date that you input, or to today.
Tip: You can also press Cmd + J (Mac) or Ctrl + J (Windows) to quickly open the Scroll to date panel.
Jump to Events or Items
You can jump straight to a specific event or item on the timeline.
- Select the event or item you want to find.
- You can do this by searching: click the Search icon in the sidebar and enter text that matches the item.
- At the bottom of the inspector, click Find in view.
The timeline will scroll to that event or item and bring it into focus.
Tip: Once you have selected an event or item, you can also press Cmd + G (Mac) or Ctrl + G (Windows) to scroll to it in the view.
You can add new events and items directly on the timeline.
Events and items created in other views will also appear here, as long as they have dates and their item types are set to be shown from the Content panel in the view header.
Add a New Event or Item
Add directly on the timeline:
- Double-click an empty space on the timeline to create a new item at that date.
- If multiple item types are available, use the Choose type dropdown to select the one you want.
- Type a label and press Enter.
Add from the sidebar:
- Click the + button in the sidebar.
- Select an item type.
- Type a label and press Enter.
Duplicate an Existing Item
- Click an event or item’s [] pencil icon to open its Edit menu.
- On Mac or Windows, hover over the item to show the icon.
- On iOS, tap the item once to show the icon.
- Choose Duplicate.
Create an Item Directly Above or Below Another
- Click an event or item’s [] pencil icon to open its Edit menu.
- On Mac or Windows, hover over the item to show the icon.
- On iOS, tap the item once to show the icon.
- Choose Create item above or Create item below.
You can drag events and items in the timeline to adjust their dates.
If you prefer to more precisely adjust dates, you can also select an event or item and edit its dates in the inspector.
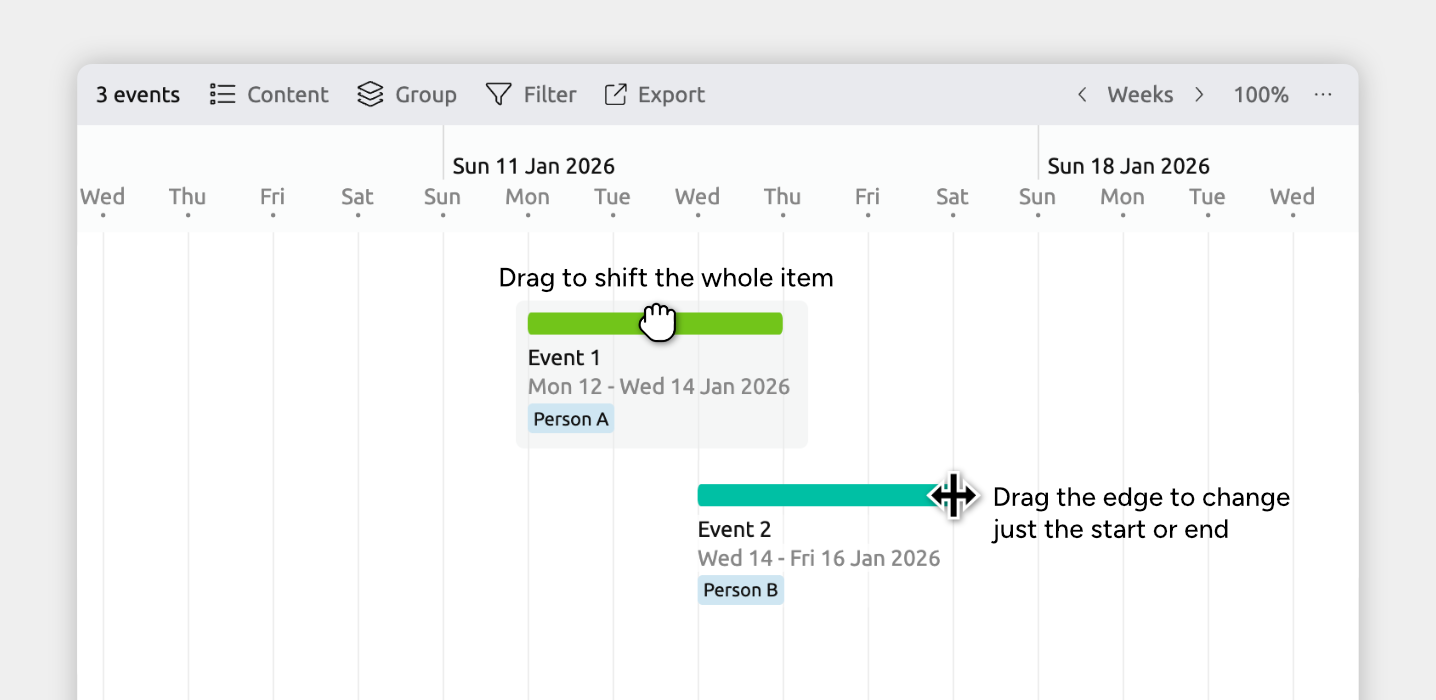
Shift an Entire Event or Item
Drag an event or item left or right on the timeline to move it through time without changing its duration.
- Hold Shift while dragging to move by set increments (such as 1 hour or 1 day), based on your current timescale zoom.
- If the item contains nested items, they may move automatically as well depending on your date editing settings. To learn more about date editing behaviours, see the Add and Customize Dates guide.
- Note for iOS: Long-press to enter Edit mode before dragging events and items.
Shift an Item's Start or End
Adjust when an event or item begins or ends by resizing it on the timeline.
- Hover over the left or right edge of the marker until the resize arrows appear, then drag inward or outward.
- Hold Shift while dragging to move by set increments (such as 1 hour or 1 day), based on your current timescale zoom.
- Note for iOS: Dragging marker edges isn’t available. To change start or end dates, select the item and edit its dates in the inspector.
Learn more about the timeline in the Timeline View guide.
Organize Your Timeline in a Spreadsheet
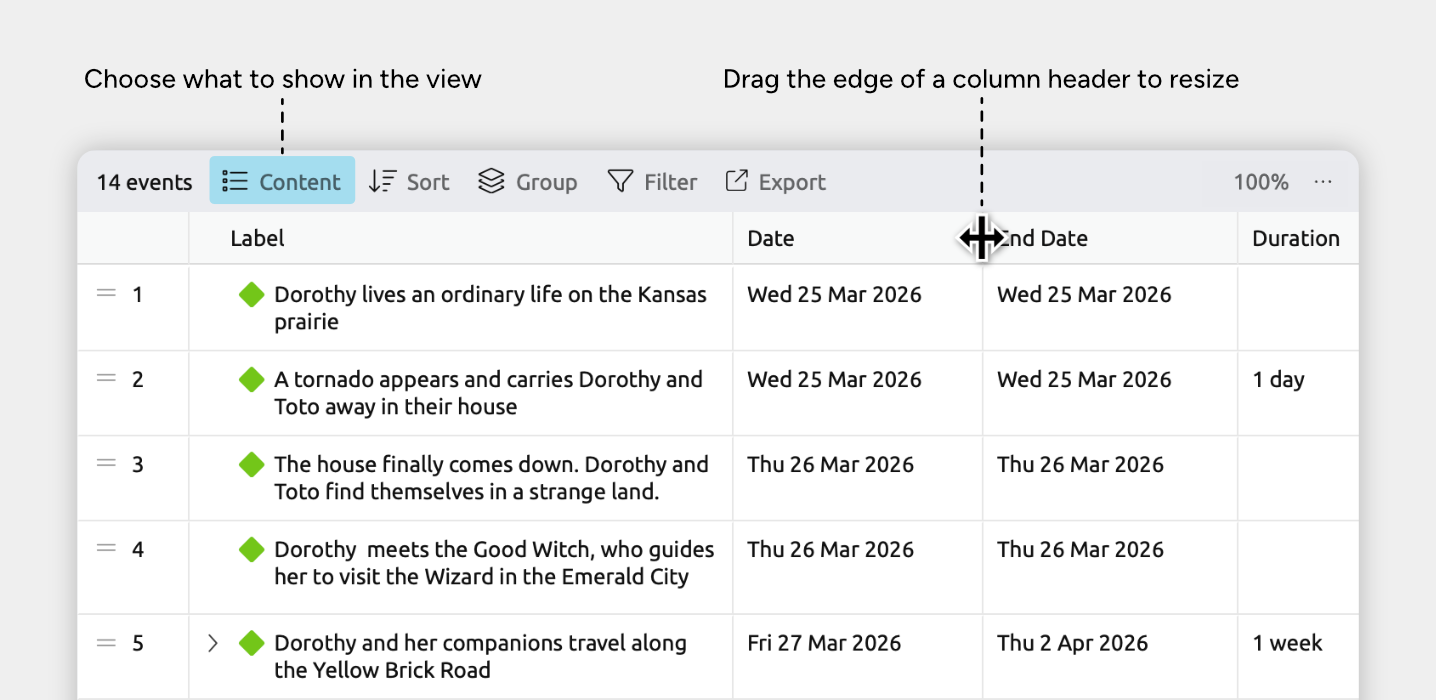
The Spreadsheet view shows your story in a simple table.
Each event appears as a row, with columns for dates, summaries, related characters, or any other fields you’re tracking. This makes it easy to review your work, sort by specific details, or make bulk edits quickly.
To organize your timeline in a spreadsheet:
- If you already have a tab with a Spreadsheet view, select it.
- Otherwise, click the + Add Tab button at the end of the tab bar, and select the Spreadsheet view.
If you have more tabs that can fit on the screen, this may be within a More dropdown menu at the end of the tab bar.
Choose Which Item Types to Show as Rows
To outline your story, you will likely want to select to show Events in your spreadsheet. What types are available depends on your file's settings.
- Open the [] Content panel in the view header.
- Under Rows, check or uncheck the item types you want to show or hide.
- (Optional) Adjust Max Lines Per Row to limit how tall each row can be.
Note for narrative views: If you’re using a spreadsheet view set to show the narrative (shown by the Narrative label in the view header), the rows will always show your narrative items and cannot be customized per view. Learn more in the Organize a Separate Story Structure guide.
Add a New Event or Item
- Scroll to the bottom of the spreadsheet and focus the New Event or New Item cell.
- If multiple item types are available, click the down arrow on the right side of the cell to choose the item type.
- Type a label and press Enter.
Duplicate an Existing Item
- Click an event or item’s [] pencil icon to open its Edit menu.
- On Mac or Windows, hover over the item’s label cell to show the icon.
- On iOS, tap the item’s gutter cell once to show the icon.
- Select Duplicate.
Create an Item Directly Above or Below Another
- Click an event or item’s [] pencil icon to open its Edit menu.
- On Mac or Windows, hover over the item’s label cell to show the icon.
- On iOS, tap the item’s gutter cell once to show the icon.
- Choose Create item above or Create item below.
- Open the [] Content panel in the view header
- Under Columns, click fields to show or hide them
Add New Columns
If you want to store information that isn’t already available as a column, you can add new fields in two main ways:
- Connect rows with other events, people, or items
Add a relationship field to link items together. Learn more in the Connect Events, People, and More guide. - Store text, numbers, option lists, or checkboxes
Add a property field to hold supplementary information. Learn more in the Add Notes, Tags, and Extra Details guide.
Reorder and Resize Columns
- Reorder: Drag a column header left or right.
- Resize: Hover over the right edge of a column header until the resize cursor appears, then drag to adjust the width.
Set the Dates for Events and Items
- Ensure the dates column is shown.
- Open the [] Content panel in the view header
- If the Date column is not already visible under Shown, find it under Hidden and click it to enable it.
It may appear under See More, depending on your settings.
- Set the date by either:
- Typing directly into a date cell, or
- Clicking the [] calendar icon in a date cell and choosing a date from the picker
You can also sort and reorder rows to put them in the order you want.
Sort All Rows
Use sorting to quickly reorganize the entire view based on what you want to focus on.
- Open the [] Sort panel in the view header.
- Choose the field you want to sort by, such as date, label, or another column.
Reorder Events and Items
In some cases, you can drag and drop individual rows to reorder them. Whether this is available depends on how the view is currently sorted.
- Click and hold the leftmost gutter cell (with the [] drag handle).
- Drag the row to where you want it to go.
Rows can be manually positioned when you are sorted by:
- No sort order
- Dates → Flexible ordering enabled
- Color, as long as you stay within the same color group
- Item type, as long as you stay within the same item type
- Option list properties, as long as you stay within the same option
Note for iOS: Long-press to enter Edit mode, then drag a gutter cell.
Note for narrative views: If you’re using a spreadsheet view set to show the narrative (shown by the Narrative label in the view header), the rows will always show your narrative items and cannot be customized per view. Learn more in the Organize a Separate Story Structure guide.
Plan Around Inexact Dates
When planning your story, you might begin by sketching out the rough order of events. Or you might have just a few rough dates in mind.
Aeon Timeline gives you several ways to work flexibly, so you can use as much, or as little, detail as your project needs.
- Order events without dates
In the Spreadsheet, List, and Relationship views, you can drag and reorder events to define what happens first, second, and so on, without needing to add dates.
You can also mix dated and undated events. This is useful when you’ve set a few key anchor events, and you want to arrange other events around them without defining their dates yet.
If you want to arrange events or items in a rough chronological order before all dates are known, Aeon Timeline lets you do this using flexible ordering.
To enable flexible date ordering:
- Select or create a tab set to the Spreadsheet, List, or Relationship view
- Open the [] Sort panel in the view header
- Sort rows by Date
- Enable Flexible ordering
With flexible ordering turned on, you can drag and drop items to arrange them relative to each other. Items with dates will stay in date order, while undated items can be placed before, after, and between them.
This makes it easier to establish the overall sequence of events first, and fill in exact dates later.
Note on the narrative: If you’re using a spreadsheet view set to show the narrative (shown by the Narrative label in the view header), the rows will always be sorted by your narrative order.
To sort by date, create a new spreadsheet tab that doesn’t use narrative order.
Learn more in the Organize a Separate Story Structure guide.
- Use less precise dates
You can also use less specific dates.
Instead of entering a full date like January 5, 2020, you can enter just January 2020 or simply 2020. This lets you place events in time without deciding on an exact day.
When entering a date, you can either:- Type a less specific date, like March 2020
- Click the [] calendar icon in a date field, then expand Date Precision to choose how precise the date should be
You can set a maximum level of date precision for your timeline. This defines the most detailed dates that can be entered, while still allowing items to use less precision if needed.
For example, you might allow dates down to months, but not specific days or times. When this setting is in place:
- Dates can’t be entered with more detail than what you’ve allowed
- Any existing dates in your file that were more precise will be adjusted to match the new limit
- Events and items can still use broader dates, such as years only
To set the maximum date precision:
- Open [] Settings
- Select the Dates tab
- Using the Maximum Date Precision dropdown, choose the highest level of detail you want to allow:
- Years
- Months
- Days
- Dates with times
- Use relative dates, like Day 1, Day 2
You can also work without calendar dates at all.
By using a relative calendar, your events can be dated Day 1, Day 2, or Week 1, Week 2, and so on. This is useful for tightly paced stories that unfold over a defined stretch of time.
Aeon Timeline supports two main approaches to tracking time:
- Calendar dates: Dates like 12 March 1942.
- Relative dates: Dates like Day 1, Day 2, etc.
Relative dates can be:
- Day count
Day 1, Day 2, etc.
Times can also be included, such as 5pm Day 1. - Week count
Week 1, Week 2, etc.
You can also use weekdays and times, such as Monday, Week 1, 5:00 pm. - Timestamps
Clock-style times like 00:10:15.
Switch Between Date Styles
You can switch between the different calendar styles any time. Aeon Timeline will automatically convert all existing dates in your file.
To change the date style:
- Open [] Settings.
- Select the Dates tab.
- Choose an option under Calendar Style.
If you switch from calendar dates to relative dates, you’ll be asked to choose which calendar date should be treated as Day 0, Week 0, or Hour 0.
If you switch from relative dates to calendar dates, you’ll be asked which calendar date the starting point (Day/Week/Hour 0) should map to.
This lets you easily change calendar style without needing to re-enter or adjust your dates.
- Use start or end date ranges
Instead of specifying an exact start or end date, you can assign a range.
This allows you to indicate that something starts or ends sometime within a window — useful when the timing is flexible or still being worked out.
Sometimes you don’t know the exact start or end date for an event or item. If you only know the earliest and latest possible dates, you can record the start or end as uncertain and enter a range instead of a single date.
To record an uncertain start or end date:
- Select the event or item.
- In the inspector, find the Dates field.
If it isn’t shown, scroll to the bottom of the inspector and click Add and Edit Fields to add it. - Click More.
- Choose Show uncertain start date or Show uncertain end date.
When enabled:
- An uncertain start date is shown as Earliest start and Latest start fields.
- An uncertain end date is shown as Earliest end and Latest end fields.
This lets you record partial information — such as a likely window of time — without having to put in a specific date.
Use a Custom Calendar
If your story is set in another world or in another age, you can create a custom calendar to match it.
This lets you define your own months, week lengths, year lengths, or eras, so your timeline reflects the way time works in your story.
If your project doesn’t follow the standard Gregorian calendar, you can define your own.
Custom calendars can be useful for fictional worlds, academic timelines, or any project that uses its own system for tracking dates.
- Open [] Settings.
- Select the Dates tab.
- Choose Edit Calendar to open the calendar panel.
From here, you define how dates are measured and displayed throughout the timeline.
Define the Calendar Structure
When creating a custom calendar, you can:
- Set how many months are in a year, and how many days are in each month.
- Rename the months and weekdays (and choose how many of each your calendar has).
- Choose which day the week starts on.
- Set up eras (for example, labels like BC/AD or your own custom ones).
- Choose whether or not to use leap years.
Once saved, the custom calendar is used everywhere dates appear, including date fields, date pickers, and timeline views.
Important Note for Existing Timelines
Custom calendars can only be edited when your timeline does not yet contain dated events or items. This helps prevent existing dates from being reinterpreted unexpectedly.
If you already have dated items, you can:
- Use custom templates to create a new file with your existing settings.
Learn how to do this in the Exporting, Printing, and Sharing guide. - Update your calendar in that new file.
- Import your existing data into the file with the updated calendar.
Learn how to do this in the Importing Data guide.
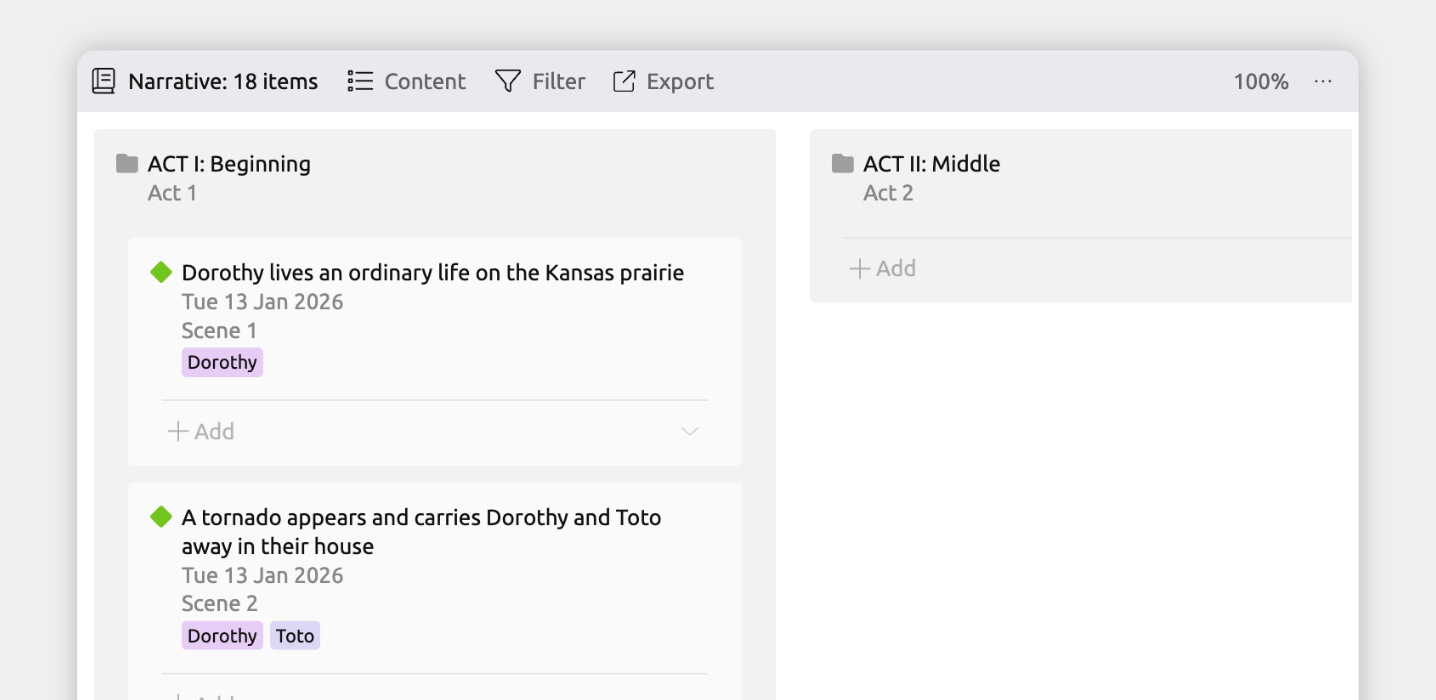
Organize Acts, Chapters, and Story Structure
In Aeon Timeline, you can organize events not just by when they occur, but by how you want readers to experience them.
You can create a separate story order alongside your timeline, placing selected events into folders for acts, chapters, scenes, or other sections. You can then manually arrange those events in any order, even if it doesn’t match the chronological timeline.
This separate story-focused order is called the narrative order.
The narrative is especially useful when:
- Your story includes flashbacks or jumps around in time.
- You’re planning by chapter, act, or book numbers.
- You want to experiment with the order scenes and story details are presented in without affecting your timeline.
- Your full timeline includes backstory or world events, and you want a space to organize just the events that are shown to your audience. (Note: The narrative is just one option for organizing your backstory. See Organize, Categorize, and Add Detail to Events for more options.)
To create a narrative:
Before you can use narrative views, you’ll need to enable the narrative.

- Open [] Settings.
- Select the Narrative tab.
- Enable Track independent narrative.
- Optionally customize the item types that are allowed in the narrative.
You might include other item types that you are using to represent events or story scenes.
Once enabled:
- A Narrative tab appears in the toolbar.
- You can create additional narrative views, all ordered by narrative order.
- A new Narrative Folder item type becomes available.
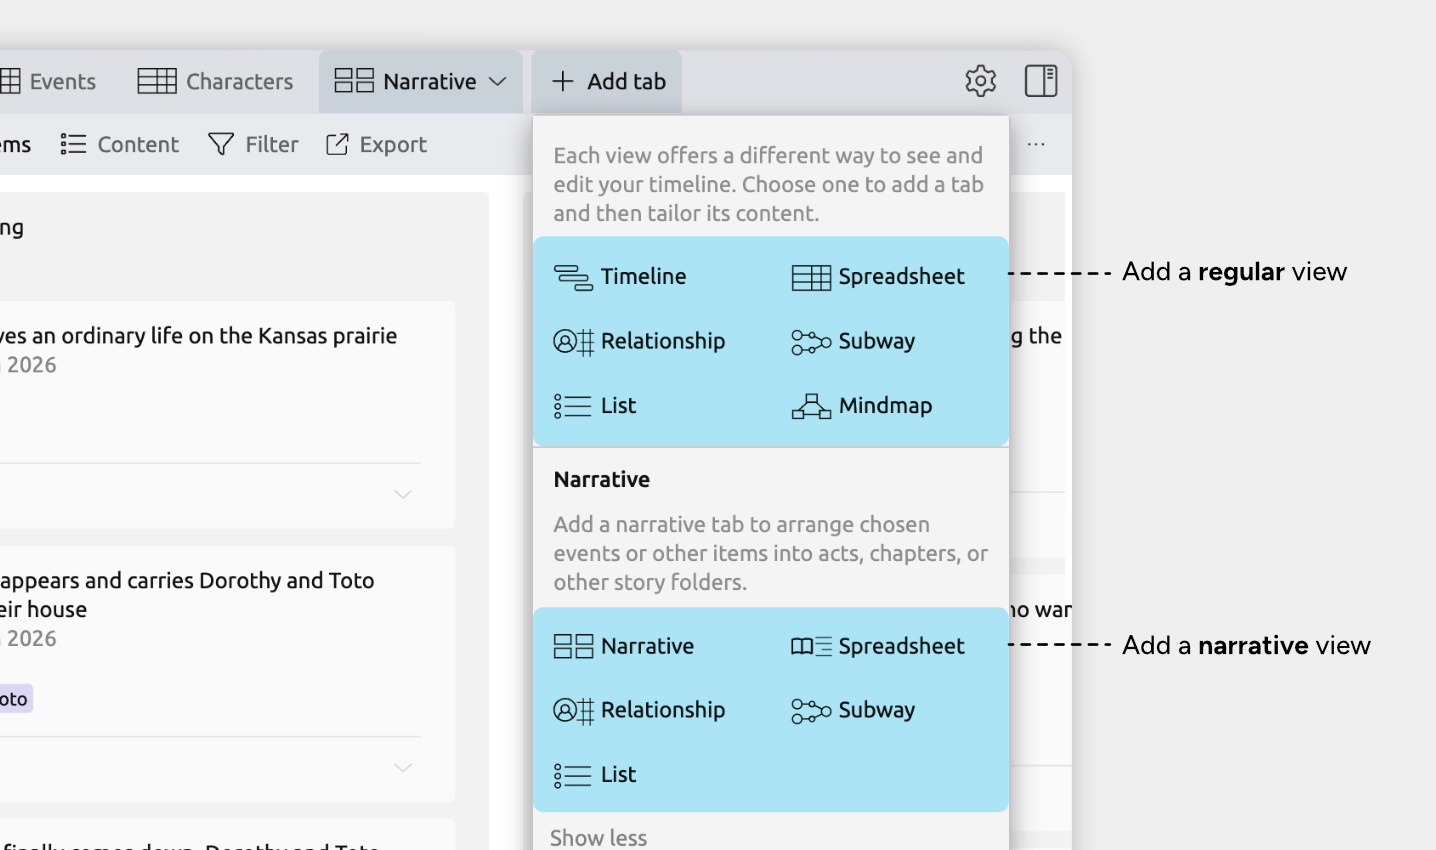
Narrative-Ordered Views vs Regular Views
- Regular views focus on your timeline data. You choose what to show by item type (such as events, characters, or locations) and can sort and organize items by many fields, like date, color, label, or other details.
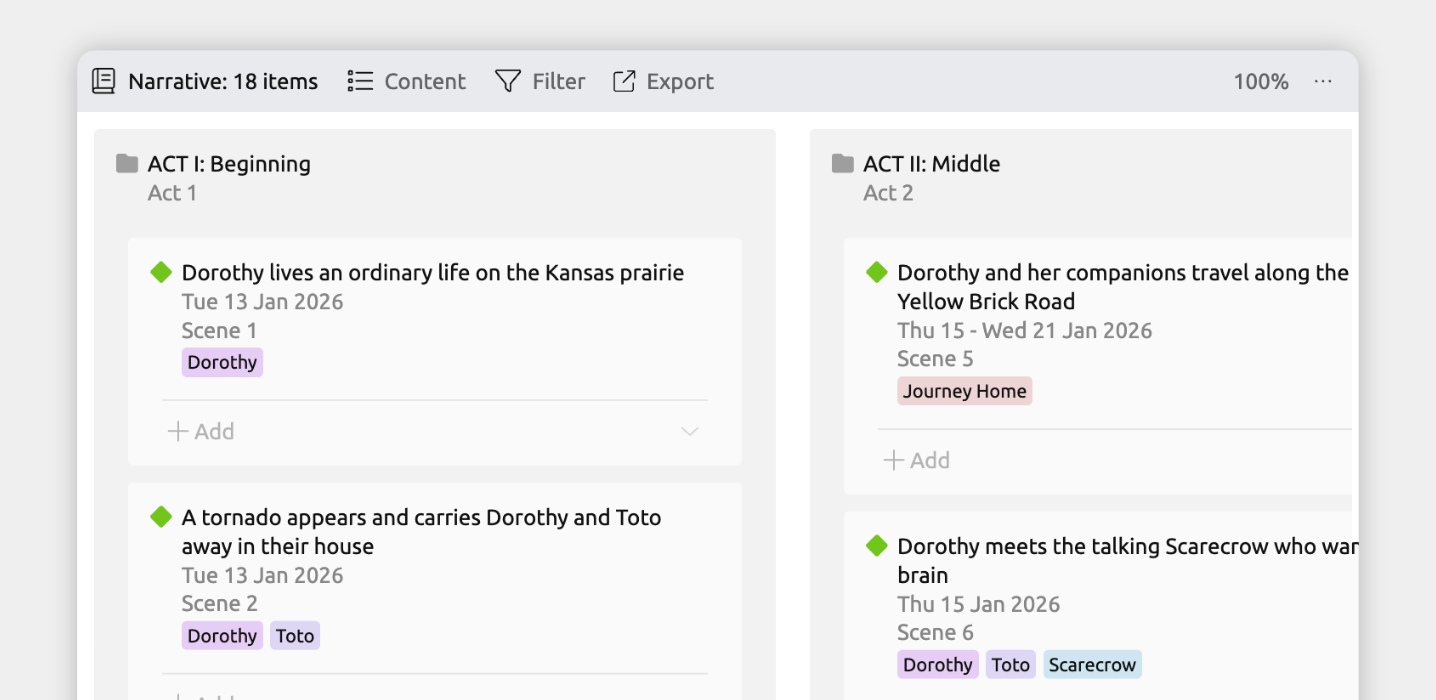
- Narrative-ordered views focus on story structure. They show only the events and folders you’ve chosen for your story, always arranged in narrative order rather than by date.
Together, these views let you manage both timeline planning and story structure, using the same shared events and items.
Switch To or Create a Narrative View
If you already have a tab with a Narrative view, select it.
Otherwise:
- Click the + Add Tab button at the end of the tab bar.
If you have more tabs that can fit on the screen, this may be within a More dropdown menu at the end of the tab bar. - In the Narrative section, select the Narrative view.
To build out your narrative:
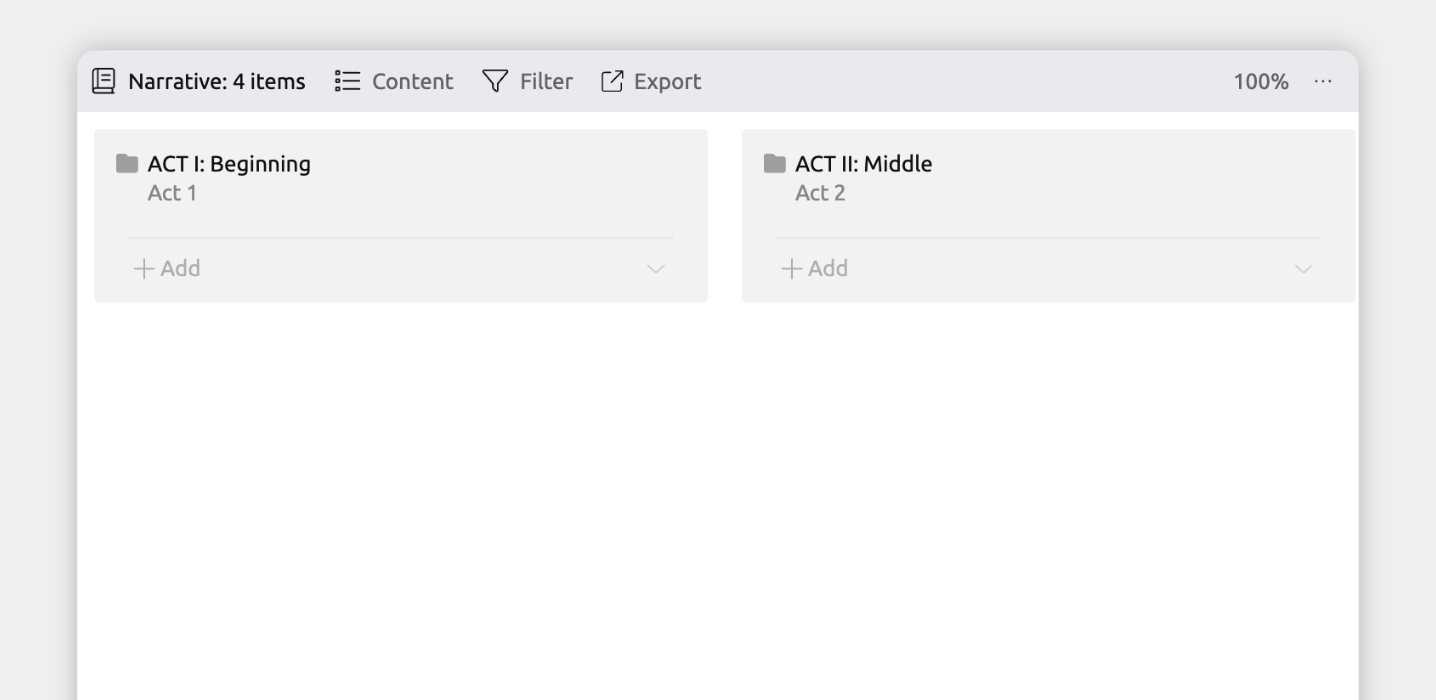
- Build Structure with Narrative Folders
Start by adding narrative folders to define the main structure of your story. Folders can represent acts, chapters, scenes, or any other sections that make sense for your project.
- Place Events into Story Order
Add events (and other allowed item types) to the narrative and arrange them in the order you want readers to experience them.
You can either create new events, or share them from your timeline.
- Rearrange Without Affecting the Timeline
Reordering events in the narrative changes only their story order. Dates, durations, and timeline positions remain unchanged.
- Edit Details Anywhere
The narrative doesn’t create copies of events. It uses the same events and items as the rest of your file.
If you edit an event’s label, notes, relationships, or assigned characters in any view, those changes appear everywhere, including in the narrative.
Events and folders in the narrative use labels and numbering, such as Act 1 or Chapter 2. These are assigned automatically based on your settings. Together, the section and label are referred to as the narrative position.
Show an Event or Item's Narrative Position
To show narrative position in the inspector:
- Open [] Settings.
- Select the Item Types tab.
- Select the item type you want to show narrative positions for.
- Under the Fields section, add the Narrative field.
To show an item's narrative position in a view:
- Select the tab where you want to show the narrative position.
- Open the [] Content panel in the view header.
- Enable the Narrative Position field or column.
This may appear under See More, depending on your settings.
Note for the Spreadsheet view: If you are using a narrative order spreadsheet view, the narrative position is always shown in the leftmost column.
Change an Event or Folder's Section Label
You can choose between different section labels — such as Act, Chapter, or Scene — or create your own custom labels.
To change an event or folder's section label:
- Select an event or folder to open the inspector.
- Find the Narrative field.
- Use the Section dropdown to choose a label.
By default, items use Automatic section labels. These are based on hierarchy depth and your label settings — for example, top-level folders might be labeled Acts, with Chapters nested inside them. You can choose to use a specific label instead.
To customize what section labels are available or used when set to Automatic, go to Settings → Narrative.
Change How Sections are Numbered
Sections can be numbered either like:
- Act 1, Scene 2; or
- Scene 1.2
To change this:
- Open [] Settings
- Select the Narrative tab
- Under Numbering System, choose Book or Continuous
Tip: To see an example of how the narrative can help organize your story structure, explore the Novel template in the app.
Try Aeon Timeline free for 14 days
Get Aeon Timeline and easily visualize and organize your project.